Sections of the site
Editor's Choice:
- How to close an individual entrepreneur with debts to the Pension Fund, tax and other debts - step-by-step instructions for self-liquidation
- How to check your taxes online
- Planning is an activity aimed at mentally building a bridge between the places where your team is at a given time and where you want to see it at a certain moment in the future.
- How to check the taxes of an individual by last name: step-by-step instructions and recommendations
- Help in creating a business plan
- Banking services for individuals
- Analysis of enterprise activities
- Hegumen Evstafiy (Zhakov): “Body B
- Why Europe doesn't like Russia (1 photo) Europeans don't like Russians
- Medvedev Dmitry Anatolyevich
Advertising
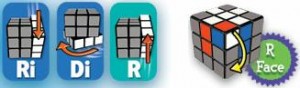
| Formulas 3x3. PLL - permutation of the last layer. What is speedcubing |
|
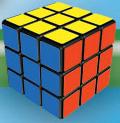
A most exciting activity- solving a Rubik's cube. This entertaining puzzle for adults and children allows you to train logical thinking and also develop your mathematical abilities. Our article will tell you how to solve a 3x3 Rubik's cube for beginners, plus a diagram with pictures and educational video will help you understand this issue. Solve a Rubik's cube 3×3 diagram with picturesThe standard design is a cube with six sides of different colors. The cube size is 3x3 separate sectors that can rotate in different directions. Such actions are achieved through a special crosspiece inside the puzzle, which cannot be seen from the outside. Based on the “classic” Rubik’s cube, many variations of this puzzle have been invented. There are cubes with two, four and even five sectors, as well as triangular and pentagonal designs. The so-called mirror cubes, in which the parts are of the same color but of different sizes, deserve special attention. It is assembled according to the same rules and patterns as the classic cube model. The task in this case requires more attention and concentration, because you need to switch your brain from colors to sizes. To assemble a cube, there is a special algorithm compiled by its developer. Subsequently, many more algorithms of varying complexity appeared, allowing one to assemble the puzzle from various positions and even set speed records. It is better to look at the instructions clearly in pictures so that you can apply the described algorithms.
How to solve a 3x3 Rubik's Cube quickly and easily for beginnersTo use such instructions, it is imperative to master the theoretical basis. In the process, do not forget that this is a mathematical puzzle, to solve which it is necessary to understand and remember a certain sequence of actions. Basic facts, terms and concepts:
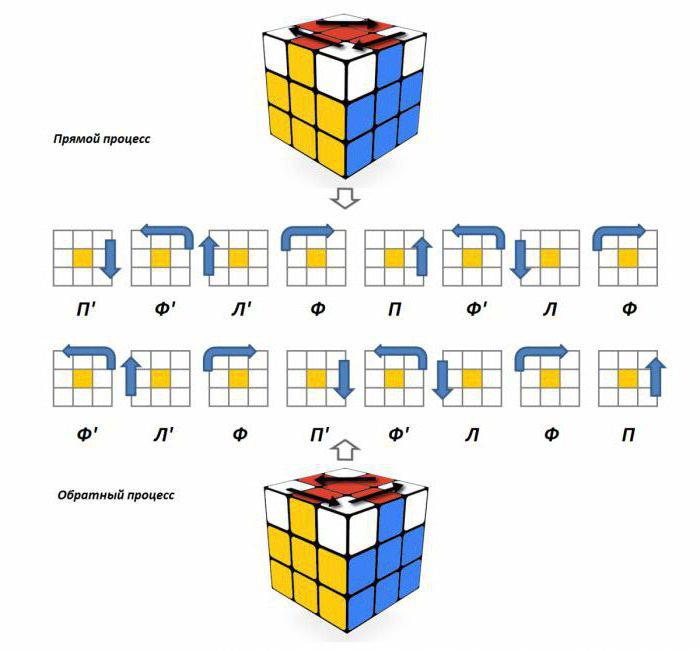
The designation of edges and direction of movement is also important. It is this information that will help you solve the cube according to the proposed formula. The following values are officially accepted:
The central cubes have a letter designation similar to the names of the middle part. For ease of identification, they are written with a small letter. The rib parts are designated by two letters, and the corner parts by three. If in the diagram there are simply letter designations, the rotation of the faces is carried out clockwise. In formulas, you can find the designation of the apostrophe sign (`) next to the letter. This means that the specified face should be turned counterclockwise. If there is a number 2 next to the designation, this means that you will have to scroll in the indicated direction the specified number of times. Usually with such notation the apostrophe sign is not indicated. Essentially, the result will be the same when rotating in one direction or the other. It is also worth studying the notation of interceptions. This is the name for moving (changing the position) of a cube in space. Intercept designations:
Interesting fact: the creator of the fascinating puzzle Erno Kubik derived the ideal mathematical dimensions of the cube as 57 mm. Many puzzle manufacturers still adhere to this standard. How to solve a mirror Rubik's cubeHaving mastered the basic techniques of assembling a cube, you can begin to develop more complex variations. Before solving a mirror Rubik's cube, you need to perfectly master the techniques of assembling a regular puzzle. After this, the task will not be so difficult, because the assembly algorithm will not differ significantly. Video of assembling a Rubik's cubeYou can clearly see the assembly of the mirror cube in the proposed video clip. It should be noted that now you can purchase not only a model with “classic” silver edges, but also colored cubes with different edge sizes. It will be even easier to assemble such designs, because not only the shape, but also the color will serve as a clue.
How to solve a Rubik's cube: diagram from the magazine "Science and Life" 1982When did the puzzle first appear? former USSR, many people puzzled over the solution to this problem. At the same time, the solution published almost immediately helped to assemble the puzzle in the simplest way, and in a way that is still used today. How to solve a 3x3 Rubik's cube:
Thanks to the given diagrams in color, it was also possible to perform several atypical assemblies, so-called solitaire games. This will ensure a fun time with the puzzle even after the solution has been mastered until it becomes automatic.
Algorithm, scheme and formula of GodMost easy way How to solve a 3x3 Rubik's cube is modestly called “God’s algorithm.” On the task of developing the simplest and fast way Many people have been thinking about solving the cube for more than one year. At first, the most “advanced” algorithm included a minimum of 38 moves and required more than 119 variants of events to study. Of course, there are still fans of such a system, but this will not be enough for record-breaking assembly. The “algorithm of God” or the Lord includes a sequence of several moves:On the first pass, you may not be able to solve the Rubik's Cube. You should repeat the above sequence of actions one or more times until the desired result is achieved. You can clearly see how to solve a 3 by 3 Rubik's cube as quickly as possible in the video.
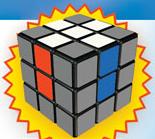
At the stage of its discovery, this entertaining puzzle drove many people crazy, because out of many options, only one algorithm made it possible to collect all the edges by color. Our article provides step-by-step instruction in pictures, and also describes a detailed algorithm for assembling a Rubik's cube. In 1975, sculptor Erne Rubik patented his invention called the Magic Cube. For more than 40 years, all rights to the puzzle belong to the company close friend inventor - Tom Craner - under the name Seven Towns Ltd. The English company controls the production and sale of the cube throughout the world. In Hungary, Germany, Portugal and retained its original name, in other countries the toy is called a Rubik's cube. Types of puzzlesThe classic Rubik's cube measures 3 by 3 squares. Over time, they came up with a huge number of shapes and sizes for toys. No one can be surprised by a puzzle in the form of a pyramid or a cube size of 17x17. However, humanity never stops there. Obviously there is no beginner's guide to building this cube. The process of assembling and solving the puzzle can take years. IN Lately Interest in the cube is growing not only in Asia and Europe, but also in places where the toy was not very popular, for example, in the USA. One of the fans of the Rubik's cube filmed the assembly of a 17 by 17 puzzle. The total length of the video was 7.5 hours, filming took place over the course of a week. Growing demand creates supply. Sometimes the models sold are incredible and it is not always clear what they will look like when assembled. Each country has its own favorite types of toys. What is speedcubing?Fans of the game organize real competitions in how quickly they solve the cube. There are special “speed” puzzles on sale. The rotation mechanism of such Rubik's cubes is very high quality, and rotations of faces and rows can be done with the movement of one finger. World Cube Association (WCA) is non-profit organization, supporting the speedcubing movement. The WCA regularly organizes competitions around the world. There are representatives of the organization in almost all countries. Anyone can become a participant in a speedcubing event; you just need to register on the website and meet the assembly standards. The most popular discipline at such competitions is speed solving a 3x3 Rubik's cube. The standard for participation is 3 minutes, but even if a person cannot solve the problem in the allotted time, he will still be allowed to participate in the event. You can sign up for any discipline, but you need to come with your own puzzle.
The record for solving a 3x3 Rubik's cube belongs to the robot Sub1, created by engineer Albert Beer. A machine can solve a puzzle in a fraction of a second, while a human will need 4.7 seconds (Mats Valk's achievement in 2016). As you can see, participants in the speedcubing movement have someone to look up to. What algorithms exist for solving a 3x3 Rubik's cube?There are many ways to solve a famous puzzle. Variants of 3x3 Rubik's Cube assembly schemes have been developed for both beginners and advanced people with complicated schemes: 4x4, 6x6 and even 17x17.
The 3x3 version of the puzzle is considered a favorite classic among most fans. Therefore, there are much more instructions on how to solve a 3x3 Rubik's cube than any other. What should the puzzle look like?You can assemble the toy according to the diagram only from a pre-prepared position. If the patterns on the faces of the cube are located incorrectly, then it will not be possible to solve it using the algorithm for solving a 3x3 Rubik's cube for beginners. There is a set of such positions for different options solutions.
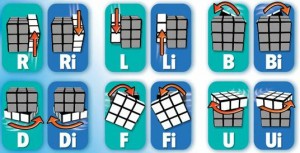
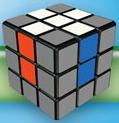
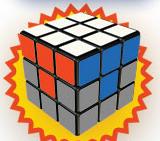
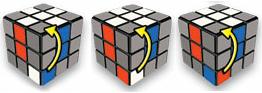
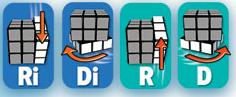
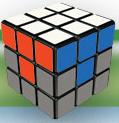
The figure shows or simply a “cross” - the starting point of the simple way solve a 3x3 Rubik's cube. It is recommended to disassemble and fold the toy correctly. Designations of circuits and methods of rotating the cubeBefore you start disassembling the 3x3 Rubik's cube formulas, it is worth learning the notations used in speedcubing. All movements of the puzzle are indicated in capital letters. The absence of an apostrophe above the symbol means that the rotation is clockwise; if there is a sign, then the rotation should be in the opposite direction. The first letters of English (or Russian) words denoting movements are considered generally accepted:
Pointers can also be used to change the position of the cube in space - interception movements. Here, too, everything is simple, everyone knows the coordinate axes X, Y and Z from a school geometry course. Movement X means that the cube must be rotated with face F to the place of face U, when shifted Y - F becomes in place L, and when rotated Z - F moves to R. The following group of notations is rarely used; it is used when drawing up pattern diagrams:
Why do they collect patterns on the faces of the cube?At speedcubing meetings, people compete not only in solving a puzzle, but also in their ability to create various patterns on a 3x3 Rubik's cube. They do this in order to quickly and easily assemble the cube into the desired position. There are a huge number of schemes for assembling a wide variety of patterns: “dots”, “chess”, “dots with chess”, “zigzag”, “maison”, “cube in a cube in a cube” and many others. There are more than 46 of them for the classic puzzle alone. Speedcubing masters consider it shameful to disassemble a toy. Also, making patterns on a 3x3 Rubik's cube is a great way to practice and improve your skills.
The picture shows variations of different puzzle patterns. Below are a few more formulas for assembling the most interesting patterns from the cross position:
Algorithm for solving a 3x3 Rubik's cube for beginnersAlthough there are many ways to solve the puzzle, simple and clear diagrams Not so easy to find for beginners. With each passing stage of assembly, the formulas for the 3x3 Rubik's cube become more complex. It is necessary not only to correctly change the pattern, but also to preserve what was done before. Below is one of the options for how to easily solve a 3x3 Rubik's cube. Conventionally, the whole process can be divided into the following stages:
Solving the puzzle - preparatory workThe first stage is the easiest. Beginners can try their hand at making cube patterns using the instructions provided, but the process will take a long time.
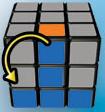
You need to select the top edge and the color that will be assembled first. The algorithm for solving a 3x3 Rubik's cube for beginners is developed from the "cross" position. It is not difficult to make, you need to select a central color, find 4 edge elements of the same shade and raise them to the selected edge. The colored arrow in the picture points to the part you are looking for. Options for the location of the desired element may be different, depending on this, 2 sequences of actions A and B are described. The difficulty lies in continuing the cross along the sides of the cube. You can take a closer look at the final view of the stage in the image above. Solving the puzzle - working on the middle row
At this stage of the 3x3 Rubik's cube assembly scheme for beginners, you need to find and assemble the corner elements of the top face. The end result should be to completely solve the cross face and the top row of the puzzle.
The image shows three possible edge patterns. When choosing one of methods A, B or C, you must collect all 4 corners of the cube. By memorizing rotation algorithms and practicing them, you acquire the skills and mastery of assembling a puzzle. It is pointless to consider formulas and imagine the process; it is much easier to take a cube and try all the methods in practice.
The third stage seems simple, but it is only apparent. To solve it, two situations of patterns are described and two rotation formulas are compiled accordingly. When using them, it is worth remembering to preserve previously achieved results. Masters constantly keep the last 3-4 rotations in memory so that in case of failure, they can return the cube to its original state.
To solve a puzzle, you need to rotate it along the coordinate axis in search of the necessary elements and work with them. Such movements are rarely shown in formulas, only in special cases. It is recommended to start assembling the edge faces from the elements of the bottom rows; after such rotations, all the necessary cubes will descend from the middle to the bottom row. Solving the puzzle - making the second cross
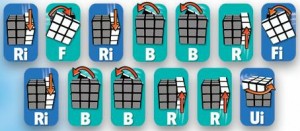
At the fourth stage, the toy is turned upside down. Solving the last face is the most difficult part of the 3x3 Rubik's Cube algorithm for beginners. The rotation formulas are long and complex, and their execution will require special care. The purpose of the action is to place the edge elements in their places for further composing the cross. The orientation of the rib parts may be incorrect. There is only one formula for cube movements and it should be applied until the goal of the stage is achieved.
The rotations of the fifth stage are aimed at turning the elements to the correct side. Its peculiarity is that the same rotation formula is used for all three patterns in the figure, the only difference is in the orientation of the cube itself. The formulas for stage 5 movements are as follows:
C H is the rotation of the middle row clockwise, and the exponent above the bracket is the number of repetitions of the actions in brackets. Puzzle solution - last spins
At the sixth stage, as at the fourth, the necessary cubes are placed in their places, regardless of their orientation. The puzzle should be rotated so that the element that is already in the right place is located in the far left corner at the top of the cube. The options proposed to solve the formula mirror each other. It is necessary to repeat the rotations until the desired result is achieved.
The seventh stage is the most solemn and the most difficult. When rotating the cube, violations in already completed rows are inevitable. You will need to fully concentrate on the movements, otherwise the result of the assembly may be irretrievably ruined. As in the fifth stage, there is only one sequence of movements, but it is repeated 4 times. First, rotations are performed to orient the element, then reverse rotations are performed to restore broken rows. We should not forget about recording movements using the English alphabet. Formulas for the movements of the faces and rows of the cube this stage look like this:
B - rotate the top face 90 degrees, B" - rotate the same face counterclockwise, and B 2 - double rotate. The difficulty of this stage is in correctly assessing the location of the elements and choosing the required rotation option. It can be difficult for beginners to immediately correctly identify the pattern and match it with the correct formula. Rubik's cube and childrenThis tricky puzzle is interesting not only for adults, but also for children. Teenagers have become world record holders for solving the Rubik's cube. In 2015, Colin Burns, who was only 15 years old at the time, assembled the toy in 5.2 seconds. A simple but fascinating toy continues to interest the younger generation for the 5th decade. A childhood hobby often develops into a profession. There are mathematical ways to evaluate solutions to Rubik's cube problems. This section Mathematicians use solutions for automated computers when composing and writing algorithms. Robots that actually look for ways to solve the cube, rather than following a pre-written algorithm of movements, solve the puzzle in 3 seconds, for example, CubeStormer 3. I continue to update puzzle solving schemes. This time I found quite decent, well-illustrated instructions for the classic Rubik's cube 3x3x3 on one of the foreign sites rubiks.com. The assembly method is somewhat different from the method from the Science and Life magazine, but just as simple. I translated it, added pictures from the original, and added a few words of my own here and there, I think it turned out well. Also here is a link to. You can buy a classic Rubik's cube 3x3x3 on ozon.ru Names of Rubik's cube parts: Rib parts or ribs– parts with two colors. The cube has a total of 12 rib parts, located in the middle of the ribs.
Corner parts or angles- These are parts with three colors. The cube has a total of 8 corner pieces located in the corners.
Central parts or simply centers– parts with one color. The cube has a total of 6 central parts, located in the center of each face. The central parts do not move and represent the colors of their edges. Centers, always opposite friend to a friend:
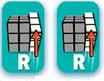
Each side of the cube is designated by a Latin letter R- right side - the right side of the cube L- left side - left side of the cube U- top face - the top side of the cube D- bottom face - the bottom side of the cube F- front face - the front side of the cube B- back face - the back side of the cube Comment: the letter "i" after the letter of the face means reverse movement or counterclockwise motion when looking directly at the edge. Very important When performing the movements presented below, keep the cube completely turned with one side facing you, as shown in the figure. Dark grey colour in the pictures means that the actual color of these parts does not matter. Every movement is one fourth of a full turn 360 degrees.
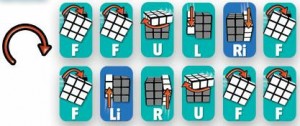
Stage 2. Assembling the white cross. Task: Holding your die with the white center on the top edge (U), you should form a white cross as shown in the picture below. Much of this stage is achieved through trial and error, but there are still a few tips.
Tips: Be sure to remember that you need to collect parts of the white cross in the following order - blue, orange, green, red. Notice that the ribs in the picture above are combined with a top white center and a side red or blue center. This way you can easily determine that the ribs are in the right places. Keeping the white center position on the top face, move the white and blue edge to the bottom face (D). Next, rotate the bottom edge until the white and blue edge is directly under the blue center. Now take the cube so that the blue center and the white-blue edge are on the right side (R). Rotate the right side (R), If your cube looks like the one below, then take the cube so that the orange center is on the right side and solve the side with the orange center in the same way. If your cube looks like the one below, then follow the sequence below, making sure the blue center is on the right (R) face. The remaining parts of the white cross are assembled in the same way. Congratulations! If your die has a white cross the same as in the picture, then you can move on to stage 3!
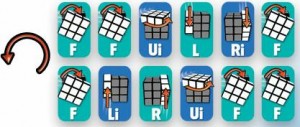
Stage 3. Collecting white corners. Task: take the cube so that the white cross is on the top face (U). Now you must collect the white corners and get a cube as in the picture below.
Tips: The corners will have one white edge and 2 edges of other colors. If the corner is already on the bottom edge, then rotate the bottom edge until the corner is directly below where it should be. After this, your cube may look like one of the 3 pictures below. Next, repeat the sequence below 1, 2, or 3 times or until the corner is in place and oriented correctly. Repeat the entire process for all four corners. If the corner is located on the top face, then move it to the bottom face by following the sequence: Now rotate the bottom edge until the corner is directly below where it belongs on the top edge. Congratulations! If your white layer looks like the image below, then you have collected one third of the cube and can move on to stage 4.
Stage 4. Assembling the middle layer. Task: Take the cube so that the completely assembled white layer is on the bottom edge. Now you need to assemble the middle layer, placing the side ribs in their places.
Tips: Pay attention to the vertical blue stripe (it can also be red, orange, green) - this is critically important. Assemble such a vertical strip by rotating the top edge until the color of the edge on the top edge without yellow matches the color of the center of the edge. The color of the upper part of the edge on the top face determines the direction of movement of the edge, that is, in which direction this part should move. 1) If you move the edge in the same direction as in the picture, then follow the sequence of pictures below.
2) If you move the edge in the same direction as in the picture, then follow the sequence of pictures below.
Repeat these steps until all the side ribs are in place. Comment: if one of the edges is already in place, but not correctly oriented, do one of the sequences presented above, and it will end up in the top layer. After this, follow the appropriate sequence to place the rib back into its place in the middle layer. Congratulations! If the bottom two layers on your cube look like the picture below, you can begin stage 5. You're two-thirds of the way through!
Stage 5. Assembling the top layer. We get a yellow cross. Task: Compare the state of the yellow side of your cube with the templates presented below. Next, follow the appropriate sequence. Clue: The yellow parts on the top edge should not yet match the color of the side edges. Step one: Let's assemble the yellow cross.
Switch to step two and start collecting the corners of the yellow edge. Follow these steps:
Option 3. Option 4.
Take a look at the top face and compare the state of the cube with the options presented below. If there are no yellow corners on the top yellow side, then you must take the cube so that the yellow side of one of the corners is on the left side of the cube. See picture.
If there is one corner on the yellow edge, follow the sequence below. Option 3. If there is not a single yellow corner on the top yellow face, and there is also not a single corner that could be used in option 1(that is, all corners have edges on the right). Then take the cube as shown in the figure below. The yellow part of the corner should be on the front edge of the cube.
Repeat the sequence below 1, 2 or 3 times to get a fully assembled yellow face. After each completion of the sequence, re-compare the state of your cube with the options described above.
Congratulations! If your cube looks like the picture, you can move on to stage 6!
Stage 6. Place the yellow corners in their places. Task: Holding the cube as shown in the figure, rotate the top edge until at least 2 corners are in place. These 2 corners should be located on places A, B or A, D or B, C as shown in the picture below. If all four corners are in place, then go to step 2. Step 1. Place the yellow corners in their places.
Holding your cube as described above, look at the top edge. Place two correct angle to the back edge at position A, B or diagonally A, D or B, C. If corners A and B are in place, then swap corners C and D by following the sequence below.
If you need to swap diagonal corners B and C or D and A, then repeat the sequence once. Then, rotate the entire cube so that the two correct corners are on the back face and repeat the sequence again. Congratulations! If your cube looks like the one in the picture, then you can move on to step 2.
Step 2. Place the yellow edges correctly.
If one edge is in its place and three are missing, then take the entire cube so that the correct edge is on the back face. Next, determine in which direction you need to move the remaining ribs: clockwise or counterclockwise. Depending on the direction of movement, perform one of the sequences presented below. If all four edges are out of place, perform any of the sequences once. After this, one of the edges will be in its place. Then go to the beginning of stage 2 and repeat the procedure. To move E F G or EFGH clockwise
To move EFG or EFGH counterclockwise.
Congratulations, you have solved the cube!
How wonderful is this moment when you manage to do something that is sometimes beyond the power of most, and in this case we're talking about that not everyone can quickly solve a Rubik's cube. Although anyone can do this. To do this, the main thing is to know a few secrets and have patience. How to learn to solve a Rubik's cube - secrets of success5.66 seconds. This is exactly how much time Felix Zemdegs needs, the first person in the world who can quickly assemble this creation of the 1980s. After weeks of training, a beginner will be able to create an assembly record for himself within 2-3 minutes. When considering the question of how to solve a Rubik's cube, it should be noted that before starting the lesson it is necessary to “strip” the cube into parts. After all, it is possible that the manufacturer made an erroneous assembly, and this is fraught with a waste of time assembling the toy. Then comes the process of carefully memorizing the colors (which is located next to which). How to completely solve a Rubik's cube - detailed instructionsWell, now let's move on to the main stages of putting together all the colors of the Rubik's cube. We divide the cube into separate components:
It should be remembered that in the future, counterclockwise turns will be indicated by an asterisk (*). If you come across a designation like a3, b3, it means that so many times (in this case three times) the face should be rotated 180 degrees. The main goal for stage No. 1: collect the red color in one line. Next, we install 4 elements, thereby forming a cross. So, the first layer is put together. Next, it is recommended to find a rib that can be easily deployed by turning the top. So, when collecting a new layer, the red one should not be touched. It should be kept face down. It is necessary to scroll the top layer (the one that is collected in this moment) until the central sections of the cube coincide. In order to put the white and blue part in place, as indicated in the photo, we use the following: b e b* e* b* d* b d. To fill in the left side: b* c b c* b d b* d*. 
A cross is formed from a certain color. Now let's work on the edges of the remaining layer. If it turns out that those cubes that coincide in , are on different faces, you need to rotate the cube according to the formula: e b e* b e a2 e*. If the matching elements are on adjacent faces, then: the unassembled part is in front, and the second one is on the left. e b e* b e b2 e*. Now we will talk about arranging the corners of the remaining layer. If the desired color is on the right (blue-white-orange in the photo), then: a e a* e* a e a* e*. The corner that needs to be assembled should be brought to the bottom. So, the assembly itself consists of 7 stages, which will be described in detail below. But first you need to prepare a little. Don't be afraid, it won't take long :) I understand that learning the basics is often boring and discourages any desire, but they are needed! Basic elements of a Rubik's cubeCenterThis is the only component that cannot move, that is, it is around the centers that we collect the remaining elements. Ribs
AnglesCombines 3 colors at the same time. Surely you have already spun your cube and discovered that it does not rotate chaotically, but according to well-defined rules. Have you given it a spin yet? Well, let's quickly explore all the possible turns!
Russian-language designations for a cubeSince our people are Russian, we will also give Russian-language designations for the components of a Rubik's cube:
It may not be so elegant, but it is extremely clear and understandable. In what follows, the formulas will also be presented in two versions. Also during the assembly process you will encounter such miracles as P2 (R2) or F2 (F2) Don't be alarmed, in this case you just need to rotate the edge twice, that is, make 180 degrees. Spin languageTo solve the cube correctly and quickly you need to know the language of rotations. Let's consolidate our knowledge and scroll through one of the formulas. It's long, so be careful: R2 F R’ F’ D2 R2 U F U’ B L2 F2 R F2 U’ L F2 L B R’ D’ L’ D’ R F (P2 F P’ F’ N2 P2 V F V’ B L2 F2 P F2 V’ L F2 L B P’ N’ L’ N’ P F) Phew, you did it!! Right or wrong? Well, this is not so important here, because the cube will break in any case. This formula is called. Great, the cube is broken, as you can see, no violence was required. Now let's get started with the assembly! Stage 1 - CrossActually, as my assembly teacher said, anyone can assemble the first layer using only logic, and it’s really simple. Therefore, if you are not devoid of excitement, then try to handle it yourself, it will be even more useful And for those who did not risk losing their self-esteem, we will continue So our target at the first stage - collect correct cross which looks like this In general, there is nothing to explain here, it is important that you get exactly the right cross, that is, the colors on the edges correspond to the centers of the cube. Before proceeding to the next step, check that everything is correct. Let's call this point EXAMINATION. A check should be performed after each step to make sure that you are doing everything correctly. Video: how to assemble a 3x3 cross
|


 until the white-blue edge is on the top (U) face above the blue center.


 Step two: Make all the corners of the top edge yellow.
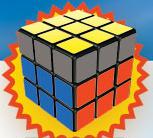


Popular:

New
- How to check your taxes online
- Planning is an activity aimed at mentally building a bridge between the places where your team is at a given time and where you want to see it at a certain moment in the future.
- How to check the taxes of an individual by last name: step-by-step instructions and recommendations
- Help in creating a business plan
- Banking services for individuals
- Analysis of enterprise activities
- Hegumen Evstafiy (Zhakov): “Body B
- Why Europe doesn't like Russia (1 photo) Europeans don't like Russians
- Medvedev Dmitry Anatolyevich
- "Tolik declared war on me"


