Sections of the site
Editor's Choice:
- Arkady Moreinis, Glavstart: “I work with startups, not sell boxes of coffee General Director of the Glavstart company”
- A box of quality problems in physics and electricity How does a naval galvanic impact mine work?
- Sergey Cheremin: “A compatriot is someone who shares the cultural values of the Russian world”
- “A pilot lives only in flight”
- Spring is the time to bloom quotes
- How to get rid of uterine polyps?
- Riddles, proverbs, sayings, stories and poems about linden Properties of linden tree
- Hour of "massacre" Capture of the Winter Palace
- Ulrich Chairman of the Military Collegium of the Supreme Court of the USSR
- John Cabot - discovery of North America 1497 John Cabot discovery
Advertising
| How to draw dogs with a simple pencil? Learn to draw a puppy step by step - pencil drawing lesson for beginners and schoolchildren Pencil sketches of dogs |
Before how to draw a puppy with a pencil I started searching for interesting things on the Internet. I came across a forum for dog breeders, where the owner provides interesting statistics, the result, so to speak, of acquiring a tailed friend:
Fun, in short! In order for a small fluffy ball to grow into a full-fledged dog, you need to seriously engage in its upbringing literally from the cradle! So, tips for raising a puppy:
Be patient and good luck. We know how to raise a puppy, let's start drawing! How to draw a puppy with a pencil step by stepStep one: Draw a circle in the very center of the sheet. This is the future head of our dog. From it we draw the body contour lines down. And on the left we will draw a small oval - this is the thigh. Hello again everyone! I'll start drawing from the eyes. First, we draw two identical circles, around which we make an edging. The edging will serve as glasses in the future. The result is an eight. To make the eyes real, add pupils to them. I draw two pieces, whoever decides to draw a one-eyed Cyclops can do it twice as fast! At the next stage, we will draw a body for our minion. Here you can dream up. Depending on the size of the body, it will be tall, short or normal, like mine. Are there bald minions? Certainly! But I decided to make mine handsome and gave him these rare curls. You can depict the hair on your head in a different way, for example, draw a thick bunch from one point, similar to how a palm tree grows. And at this stage, don’t forget to draw the glasses strap. It turned out like this. The yellow men are mostly dressed in the same denim overalls, in other words just pants with straps. My friend is no exception. Now I’ll draw the very straps that hold the pants on. The dots on the straps are buttons or buttons. Almost left our yellow hero without the opportunity to discuss last news with brothers. Let's go back and draw his mouth. I love to smile, so of course I decorated my face with a smiling grin. What's next, you ask? Next we will draw the hands, one raised up, the other down. Yours may be different, both up, both down, you can even portray a one-armed bandit. In fact, these are just blanks; a little later we will turn them into real hands. Let's return to the torso and clothes, let's complete the overalls with the obligatory pocket in the middle. In the next step, let's finish the arms and draw the hands, in my drawing it turned out like this. There is a head, there are hands. What's missing? Correctly draw the minion's legs. This is also easy and simple to do. That's it, the drawing is ready! Of course, children love colorful and bright drawings more. Therefore, to ensure that the impressions from today’s lesson remain in your memory for a long time, take pencils or markers and color the picture, as I did. Our minion itself is yellow, the clothes are blue, the eyes are brown, and the glasses can be shaded with a silver felt-tip pen or a simple pencil. I think it turned out great, write your opinion in the comments. We have already learned how to draw a cat, now we will figure out how to draw a dog step by step. The animal can be depicted in several versions: a simple “cartoon” sketch for those who skipped art classes at school, or a more complex and detailed pencil drawing of a dog. Thanks to the detailed step-by-step description Anyone can easily cope with this task. The main thing is a little patience, perseverance and a good mood. For drawings you will need: a set of pencils (2M, M, TM, T, 2T), an eraser, a sharpener, sheets of paper. Young children struggle with complex lines, so we found some easy and fun dog pictures. Such drawings are the simplest and any child can repeat them. cartoon characterMany children have favorite cartoon dog characters. Balto, Dalmatians, Walt Disney's Goofy, characters from Lady and the Tramp or Bolt - that's far from full list cute and funny dogs that children and adults love so much. We offer to draw Baby from the animated series "Barboskiny" - the youngest in the "dog family", a reasonable, obedient, but playful dreamer puppy and a funny bulldog from the animated series "Tom and Jerry" Baby BarboskinUsing a hard pencil, draw two circles. The first, large one, is the head, and in the place of the second, smaller one, there will be a puppy’s tummy. Mark where the ears will be. We mark the body and paws with straight lines.
We mark the muzzle with thin shading. Pay attention to the symmetry of the features. We mark the eyes, nose, mouth and eyebrows. Draw pointed ears. Then, based on the markings made at the previous stage, we draw the paws and torso with soft lines. Use an eraser to erase the markings and extra lines.
Let's detail the Baby's face. We draw a jumpsuit and an applique on it. We mark the collar, toes on the front paws and sneakers on the back paws.
At the final stage soft pencil We add shading to the fur and give clarity to the features of the muzzle. We draw the pupils, teeth, detail the clothes (add buttons on the straps, a pocket in front and shoes). We finish drawing the tail. Baby Barboskin is ready.
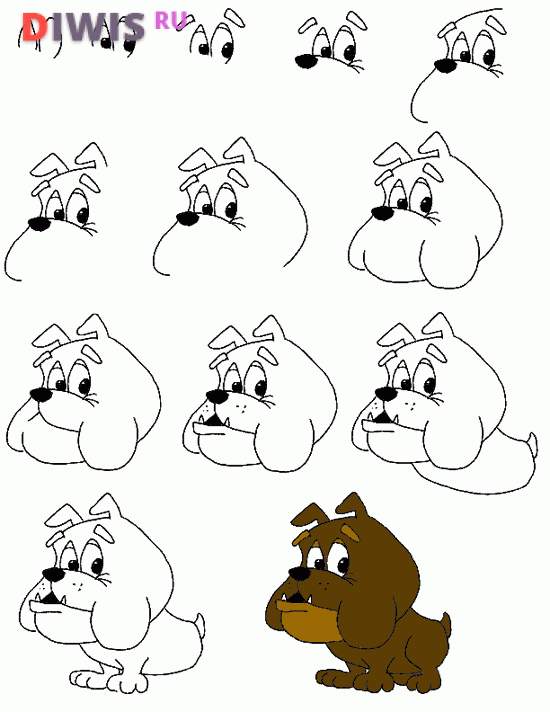
Toothy bulldog from Tom and JerryIn real life, a bulldog may not be the friendliest breed. And in the cartoon he is a very funny and amusing dog. Thanks to the step-by-step MK, you can easily draw such a curious pet. The main thing is to maintain proportions and adhere to the algorithm.
Funny dog coloring bookIf a child asks to draw a dog, then don’t get lost. Try this simple and cute coloring page. Afterwards, you and your baby can color the dog with bright markers, colored pencils or paints. The drawing of a dog begins with its muzzle. To do this, draw an oval above the middle of the sheet (Figure 1). Then we add the head and ears (Figure 2). Now you need to draw the dog's paws. Please note that the paws widen and become thicker towards the bottom. We draw paws. Ask the child to take part in the process and draw three short lines - the fingers of the animal (Figure 3). Then add two semicircles. These will be the hind legs (Figure 4).
Connecting short line the front legs, thereby completing the drawing of the body. Add a short ponytail. The silhouette of the animal is completed (Figure 5). Let's move on to the muzzle. We mark oval eyes, a nose, a sweet smile. Add two curved lines – the puppy’s eyebrows (Figure 6).
Attention! Don't cover your eyes completely. Leave two white, unshaded circles. The pupils will be here. We depict the nose in more detail. Here, too, you need to leave an unpainted spot-highlight. This will add liveliness to the dog. The dog coloring book is ready.
How to draw a playful dogThis image can be made very quickly. The sketch is simple, so part of the “work” can be entrusted to the young artist.
Step 1: Place the sheet diagonally and draw 6 identical circles at the bottom.
Step 2: Mark circles No. 1, 4, 5 and 6 to your child and ask him to draw two short parallel lines in each. The lines should be centered. These will be the dog's paws.
Stage 3: Above circle No. 2 and 3, draw the head of the animal in the form of a semi-oval.
Step 4: Use an arcuate line to connect the head to the last paw. This will be the torso.
Stage 5: Draw the tail. It can be long and shaggy, or short and perky, as in our picture.
On last stage draw a face. Round nose, eyes with pupils, eyebrows and ears. The curious puppy is ready. All that remains is to color the drawing.
Realistic imagesThanks to the next master class, we will figure out how to draw a dog step by step with a pencil. Be patient, it may not work right away. Stage 1. Using thin, light lines, without pressing the pencil lead into the sheet, draw two ovals. This will be the head and torso. Where the ovals touch each other we draw a small circle, marking the future muzzle. We draw blank lines for the paws.
Stage 2. The most difficult in the whole drawing, since here the head and muzzle of the animal are drawn. And here there are several very important rules, on which the success of the “masterpiece” depends:
When drawing eyes, note that they are usually round. The shape of the pupils (dilated, constricted) and their location will determine the mood of the dog as a whole. A dog can carry any emotion: be angry, cunning, aggressive, sad, curious, and so on.
Stage 3. Using a soft pencil (2M) and a thick line, draw the outline of the body. We draw pads and claws on the paws. Don't forget to add a tail.
Stage 4. Erase the excess.
Stage 5. Finally, you can draw the fur, add shadows and shade. This will make the dog more realistic and lively.
Sketch by cellsBox drawings can be turned into exciting activity for the whole family. Dogs can be just pictures that need to be reproduced exactly, or in the form of graphic dictations. Such entertaining activities will help you pass the time in line, during a long trip on public transport, or anywhere else. We offer master classes of varying complexity on how to draw a dog by square. Some of them are suitable for preschoolers 4-6 years old, and more complex ones are for older children and their parents. You can use either a squared notebook or graph paper. Graphic dictation “Dog”For such a dictation, you need to take a notebook sheet in a square, step back 6 squares from the top and left and start drawing.
Exercise: Drawings of a dog by cells
Serious dog:
Naughty hero
The favorite of many is the dog Scooby-Doo.
For experienced artistsNext step-by-step master class will teach your child how to draw a dog with a pencil in just 5 steps. To make a portrait of a Spitz you will need:
Stage 1: draw the head. Using a hard pencil H, draw the ears and fur along the outline of the pet. Focusing on the proportions indicated in the figure, we mark the muzzle. We mark where the Spitz's eyes, nose and mouth will be.
Stage 2: darken the face. Using a black pen, shade the areas that will be the darkest. These are the nose, mouth, eye areas.
Stage 3: detailing the muzzle. Using the softest pencil (B4 is best for these purposes) we draw the eyes, nose and protruding tongue.
Stage 4: designate the shadow. We determine which side the “light source” will be on and, using a B2 pencil, draw the part of the fur on which the shadow will fall.
Stage 5: final Use Soft B to finish drawing the rest of the fur. Pay attention to the direction of the fibers and the pressure with which the shading was performed. Spitz is ready.
You can easily, quickly and beautifully draw a dog even with a simple pencil. In the article we just cited several step-by-step lessons, guided by which, you can effortlessly recreate the image of your favorite pet on a piece of paper.
The right tool is already half the success. Therefore, when deciding to draw this or that drawing, you should first choose a high-quality pencil. For example, a medium-hard tool is suitable for drawing contours. Most often it is marked with the letter “H”. But the marking “B” means that the pencil is soft and is only suitable for sketching the internal elements of the drawing. Important! For beginners, it is better to give preference to tools of medium hardness marked “HB”. You should also not forget about the eraser. It must be of high quality and quickly remove marks without leaving marks. How to draw a dog: step-by-step lessonsIt would seem that for beginning artists, to depict clean slate paper portrait of a dog is pretty difficult task. However, if you follow the lessons below, you can greatly simplify the drawing process. Cheerful puppy
cartoon heroAnyone can recreate a small cartoon puppy on a blank sheet of paper. The main thing is to follow the instructions below step by step.
Sitting dogNow let's look at how to draw a sitting dog. The procedure is as follows:
Dog from cagesAn ideal option for children, since in this case the child will not only be busy drawing, but also develop fine motor skills, attentiveness and logical thinking.
HuskyWith a simple pencil you can draw even such a purebred dog as a husky.
Step by step drawing of a husky
ShepherdYou can easily and beautifully draw a German Shepherd with a simple pencil.
PugLovers of small decorative dogs can please themselves with a drawing depicting a beautiful pug.
An easy way to draw a pug
Both children and adults love dogs. It’s not surprising, because dogs are very smart and loyal animals. Most people will be pleased to receive a painted dog as a gift. Such a drawing can give confidence and encouragement, or lift your spirits and make you smile. How to draw a dog for kids This cheerful spaniel is easy to draw. And at the same time he is so cheerful. which will please any child. It is better for beginners to start trying out the pen with this scheme. Draw an open circle. Below it is an oval with a dent at the bottom (muzzle). In the center of the muzzle, symmetrically draw and shade 2 small circles. Place them in the center of slightly elongated ovals. Draw a heart shape for the nose in the middle of the large oval. Under the oval in the center, draw a small arc (mouth), mark the eyebrows. From the dog's head, draw 2 short parallel lines down, and under them draw an irregular circle, expanding towards the bottom (neck, torso).
Draw the dog's paws, first draw the front ones, then the back ones. Keep in mind that the hind legs are slightly larger than the front legs.
How to draw a dog step by step
Draw the outline of the muzzle in the form of 2 connected curly braces. The dog's head is tilted, so draw all its details at a slight angle.
Draw a right angle and connect its edges with an arc. Draw 2 more internal arcs. Inside the smallest of the arcs, draw a white dot, and shade the rest of the space. The result is an eye. By analogy, draw a mirror image of the second eye.
Draw an oval in the center of the muzzle, erase its bottom in 2 places with an elastic band. Draw a white highlight in the center of the nose and paint over the rest of the surface. Define the eyebrows.
The mouth is drawn in the form of a seagull upside down in flight. Draw the line of the chin a little lower. Draw the ears; their shape is selected depending on the shape of the dog’s head.
Draw the collar by drawing 3 arcs, each subsequent one slightly smaller, and connect their edges with parallel lines.
Draw the back and hind leg of the sitting dog. From the collar, draw a smooth line with 2 bends. Below it, draw an upside down letter “C”.
Draw the tail, while maintaining the proportions. Draw the front paw, and then finalize the image of the dog's hind paw.
How to draw a dog video (in the video we draw a Beagle dog) How to draw a dog with a pencil
Draw a small horizontal oval (head), under it at an angle of 45 degrees. larger oval (torso). At their junction, draw a small circle (muzzle). Label the paws.
Start drawing the head by drawing lines of symmetry. Draw the nose and mouth, ears on the sides of the head. The eyes are the most expressive detail and set the mood for the entire drawing. Their shape is round, the pupils can be dilated or constricted. The location of the glare is determined by the angle of illumination of the dog.
You can stop there, or you can continue to make it more realistic. Imagine how the light falls, how the dog’s fur bristles, its texture and reflect this in the drawing. How to draw a dog step by step with a pencil Draw a square in thin lines with a pencil. Use a ruler to find the middle of the sides and divide the square into 4 parts. Sketch the neck and torso. Connect the top points of the ears with a line. Draw lines parallel to it, connecting the upper and lower parts of the eyes, mouth, nose, nostrils. Adjust the shape of the ears, eyes, and muzzle. In the nose draw 2 arcs (nostrils), under the nose draw the curve of the mouth. Outline the neck and torso. Drawing fur Erase the auxiliary lines, leaving the mesh of the muzzle visible. The dog's fur is drawn with strokes of varying thickness and length and color saturation. Watch the direction of their bend.
Drawing eyes, nose
Shading of eyes, nose
Working out the details You need to apply shadows to the fur. This will add volume to the pattern, highlight the light source and emphasize the structure of the wool. The light is coming from the top left, which means the darker fur will be on the bottom right.
Draw a shadow under the dog's chin. Check the shading of different areas again. If everything is in order, the drawing is ready. It often happens that you want to draw not an abstract dog, but a representative a certain breed. Below are several examples. How to draw a Chihuahua dog
|
 Step two Draw the details of the head: curved ears, oval muzzle. Now let's show the paws. Carefully examine their position in the figure to depict them as well.
  Step Three On the “face” we will draw eyes, a nose, and from there downwards – a mouth. A small tail sticks out from behind the leg. Toes are visible on the “lump” paws. And one paw is unfolded and its “sole” is visible. Try to draw it too.
  Step Four Let's give the ears a rounded shape. Let's paint the eyes. Above them are eyebrows and folds of skin. There are a couple more folds on the forehead. The body also needs to be transformed from angular to realistic, with smooth lines. Some hairs stick out in places.
  Step five Let's outline the fur along the contour of the dog. Looks a bit like shading. Let's show a couple of skin folds on the paw. Let's make the outline brighter.
  Step six Let's do the shading. This is a crucial moment. We need to show the relief of our image, but not darken it too much. In places of folds it is darker. Also a darker muzzle. So how? You should also succeed!
  I also suggest you try to draw other quadrupeds.


 On the left side of the muzzle, draw a downward letter C (ear) with a wavy line. Similarly, in a mirror image, draw the ear on the right side.
 Give your dog a fluffy look by drawing fur. The drawing is ready, you can paint it.


 On the left side, draw a smooth curved line – the dog’s chest and stomach.
  Now draw the second front paw. The remaining hind leg is drawn last.
  The dog is ready, you can paint it.


 Draw an outline. Draw toes on the paws and add a tail.
  Erase the extra lines. You will get an image of a puppy.
 Draw a circle (head). Most of it is located at the top of the square.
  At the top of the lower right square, draw a smaller circle (the muzzle).
  Mark the position of the ears. The right ear is higher than the left and located in the upper right square.
  Sketch the eyes.
  Draw a circle (nose) on the muzzle.

 Apply fuzzy strokes around the perimeter of the head to indicate the texture of the fur.
  Add long strokes at the top of the dog's head.
  Give the ears some fluffiness around the edges.
  Cover the surface of the ears with wool. To add volume and depth, darken certain areas.
  Draw the area between the eyes with strokes that vary in shape and size. Draw the fur under the left ear. Shade the outline of the muzzle and chin.
 Draw fur on the sides of the nose, under the mouth. Watch the direction of the hairs. Shade the torso and neck.
 Area 1 (highlight) is the lightest and brightest in the eyeball. Area 2 (pupil) is the darkest part of the eye. Area 3 (iris) is the colored part of the eye. Area 4 (white) part of the eye is light, but not
  Give your dog's eyes an almond shape.
  Outline the lower part of the eye (eyelid).
  Draw in an arc at the inner corners of the eyes (iris).
  Apply a highlight to your eyes.
  Inside each iris, draw the 1st circle (pupil).
  Draw the lines of the nose.
  Draw the nostrils.
  Draw curves under the nostrils.
  Add highlights to the nose.
  This is what you should get as a result.
 Sketch the iris of the eyes. It is darker at the top and lighter at the bottom.
  Shade the eyelids so that there is a thin light stripe on them.
  Shade the squirrels with an HB pencil; usually in dogs they are always in the shade.
  Use a 2B pencil to shade the top of the iris and the outer edge of the eyelids. Lightly blend the iris and whites with cotton wool.
  Use a 6B pencil to darken the pupils.
  Blend your eyes towards the outer edge.
  Using an HB pencil, sketch out the nose in small spirals.
  Draw out the contour of the highlights on the nose and the areas under the nostrils with dots and small turns. Use a 2B pencil to shade the shadow areas of the nose. Draw the nostrils with a 4B pencil.
  Blend the nose, then re-lighten the highlights with an eraser.
 Shade the fur around the eyes, nose, mouth.
  Shade the areas under the eyes and around the eyes where the shadow falls. Fill in light areas with a 2H pencil, for dark areas use 2B, 4B pencils.
 Draw a large circle (head), make a grid on it, indicate the position of the ears. From the circle to the side, draw 2 parallel lines (neck), below a horizontal oval (torso), outline the position of the paws.
  Correct the shape of the ears, mark the position of the eyes and nose. On the feet, start drawing the toes.
  Draw the eyes, outline the nostrils on the nose, form the mouth and neck. Draw claws on the paws and outline the stomach.
  Add smooth lines to the ears. Draw eyebrows, refine the nose, draw pupils, teeth in the mouth. Draw lines on the chest and claws on the hind paw. Draw the tail.
Popular:
New
- A box of quality problems in physics and electricity How does a naval galvanic impact mine work?
- Sergey Cheremin: “A compatriot is someone who shares the cultural values of the Russian world”
- “A pilot lives only in flight”
- Spring is the time to bloom quotes
- How to get rid of uterine polyps?
- Riddles, proverbs, sayings, stories and poems about linden Properties of linden tree
- Hour of "massacre" Capture of the Winter Palace
- Ulrich Chairman of the Military Collegium of the Supreme Court of the USSR
- John Cabot - discovery of North America 1497 John Cabot discovery
- Who ruled after the wicket? Ivan I Danilovich Kalita. Biography. Origin and nickname


