Sections of the site
Editor's Choice:
- Media and mass culture Characteristics of mass culture and examples
- The nature of modern wars and armed conflicts in brief Conventional and illegitimate wars
- Why do you dream of a white wedding dress: decoding the image from the dream book
- Arkady Moreinis, Glavstart: “I work with startups, not sell boxes of coffee General Director of the Glavstart company”
- A box of quality problems in physics and electricity How does a naval galvanic impact mine work?
- Sergey Cheremin: “A compatriot is someone who shares the cultural values of the Russian world”
- “A pilot lives only in flight”
- Spring is the time to bloom quotes
- How to get rid of uterine polyps?
- Riddles, proverbs, sayings, stories and poems about linden Properties of linden tree
Advertising
| Draw Pikachu with a pencil step by step for beginners. How to easily and beautifully draw Pikachu step by step with a pencil for beginners. General outline of the torso and head |
|
And in this you will learn how to draw a Pokemon step by step. Typically, these creatures consist of simple figures and are highly stylized, so the lesson is perfect for beginning artists. Over the course of the lesson, we will draw three Pokemon that differ in difficulty level: Butterfree, Pikachu and Charizard. Necessary materialsIf you're painting on a tablet, you'll only need two coats and a brush. In the case of a traditional drawing, we need paper, a pencil for the sketch and something to trace the final outline (marker, liner, etc.). When working with a pencil, do not press hard on the paper; the lines should be light. Also, if you want to simplify the task a little, reduce the scale of the drawing - this will make it easier for you to maintain proportions. How to draw PikachuStep 1We start with two squares located horizontally. If you have a well-developed eye, you can do without a ruler. Step 2Draw a circle inside each square.
Step 3Then inside the squares we draw two crossed lines in the shape of an X.
Step 4Draw a vertical line through the center of both squares.
Step 5Now draw horizontal lines in the center of each square. Then draw a horizontal line under the bottom square.
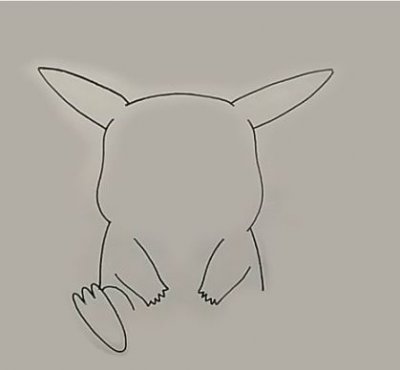
Step 6On the bottom square we draw Pikachu’s hips in the form of two ovals.
Step 7
Step 8Between the two squares we draw two small circles - these will be the shoulders.
Step 9We draw two lines - this is the basis for the hands.
Step 10Add volume.
Step 11We finish the hand with a rounded hand with fingers.
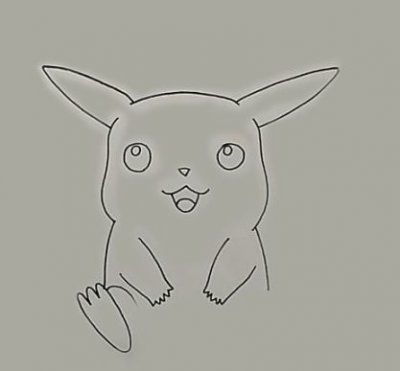
Step 12We will place all facial features inside the rectangle shown below.
Step 13Draw a horizontal line just below the center of the rectangle.
Step 14Draw round cheeks.
Step 15Draw eyes in the upper corners of the rectangle. Make them slightly oval to make the character look cuter.
Step 16Adding highlights to the eyes.
Step 17Draw the mouth and nose.
Step 18At the top of the head we draw two small circles - this is the basis for the ears.
Step 19Adding length...
...and volume. Step 20Then we draw the base of the tail.
Step 21Add several lines parallel to the base of the tail and one long line at the tip.
Step 22Draw horizontal lines tapering towards the base of the tail.
Step 23The sketch is ready! Now take a marker or liner and draw the final outline.
Step 24To prevent the drawing from looking too flat, make the outer contour a little wider.
How to draw Pokemon ButterfreeStep 1We start with a wide, slightly inclined drop. This will be Butterfree's torso.
Step 2Add a larger circle for the head.
Step 3Then we add two elongated ovals for the legs. We make the right figure a little longer.
Step 4We've sketched out the base for the body and now we're drawing the curves for the wings...
...and enclose them in drop-shaped shapes.
Step 5In the same way we draw the lower wings.
Step 6I think Butterfree only has two pairs of wings? That's right! We connect two pairs of upper wings to get the final shape.
Step 7Having finished with the main silhouette, we can move on to the details. Draw two tilted ovals for the eyes.
Step 8Two small circles on the body for the arms.
Step 9Add fingers using zigzag lines on the hands.
Step 10Draw the mouth in the form of a circle.
Step 11Divide the circle with a curved horizontal line.
Step 12Below the line we add two small fangs.
Step 13We draw mustaches on the head.
Step 14Using additional ovals we detail the eyes.
Step 15Draw a pattern on the wings:
Step 16Butterfree sketch is ready! Now we draw the outline dark color.
Step 17Fill in some details with a dark color to make the drawing look more contrasting.
Step 18We make the thickness of the outer contour a little wider, so the drawing will be more interesting.
Drawing CharizardStep 1We start with a large circle. This will be the lower torso of Charizard.
Step 2Add a small circle on top and get a snowman.
Step 3Above we draw a line and add another circle - this will be the neck and head.
Step 4At the bottom of the large circle we draw the hips.
Step 5Draw a horizontal line on which the Pokemon will stand.
Step 6Draw oval feet.
Step 7On the upper part of the body we add two circles.
Step 8Draw the base of the hands.
Step 9Add a circle base for the elbows and hands.
Step 10On each hand we draw three circles - these will be the fingers.
Step 11Draw the face.
Step 12We draw a horizontal curved line in the center of the head, trying to show volume.
Step 13Draw the base for the wings.
Step 14Draw the base of the tail.
Step 15To ensure that the tail has a uniform thickness, add circles along its entire length. We start with the largest one at the base of the tail and end with the smallest one at the tip.
Step 16Let's move on to the details of the muzzle. Draw a heart-shaped figure.
Step 17Add nostrils.
Step 18Draw the mouth.
Step 19Add fangs.
Step 20Then the top of the muzzle.
Step 21Drawing eyebrows.
Step 22Then we draw typical anime style eyes.
Step 23We draw horns.
Step 24Draw the outline of the eyebrows.
Step 25We draw claws.
Step 26Add circles on the wings, legs and feet to better convey the volume when tracing with a marker.
Step 27Draw a flame on the tail.
Step 28The sketch is ready and now we can outline our Charizard with a marker.
Step 29Don't forget to make the outer outline thicker to make the drawing look more interesting.
Great job! Now you know how to draw a Pokemon step by step. Even such a small experience will give you the basis for further development and implementing your own ideas.
I hope you enjoyed the lesson and learned something new. Don't forget to share the article on in social networks and subscribe to site updates. Happy creativity! We all have memories in our minds of the cute Pokemon we all loved as children. After the release of Pokemon Go, these memories came back to life, and everyone's favorite characters became popular again. Let's learn how to draw the famous Pikachu. If you can draw this character without any problems and want to draw the rest of the characters, then we recommend watching a video with instructions for drawing Jigglypuff. Let's start drawing the Pokemon Pikachu step by step with a simple pencil.
2. Next, we finish drawing the left ear, crown and cheeks. Don't forget that Pikachu has cute chubby cheeks that should be drawn voluminous. Draw the left ear at a slightly different angle than the right. It is more clearly demonstrated in the figure.
3. We begin to draw the torso.
4. Then add the paws on one side. We remember that Pikachu moves on all 4 legs, so we will call them front and back.
5. In the same way, draw the front leg on the other side.
7. Now draw a joyful smile.
8. Finish drawing the cheeks. Let's make them rosy. Pikachu - famous character from Pokemon. All babies and children love this funny and cute image. He has a very simple form, and you can easily draw it. Many of you don't need this drawing lesson, and many children can draw Pikachu without step by step instructions. But We know that with these drawing tips you will be able to draw its shape and proportions more accurately. Try to draw Pokemon Pikachu!Step 1
The first step of drawing Pokemon is very simple. You need to draw sketch outlines for the head (circle) and add two vertical lines. They are the boundaries of Pikachu's body. Step 2
Now you need to add small circles to the ends of these lines. They will help you draw your legs. Add two very small balls to the Pokemon's head and draw two short horizontal lines (arms). Step 3
At this stage you should add outlines for the ears and legs. Step 4 This step is more difficult. You should draw the general outline of Pikachu's body and head, ears, arms and legs. Step 5
Take a sharp pencil and trace this preliminary diagram. Step 6
Now you need to remove the unnecessary lines and loops and draw the actual lines for Pikachu's face. Step 7
At this stage you must choose how to draw final stage. This Pokemon drawing is done with a #2 pencil, but if you prefer to use colored pencils, your drawing can look even more fun and cute.
In this lesson you will learn how to draw Pikachu with a pencil step by step. Our lessons are suitable for different levels of preparation. We have collected several examples of lessons for you, all you have to do is choose the lesson you like and start drawing Pikachu. As a result, you will have an easy and beautiful pencil drawing of Pikachu step by step. Get started now. Write comments under the article and share with friends. Click on the desired option and you will go to it.
Option 1 - How to draw Pikachu easily step by stepSource Do you love Pikachu? This page is for you :) Here you will find many options on how to draw it. There are a huge number of Pikachu fans around the world. Have you watched the anime with him? STEP 1
You can draw something like this first. Cheerful and like a bunny. 1. Draw a circle and auxiliary lines. 2. Add long ears slightly tapered at the ends. Select the cheek. 3. Draw arcs on the ears. And on the head draw two round eyes with a highlight. The nose is very tiny. 4. Ros breaks into a smile. And draw circles on the cheeks. 5. At this stage, remove all the auxiliary lines. Ready STEP 2
The head is round. There are two intersecting lines in the center. They will be useful to us. STEP 3
Make your cheeks thicker. And on the head draw long ears with pointed ends. STEP 4
Now draw round eyes directly on the horizontal line. And there are big glares in the eyes. Draw two arcs on the ears. There are circles on the cheeks. The nose is triangular and the mouth is also slightly angular. STEP 5
Remove the auxiliary lines and you can color. RESULT Choose bright colors. Yellow and red-orange. It's dark on my ears grey colour or black. Option 3 - How to draw Pikachu dancing Gangnam Style step by stepSource
Be sure to draw Pikachu dancing gangam style. It's simple and fun. Especially by turning on the right song. STEP 1
Draw the head in a round shape, but the top is narrower. Make the body smaller. We'll still finish it. There are auxiliary lines in the head. STEP 2
Make the head shape as in the picture. Glasses protrude from the sides. One ear is raised up and placed diagonally. And the second one hangs. STEP 3
Draw two arcs on the ears. Sunglasses on eyes. Draw ovals and a smiling face on the cheeks. STEP 4
Now draw the body. Draw a line from your head to your hips. Make them wide. And small round paws. STEP 5
Make your paws in the shape of an English S. It really looks similar, right? Make the stripes on the body triangular in shape. They look like claws. STEP 6
And of course you need to draw a tail. What would it be like without him? The tail is like lightning. You can even see a three-dimensional letter W in it. The tail is narrow at the beginning and wide at the tip. STEP 7
Delete the auxiliary lines. Now everything is ready. RESULT
Be sure to color it :) Option 4 - How to draw a warlike Pikachu step by stepSource
Pokemon warrior. Let's draw it with wooden sword. What can they do? Maybe just play in a toy war. STEP 1
Start with a rounded head and cap. Although it's more of a cap. STEP 2
Draw the cap. The ears are elongated and long like a hare's. Draw an arc on them. STEP 3
Since this is a warrior, let’s draw him screaming and with menacing eyes. The eyes are round - just draw a straight line to make the eyes look like that. The nose is small. The mouth is open and the tongue is visible. Draw circles on the cheeks. STEP 4
Now draw the body. It should be drawn with smooth, rounded lines. And hands, one of which holds a sword. STEP 5
Now draw the sword itself. Draw lines on it showing the texture of the wood. STEP 6
Draw clothes. Wide belted waistband. Sleeves with simple lines. Gate and stripe diagonally. STEP 7
All that remains is to draw the lightning tail. The drawing is ready. STEP 8
You can remove all the auxiliary lines and start coloring. RESULT
Did everything work out for you? Option 6 - How to draw a cool Pikachu step by stepSource
Smile and wave. Would you like to draw a Pokemon like this? Then let's begin. STEP 1
Draw a rounded head. There are auxiliary lines on it. The body is slightly larger, also rounded. The line of the ears is a smooth line. And outline the handles. STEP 2
Draw an ear. Draw the mouth and nose. Make circles on your cheeks. The left paw waves to you and has small angular fingers on it. Draw the hind leg too. Draw the angular outline of the tail. STEP 3
Draw the second ear. Draw round eyes and highlights in them. Draw the second leg, front and back, as well as the tail. STEP 4
Remove the auxiliary lines and you can color the drawing. RESULT
Did you like the drawing lesson? Option 7 - How to draw Pikachu from Pokemon step by stepSource
Let's draw a singing Pokemon. STEP 1
Draw an oval head. Draw auxiliary lines on the head. Draw auxiliary lines of the body. STEP 2
Draw long ears. The body is round in shape. Draw round cheeks. STEP 3
Now draw the lines on the ears. This Pikachu looks a bit unusual. Maybe it's not him? On the body, draw the paws folded together. And draw the hind legs too. Also draw the tail. |


Popular:

New
- The nature of modern wars and armed conflicts in brief Conventional and illegitimate wars
- Why do you dream of a white wedding dress: decoding the image from the dream book
- Arkady Moreinis, Glavstart: “I work with startups, not sell boxes of coffee General Director of the Glavstart company”
- A box of quality problems in physics and electricity How does a naval galvanic impact mine work?
- Sergey Cheremin: “A compatriot is someone who shares the cultural values of the Russian world”
- “A pilot lives only in flight”
- Spring is the time to bloom quotes
- How to get rid of uterine polyps?
- Riddles, proverbs, sayings, stories and poems about linden Properties of linden tree
- Hour of "massacre" Capture of the Winter Palace


