Site sections
Editor's Choice:
- Lumberjack house coordinates for minecraft 1
- Cool skins by nicknames. Skins fun. What are the advantages of our collection of skins
- Commands for Enchanting in Minecraft
- Potions in minecraft
- How to make a fishing rod and fish in minecraft
- Basic Potions in Minecraft
- Portals in minecraft 0.17. What portals are in minecraft. Portals in Minecraft for Android
- How to make an ender eye in minecraft
- Where can you find watermelon in minecraft
- How to summon the Wither in Minecraft and why do it?
Advertising
| How beautiful it is to draw with gouache if you are an aspiring artist. How to draw with acrylic paints How to draw different and beautiful drawings with paints |
|
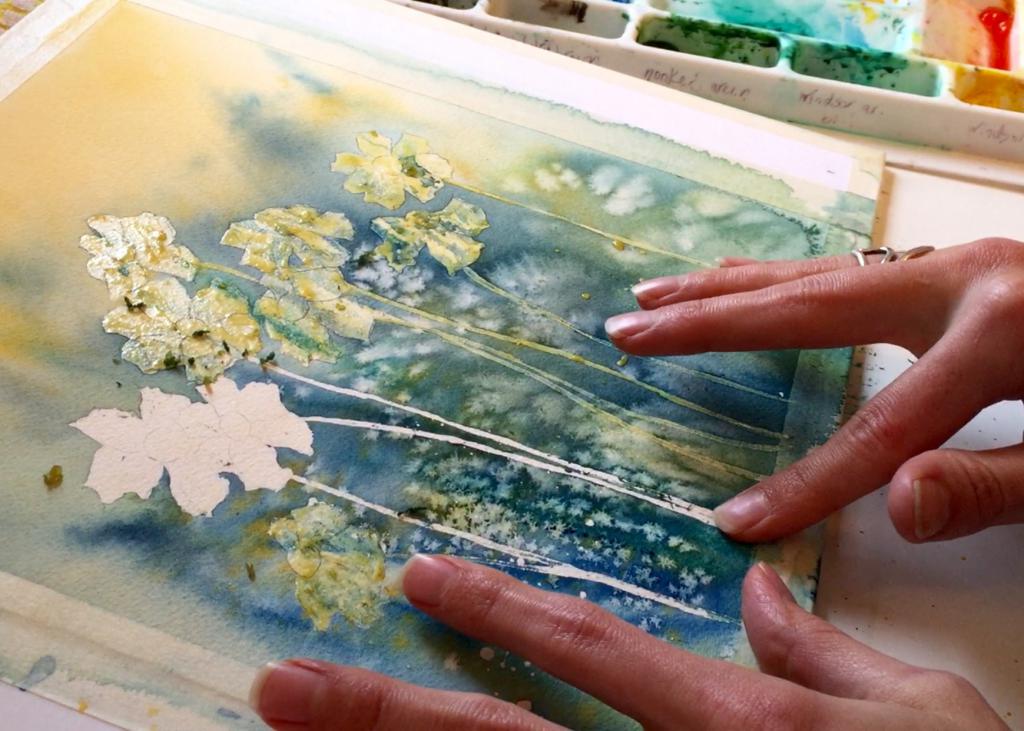
All children love to draw. But sometimes the child does not turn out the way he wants. Or maybe he doesn’t have enough familiar ways to express himself? Then you can inspire him to experiment with different techniques, among which there is sure to be a favorite. After that, your child will probably want to invent something new. Bright Side collected the most interesting techniques for you. Patterns from dotsFirst, draw the simplest squiggle. Then, using a cotton swab and paints (gouache or acrylic), we make intricate patterns, as the soul lies. Paints are best pre-mixed and slightly diluted with water on the palette. Frottage
Since childhood, a technique familiar and loved by many. We put an object with a slightly protruding relief under a sheet of paper and paint over it with pastel, chalk or an unsharpened pencil. Foam prints
Having dipped a sponge in thick gouache, a child can draw landscapes, bouquets of flowers, lilac branches or animals. Blotography
One option: drip paint on a sheet and tilt it in different directions to get some kind of image. Second: the child dips the brush into the paint, then places the inkblot on a sheet of paper and folds the sheet in half so that the inkblot is printed on the second half of the sheet. Then he unfolds the sheet and tries to understand who or what the drawing looks like. Hand and foot prints
It's simple: you need to dip your foot or palm in paint and make an imprint on paper. And then use your imagination and finish drawing a couple of details. Paint Patterns
For such an application, you need to apply a thick layer of paint on paper. Then, with the back end of the brush on the still wet paint, scratch patterns - a variety of lines and curls. When dry, cut out the desired shapes and stick on a thick sheet. Fingerprints
The name speaks for itself. It is necessary to paint the finger with a thin layer and make an imprint. A couple of strokes with a felt-tip pen - and you're done! Monotype
A drawing is applied to a flat smooth surface (for example, glass). Then a sheet of paper is applied, and the print is ready. To make it more blurry, a sheet of paper must first be wetted. When everything is dry, you can add details and outlines if desired. GrattageThe highlight of the work is that the drawing needs to be scratched. A sheet of cardboard is tightly shaded with spots of multi-colored oil pastels. Then black gouache must be mixed on a palette with soap and painted over the entire sketch. When the paint is completely dry, scratch the pattern with a toothpick. air paints
"Marble" paper
We paint over a sheet of paper with yellow acrylic paint. When it is completely dry, paint over again with diluted pink paint and immediately cover with cling film. The film needs to be crumpled and gathered into folds, since it is they who will create the desired pattern for us. We wait for complete drying and remove the film. How to use acrylic paints correctly? This science is simple, but has many significant nuances. It is practically not necessary to learn how to apply them correctly on the chosen base - painting with acrylic does not require special techniques. Rather, on the contrary - with these paints you can work in any style and on any surface. Acrylic is perfect for both palette knife and conventional art brushes. The structure of the paints allows you to draw thin graceful lines and broad strokes in the picture with equal success. Today we will look at what is better to paint with acrylic paints. How to paint with acrylics on canvas?Canvas - this is an ideal basis for acrylic, because on it reveals the best qualities of this paint. Among them are:
Thus, to the question: “Is it possible to do acrylic painting?”, The answer will be unequivocal - of course, yes. Moreover, you can work in absolutely any technique, since acrylic is ready for any challenge. If you are painting with acrylic paints on canvas, then you must adhere to the following rules:
How to paint with acrylic paints on nails?The water resistance and vapor permeability of acrylic attracted the attention of manicure masters. They did not even doubt whether it was possible to paint with this paint on the nails, because it greatly expanded their capabilities. One tube of this wonderful decorating material could serve as a base layer, translucent tonic and modeling paste at the same time. It also has another very attractive property - it can be mixed with various solid particles, such as glitter and modulators. There are a lot of master classes on the Internet that will help you learn how to make graceful drawings with acrylic paints on gel polish step by step. Of course, discussions about whether it is possible to paint with acrylic on nails covered with gel polish do not subside, because many still consider this material to be too toxic for such close contact. However, we hasten to reassure you - high-quality artistic paint does not pose any threat to health. How to paint with acrylics on paper?Can this paint be used to paint paper sheets, and on what paper is it best to do this? This is a fairly common question among those who use acrylic for the first time. And this is not surprising, because for this coloring material the right base is very important. The rather dense structure of paints and some features of their use do not allow working with thin and smooth leaves. Therefore, if you want them to lie on the base correctly, opt for thick embossed paper or cardboard. This rule will answer you another very important question: is it possible to paint with acrylic on wallpaper? This technique of artistic painting on the walls is often used in designer repairs. And all because a small drawing made by the master's hand can completely transform the room. What wallpaper can you draw on? The answer to this is not so simple. On the one hand, the chemical characteristics of acrylic make it absolutely compatible with any material, on the other hand, painting embossed textured wallpapers is quite difficult (but at the same time real). Thus, when deciding on painting finishing materials, first of all, be guided by the complexity of the pattern and your level of skill.
How to paint with acrylic paints on fabric?As mentioned earlier, acrylic is absolutely compatible with any base material, so the answer to the question of whether it can be painted on silk or on any other fabric is unequivocal. Of course you can. However, before you start working on clothes, pay attention to the material of its manufacture. Natural fabric dyed with synthetic dye is more resistant to frequent washing and constant mechanical stress than synthetic fabric. Therefore, it is the composition of the material that will primarily determine whether something can be drawn on clothes, and on what kind of thing it is better to do this. To apply an acrylic pattern to a fabric, use step-by-step painting or ready-made stencils (this will not particularly affect the overall result). If you are working with such dyes for the first time, then there is a reason to first practice on an old T-shirt. So you will accurately determine the brush number you need, as well as the desired paint density. What can you paint with acrylic paints on?As you already understood, the amount of materials that acrylic is compatible with is truly amazing. With it, you can draw on almost any surface without any fear of possible consequences. Only the question is in doubt: is it possible to make drawings on the face? There is no doubt about the excellent quality of the drawing, but whether you can wash it off later is a question. However, the Internet is replete with ideas for painting with acrylic on leather (or rather, products from it). You can talk a lot about the versatility of acrylic paints - they can be painted with equal success on felt boots, on ceramics and on a concrete wall. They are used even on an industrial scale, making drawings on factory dishes or painting jewelry. How to paint with acrylic paints on wood?For drawing on wood, it is worth remembering that this material should not be painted without a primer - the material will absorb too much paint, and the drawing will turn out to be uneven. This rule applies exclusively to natural unpainted wood. When applying a pattern to an already painted surface, a primer is not needed. However, when painting on plywood, it is still worth applying an adhesive layer - it will ensure a reliable adhesion of the decorating material and a smooth base.
We draw flowers with acrylic paintsThe technique of drawing a rose or a tulip in stages with acrylic is no different from that used when working with oil paints, watercolors or gouache. This is often used in the restoration of furniture, accessories and jewelry. The new material will be able to replace other types of dyes, besides, it is also much stronger than them. Acrylic coloring pigments are widely used in the restoration of toys. With their help, you can correct or redraw the eyes and lips of the doll, or even completely redraw her face. With acrylic, you can also paint abstract paintings, use abstraction to decorate a vintage jewelry box, or transfer it onto an old T-shirt. To be honest, there is not much difference what to draw with this material (both winter, and clouds, and a Christmas tree are equally good).
There are no special secrets on how to learn to paint with acrylic from scratch. However, it is worth knowing some tricks of working with acrylic. First, you need to make sure that the paint is always wet - acrylic dries very quickly. Secondly, always work in overalls - then it will be almost impossible to wash off the coloring pigment. Thirdly, watch the quality of the paint. The thing is that unscrupulous manufacturers often use harmful and toxic ingredients. That is why it is so difficult to answer the question of whether it is possible for pregnant women and young children to paint with such paints. This can be done if you fully trust the manufacturer and use well-ventilated rooms for work. And we have a channel in I ndex.Zen Subscribe to receive fresh content as soon as it's published! 7 basic painting techniques in watercolor, acrylic, gouacheA box of colors can give you an exciting journey into a fantasy world. Amazing images, enchanting landscapes, fairy-tale characters will come to life on the canvas. You can learn how to create drawings with a pencil and paints according to the instructions, step by step recommendations. Prepare a set of brushes and paper, sponges and napkins, simple pencils and sponges. Be patient and get started! Drawings with paints for beginners - that's what we'll talk about today. Consider drawing methods for beginners with three types of paint: Study this review and choose what you will be more comfortable working with when doing drawings for beginners. So let's learn how to paint!
How to paint with watercolorsLoved by many artists, young children and experienced adults alike, watercolor can be used to paint in a variety of techniques. How to learn to draw with this magic paint, even a novice artist can easily understand. Beginners will be able to quickly master the drawing technique, while professionals will have inspiration and a whole galaxy of new ideas. There are 7 basic watercolor painting techniques for beginners. Painting with a flat brushFirst you need to draw an image of a square or triangle in order to mark the beginning and end of the layer. Then choose darker shades. Immediately use the upper left corner. Gently touch the paper with your brush, draw a line straight to the top right corner and draw a masterpiece! Left-handers should draw in the reverse position - starting from the right corner.
GradientStart drawing with a square or rectangle. Pick a shade darker by mixing on the palette. Next comes the lighter shade layer, it will merge with the previously painted one to achieve an interesting combination of color transitions.
GlazeImprovise, fantasize: a combination of light transparent tones will allow you to get great combinations. You must wait for each of the layers to dry.
"Wet" techniqueFor effective drawings, it is necessary to evenly distribute moisture on the surface of the paper - this will provide a satin look. Start from the background. This drawing technique allows you to achieve a hypnotizing effect.
Dry brush drawing lessonsFirst you need to sketch the image with a pencil. You need to apply paint after you remove its excess with a napkin.
No excess moistureYou will need to stock up on sponges. Excess moisture must be removed from the sheet. Do not rub the paper vigorously. This work is well done with makeup sponges.
Technique for bleaching paint that has driedYou will need clean matter and water. It is necessary to wet the area of \u200b\u200bthe drawing, gently wipe and remove the remaining moisture with a dry brush.
Techniques for using different colorsHow to paint with acrylicAcrylic paint perfectly combines the best properties of watercolor and oil, and after drying, the paintings are not afraid of moisture and sunlight. Simple drawings with such paints can be done even by a child. The universal properties of acrylic are the ability to superimpose each subsequent layer on the previous image. Unlike watercolor, you don't have to wait for a layer to dry before applying a new one. Read the easy instructions and get started! For starters, you can learn to use six colors. Later, the palette will gradually expand to 18 shades. Also prepare:
To obtain high-quality paint, it must be diluted with a solvent or water. Undiluted paint is used on synthetic surfaces and dries faster. There are several acrylic painting techniques:
A novice artist for a drawing needs to choose the basis of the surface and paint in a jar or tube. Choose the drawing technique that interests you. Prepare your color palette. Synthetic brushes are more suitable for working with undiluted paints. If you choose watercolor technique, it is better to take natural pile.
At the end, you can additionally apply strokes with a felt-tip pen, ink, marker, gel pen, pencil. Even a child can master the simplest drawing technique from scratch. When you master the basics of the technique, you will be able to draw on fabric and glass, create aerial landscapes or portraits. Even painting your favorite T-shirt will be easy if you learn how to work with acrylic. On the video: step-by-step acrylic painting lessons.
How to draw with gouacheDrawings with gouache paints for beginners, children master at an early age. This paint is loved by kids for its ease of application and because the image does not blur, unlike watercolor. Gouache allows you to get more vivid drawings. For older people, instructions from the Internet will help create a unique landscape. The following surfaces can be the basis of the drawing:
There are the following varieties of gouache:
Immediately sketch with a simple pencil. When learning to draw, start with dark shades, gradually moving to light tones. Mix colors on the color wheel. Step by step drawing with children will allow you to get beautiful images on paper. If you mix adjacent colors in a sector, you get a dirty shade. The shadow can be conveyed in green, blue or purple, but not black.
Whatever technique you choose, the main thing is that you are inspired. We wish all the works to be successful, to please you, to give ideas for further creativity. With the help of such an activity, you can throw out your emotions and impressions. Draw confidently and have fun! Master classes in watercolor and gouache painting (2 videos)
What to draw when bored?What can you draw when you're bored? A question that actually has a hundred answers on lessdraw.com, but let's get started. The easiest ideas for beginnersNot all of us can draw well, and even bother with complex drawings in those moments when it’s just boring, you don’t really want to. I offer a whole range of cool and interesting drawings that you can draw for those moments when you or your child really want to do drawing to kill boredom:  More ideasWhat else can you draw when you're bored? Let's fantasize.  I leave you cool drawings for inspiration - if you still haven't figured out what to draw when you're bored - just take a look at the gallery and choose what you like! Drawing lessonsHow to draw a landscape in stages
Drawing with paints is not only very interesting, but also informative. The landscape, executed in different techniques, calms, gives positive emotions and instills in the artist a sense of beauty. From our lesson you will learn how to draw a landscape in stages and what is required for this. LandscapePainting in watercolor or gouache provides a wide range of landscapes. For example, one of the most impressive subjects for drawing is mountains. They can be both smooth, similar to a mountain range, and sharp. By depicting mountains, you have the opportunity to show the contrast between sky and earth, high plains and slopes. Another significant point is the weather. It is very exciting to draw winter mountains: you can “play” with shadow and light, with different shades and reflections on white snow. Ultramarine, yellowish, turquoise, ocher or burgundy - all this is quite appropriate on the snow cover. The main thing is to choose the right color scheme. No less interesting for novice artists will be a summer landscape depicting mountains. Picturesque and beautiful: warm shades of grass or cold colors on pine branches, a riot of greenery and colors. At the same time, you do not need to carefully draw them - the bolder and freer the brush lies in your hand, the easier and more relaxed the picture will be. Important: a landscape is not only nature, but also a certain atmosphere, in the creation of which we put our mood and emotions. Where does the landscape begin?Any drawing must begin with a layout on a paper sheet. Make the sky smaller than the earth or vice versa. Please note that these parts do not have to be the same. If you are drawing mountains, then be sure to think about which peak will become higher and which one will become low. You should not depict the same mountains, although this happens in reality. It is best to make them different compositionally, which will add some dynamics to your drawing. Pay special attention to objects located in the foreground - what is closest to the artist, that is, to you. The foreground is always drawn more diligently and in more detail than the background. And now let's try to draw a mountain landscape with gouache. Landscape in gouache in stages: draw mountains
Stage 1 Stage 2 Stage 3 Important: do not use a large amount of gouache and do not mix it with water - the paint should be thick. Practice first on a separate sheet of paper and only then start drawing.
Stage 4 Stage 5
stage 6 Stage 7 Stage 8 OK it's all over Now. You have successfully completed the task and painted a beautiful mountain landscape. Landscape watercolor in stages: draw a sunset
Stage 1 Stage 2 Stage 3 Then, with a thin brush, slowly draw tree branches, different in width and length: thick and thin, long and short. In the background, make the branches a little lighter, and darker in the foreground.
Ready! You yourself painted a colorful and very beautiful sunset. So, we have learned how to draw mountains and a sunset, but a detailed analysis of landscape techniques and the nuances of choosing paint: gouache or watercolor will be no less interesting. There are many techniques for painting a landscape with paints. But if you are a beginner artist, then step-by-step drawing will be easier using gouache. It is easy to use: it does not have a specific smell, it is easily mixed with water and washed off. Any brush is suitable for working with gouache, but it is best to give preference to ponies or synthetics. This technique is also suitable for beginners because, having made a mistake, it will be easy to correct it by painting over with another layer of paint. In addition, the next layer applied to the dried pigment will not mix with the previous one. The main difference between gouache and acrylic and oil paints is that you can paint with it more freely, without fear of making a mistake. It does not matter how you draw parts of the picture - all at once or separately. For example, you can first paint over the ground and sky with gouache, and then paint the foreground, trees and clouds. Note: to speed up the work, apply paint to objects immediately, without leaving "for later". Agree, it is much easier to do everything in one step, and not wait for the picture to “dry”. This version of landscape painting is no less interesting and is also quite suitable for novice artists. You can easily master the watercolor technique if you know some tricks and important rules. Painting with watercolors is, first of all, working with layers. The paint is translucent, which means that mixing of each new layer with the past cannot be avoided. And, of course, do not forget that painting a landscape with paints in several stages is a rather difficult task for a novice artist. Many questions arise here: how to arrange everything on a sheet, how to get a certain color, how to highlight this or that object, etc. Answers come only with experience. The best advice that can be given to all beginners in painting is more practice - draw the most ordinary subjects. Remember that the sooner you realize that realism is directly dependent on highlighting some details and creating contrast, the sooner everything will work out.
So what is a landscape? This is a good training for any artist, which does not allow you to get away from the main theme of the image and at the same time gives freedom to fantasy. Watercolor paints are one of the most beloved by artists. Firstly, watercolor has a lot of different techniques, and secondly, it can be used to create a beautiful drawing, even if you do not know how to draw at all. These techniques will help beginners learn how to draw, and professionals can refresh their memory and find inspiration and ideas. 1. Painting with a flat brushStep 1 Draw a square or rectangle to mark the beginning and end of the layer. Choose a darker shade (it's easier to see) and starting from the top left corner, brush down on the paper and gently draw a straight line all the way to the top right corner. But: left-handers should draw from the right corner to the left. Step 2
Fill the brush again with paint. Start the next stroke from the bottom edge of the first one, try to cover the buildup of paint that formed from the bottom of the first stroke. Hint 1: If the buildup of paint in the first stroke did not flow completely into the second, then increase the angle of your easel to help the paint flow freely. Hint 2: By increasing the angle of inclination, you also increase the chances of getting uncontrolled flows of paint. Therefore, try to work faster or have something like a rag or sponge handy to quickly remove drops. Step 3
Repeat the previous step, also trying to cover the accumulation of paint in the top stroke. Hint 3: You can use the flat edge of the brush to "cut off" the beginning of the layer and make it even. Hint 4: If you want to smoothen the end edge of the layer, then at the end of the stroke, pause and brush up and then down as you would with the start edge. Hint 5: If the stroke is broken, then immediately fill the brush with paint and re-swipe it. Step 4
Repeat the previous steps until the very end. Try to stick to the same tone of paint. Hint 6: You won't believe how different the behavior of brushes, paints and paper from different brands can be. Usually, the more expensive and popular brands make your job easier by providing high quality products. Hint 7: If your strokes break even if the brush is full of paint, then you are using too thick paper, or the paper is too rough. If you come across such paper, then sprinkle water on it, blot it with a clean sponge and let it dry. This will make the surface more receptive to your paint. Step 5
Rinse the brush and squeeze out any remaining water from it. Carefully pick up any blobs of paint left underneath the final stroke with the brush, but don't take too much paint or you'll discolor your drawing. To create more texture in your drawing, leave it to dry at an angle. So the paint will take on a more interesting look. GradientStep 1
Draw a square or rectangle. Then dip your brush into the darker shade of paint (it's on the palette to mix) and gently stroke the brush. Step 2
Dry the brush with a sponge or paper towel and dip it again in a lighter shade. Then draw a new stroke, overlapping the bottom of the previous one. Notice that the left side of the layer has already merged with the previous stroke. Let gravity do its thing. Step 3
Rinse the brush again and dry it. And then refill the brush with paint and make another stroke. Repeat this process until the very end. Hint 1: If the stroke breaks or does not go as smoothly as you would like, quickly refill the brush with paint and repeat the layer.
Step 4 Rinse the brush with clean water, dry it and pick up any remaining paint. Hint 2: Try this technique by working with different colors and creating interesting transitions.
watercolor glazeStep 1
This technique requires improvisation and imagination. For example, we will draw an impromptu landscape. First, paint the sky and the river with blue paint. We will separate the paint with a small amount of water, this will be a waterfall. Step 2
We draw clouds of dark pink color and we start to draw a mountain in yellow color. We will also mark the lower part of the figure in yellow. The example uses light and transparent tones so you can see how the layers interact. Step 3
By mixing cobalt blue and ultramarine blue, we will paint the horizon of the mountain and shade the small yellow slope. Hint 1: let each layer dry. You can use a hair dryer to speed up this process. Keep it at least 25-30 cm away, turn on the cool setting and set the hair dryer to the lightest air flow. No steam or hot air! Step 4
To shade and add interesting colors, use orange. With it, we will create the coast in the foreground and shade the sky. Hint 2: if you have drops of excess paint, rinse and dry the brush as you did in the previous techniques, and pick up drops with it. Step 5
Please note that the images show different brushes for painting. You can use the ones you have available. Take a dark blue color and shade the top of the mountain with it, changing the pressure on the brush and turning it around to create an interesting texture. Step 6
Using the same blue color, let's play with the waterfall by drawing some circles. Sometimes visual clichés become your friends. We will wash the brush and pick up the yellow color, with which we will add visual details to our shores. Step 7
Once the paint is dry, shade the bubbles in the waterfall with a hint of purple. So we will make them more interesting. Step 8
We need to link some elements and add trees. In the example, we used round templates for crowns, but you can draw as you like. Step 9
In brown we will depict tree trunks. Also with the help of blue we will shade the water and the sky a little more. Then, using pink, blue and green, paint the grass in the foreground. Step 10
Use a mixture of pink and red to add the final details. Our trees are bearing fruit now, and there are several fruits under them. If you look closely, you can see how each layer interacts with each other. A darker shade has more power, but when the colors overlap, they create an interesting and beautiful combination. “Wet” techniqueStep 1
Wet the paper with water Step 2
Blot the paper with a clean sponge, removing excess water. Try to achieve an even distribution of moisture on the paper, you should get a satin effect. If the paper is shiny, it means that it is too wet, blot it again. Step 3
We will paint the landscape again. Let's start, of course, with the sky. Using this technique, it is easier to draw the background first, then moving on to the objects of the foreground. Step 4
We continue to draw the sky until we start to like it. The strokes will blur, creating an interesting effect. Step 5
Now let's move on to the grass in the foreground. Using green, make a few wide strokes, leaving room for the stones. As the paper dries, the strokes become less and less blurry. Step 6
Let's add forms. To do this, use different shades of green and draw trees on the horizon. Step 7
After adding the trees, let's try to add texture to them. To do this, use a darker shade of green to set the accents. Step 8
Add stones using gray color. We filled in the gaps in the foreground with this color, leaving some gaps. Try to use either dark or cold shades. Using both dark and cold shades will create visual dissonance. Step 9
We will place accents to diversify the picture. Using a crimson hue, we depict several floral elements in the foreground. Let the crimson flow as it wants. Then, using a dry brush, remove the color from the middle of the spots. Step 10
Then, drip clean water into the center of these spots to allow them to blend into the grass. The hardest part about this technique is knowing when to stop. If you overdo it with blurs and colors, you will end up with a messy drawing. This technique gives a slightly strange, but interesting result. A drawing made in this technique has a hypnotizing effect. Dry brush drawingStep 1
We think the name of the technique speaks for itself. We will need to pick up paint on a brush, blot it from excess liquid with a paper towel or sponge, and only then paint. Let's start with a pencil sketch. After that, roughly mark the sky, moving the brush over the surface of the paper. Step 2
Let's draw green trees on the horizon line, outlining what will later become our lake. Then, by mixing mauve with blue, draw the first layer of the tree trunk. Step 3
Let the drawing dry and add some elements: the reflection of a tree in the lake and the flow of water. Mixing green and blue, shade the coast on the background part of the image and let the painting dry again. Step 4
Mix an intense blue with ultramarine and paint a layer on the trunk of the tree to create the shadows and texture of the bark. Step 5
Then, using shades of orange, we will depict the autumn landscape by painting the background trees. Step 6
Having finished with the previous step, with a light orange tint, we will depict the reflection of the trees in the water. Also, by mixing gray with blue, we will place dark accents on the trees. We will also add trees on the other side of the horizon. Let's mark the shapes of the trees in orange. Step 7
Let's take water. Use dark green and brown to achieve the desired color. And with wave-like movements we will draw water in the lake. Step 8
When painting a lake, change the pressure on the brush to add texture. Clue: if the brush is too wet, the paint will look flat. Dry the brush to intensify the colors. Step 9
Let's add some grass under the tree, using the same color as the grass in the background. Step 10
Let's add some details to the foreground. We will also darken the lake a bit by adding a blue tint. And also shade the sky with the same color. We remove moistureThis technique will require several sponges. It is suitable for the image of clouds, soft light. And it can also control the behavior of colors.
Sponges
Makeup sponges are the best. They absorb well and give an interesting effect. Avoid rubbing the paper with the sponge, and if you do, be very careful not to damage the paper. Paper towels
With their help, you can create clearer highlights. But paper towels absorb a huge amount of paint very quickly. Therefore, they can absorb fresh paint completely. Paper towels can come in handy if you make a mistake. Then you can quickly remove the paint. Dry brush
You can use a dry brush to create a pattern using this technique. To do this, rinse thoroughly and wring out the brush. With it, you can create clear lines. Other methods:
Discoloration of dried paintBrushes for watercolor paint
Use clean water and a cloth, wet the desired areas, gently rub the pattern and remove moisture with a dry brush. This method allows you to control the areas you lighten. Brushes for oil or acrylic paint
Stiff bristles allow you to quickly scrape paint from the desired area. But it is worth noting that this method can damage the paper, so control yourself. Here, just as in the first method, you must first moisten the area, and then process it with a brush. Spray and towel
Take a spray bottle and spray on the desired area, and then apply a paper towel to it. This method leaves large light spots and gives an interesting effect. Sandpaper
Very rarely used, as it can damage the paper. It is best used at the end to add texture. You don't need water for this method, just rub the drawing in the right place. Blades and knives
Can be used to highlight small areas and create crisp lines. This method is also very risky as it can damage the paper. Sponges
You can also use sponges. Wet the desired area and dry it with a sponge. Drawing classes help to relax, calm down and get away from everyday, domestic problems into the world of dreams and fantasies. You can start drawing with anything: pencils, gouache, charcoal, oil paints, watercolors. But only a box of watercolors familiar from childhood can give a ticket to childhood, a world of fantasy and adventure. What can be painted with watercolors? Where to beginWith ease, they will help you create a variety of images, landscapes, still lifes, everything your heart desires. To begin with, it is worth arming yourself with desire, patience, various brushes, paints, a palette and water containers. Sometimes it is useful to have sponges, paper napkins, and also simple pencils and sponges on hand. So what can you paint with watercolors? How to make drawings of the highest quality and professionalism? Watercolor paints - to fightBoth experienced artists and beginners, including the smallest ones, love to paint with watercolors. It contains natural, harmless pigments. The adhesives in these paints are also created by nature. Used mainly such as gum arabic, casein, honey, dextrin, phenol. The brush is wetted with clean water, then paint is picked up, then conceived images begin to appear on the surface of the paper. What can be painted with watercolors? Due to the transparency of the pigments, they are able to convey weightlessness, lightness, freshness. So, for example, to paint something light, weightless with oil paints, you have to apply several opaque shades one on top of the other until the desired effect is obtained. Watercolor is a universal medium, because thanks to the unique structure of paints, it becomes possible to reproduce all genres, original and unpredictable effects. Pigments on paper seem to melt, spread, their mixtures can create various combinations of colors and shades. What can you paint with watercolor for beginners? Whatever the soul of the artist desires. The question arises: what about gouache? How are they different from gouache? Transparency is what distinguishes watercolor from gouache, where pigments are mixed with white. There are many interesting ways to paint with this paint. The main ones are described below. Flat brush paintingWhat can be beautifully painted with watercolors? Let's figure it out. Anything can be beautifully painted with watercolors. But there are also unusual ways to do it. There is an interesting method of painting, performed with a flat brush, designed for paints on a wide variety of bases, both water-based and oil-based, acrylic. Its principle is as follows: two different colors of paint are drawn on the edges of a flat brush.
Work is done on a dry sheet of paper. First - a square or triangle outline is drawn to determine the beginning and end of the layer. Next, colors are selected, and a line is drawn along the upper left corner to the right corner (left-handers start drawing from right to left). With this technique you can get masterpieces! So, plants are often drawn:
Differentiated (in certain areas of the picture) blurThis method is the main one among professional artists. It is done as follows:  What can be painted with watercolor in this way? This method is used by artists to depict the sky, large meadows, glades, water, various surfaces where transparency, lightness and immensity are required. It becomes possible to convey in the picture all the shades of natural beauty, natural overflows. Differential blur helps show the richness and magic of natural beauty. GlazingWhat can be painted with watercolors in stages? A method resembling blur, but in this case, the pigment should be applied to a dry sheet of paper. Glazing allows you to adjust the color and tone of the picture, clearly work out the transitions of shades. When working with glazing, each color should be dried separately in stages. This is how the background of the drawing is created, if the artist wishes, the sky, the sea, any extensive surfaces are drawn. "Wet on wet"What can be easily painted with watercolors? There is a method developed by European artists that allows you to paint landscapes and natural phenomena in a wonderful way. The secret of the method lies in the fact that the paint is applied to a wet sheet. The entire canvas is evenly wetted with clean water. It is most convenient to do this with a sponge, but a large soft brush will do. Further, the necessary strokes are applied with a brush, creating unique shapes, shades, color transitions in the work. "Dry brush"This method requires certain skills and skill of the artist. An almost dry hard brush is used here. Paper - should also remain dry. A large amount of paint is collected on the brush and the study of images begins. On bumpy surfaces, it is possible to create clear marked marks, create effects similar to pencil drawings.
In this way, both independent works are created, and individual elements that are lost in a dull background are worked out. What drawings can be painted with watercolor "dry brush"? Very often this method is used to create portraits, landscapes, still lifes. In a word - wherever detailed elaboration of images is required. A “dry brush” is able to bring clarity, clarity to a drawing, like a pencil - to show the necessary lines and curves, one might say - to write a whole work about what the artist painted. flushingWhat can be painted with watercolor paints? There is another unusual way of using watercolors used by professional artists. In this case, the pigment needs to be washed off after it has completely dried. The part of the work that needs correction is wetted with water. Next, blot this area with a soft absorbent cloth. Excess paint, along with water, will remain on the fabric. This technique creates unusual shapes, curves, lines, gives volume to figures, color depth. Drawing with water on paintA layer of watercolor is applied to a sheet of paper. When the paint dries, take a clean brush, wet it with water and drip drops of water on the desired areas. This allows you to create layering, volume, the illusion of cracking rounded shapes.
GlazeWatercolor paints of light tones are applied one on top of the other in a certain order: lighter shades are lower, darker ones are higher. The pigment is transferred to a sheet of paper with the thinnest brush strokes only after the previous layer has dried.
As a result, three-dimensional figures will appear, in which all colors will complement each other without mixing, allowing you to see the boundaries of multilayer paint application. scratchingA method that allows you to remove individual areas of paint on a dry surface. In some cases, in this way, within the same tone, its enlightenment is made. DisguiseWhat can be painted with watercolors easily for kids? In principle - anything, but in this method - there is an element of mystery and mystery that can attract the attention of any child. On a sheet of paper, before applying a layer of watercolor, with the help of wax or paraffin, areas that should remain unpainted are closed. Next - work is done with paints. As soon as all the paint dries, the wax can be rolled up with your hands, with a brush, or left on the canvas.
AddendumA different color is added to the wet areas of the future work, which in a unique way creates illusions, bizarre overflows. Using this method, you can create different color solutions that are not possible with the usual mixing of paints on a palette. A little history of watercolor paintingEven primitive people discovered and began to use watercolor natural pigments. They mixed them with water, applied them to the rocks with their fingers, as well as simple tools (sticks, bones). In ancient Egypt, water-soluble dyes were used to create amazing, original paintings on the walls of the palaces of the pharaohs, tombs, religious buildings; during excavations, intricate watercolor drawings depicted on papyrus were found. Watercolor paints were known to masters from Japan and China.
The works were done on silk, as well as on handmade rice paper. The artists of the Far East painted contemplative landscapes in the tradition of their schools, filling the images with literary allusions and calligraphy.
In the 18th and 19th centuries, a classical technique was developed in England, which absorbed all the most important, interesting things, which made it possible to achieve amazing results with the help of watercolors. Watercolor pigments were used in the wash technique, allowing light reflections from the paper surface to be transferred to the canvas.
For centuries, artists have been preparing water-soluble paints for themselves, keeping unique recipes in secret. In watercolor painting, the surface on which the artist works also plays an important role. The texture of the canvas is also an obvious and important factor in the work of real professionals. The texture of the surface of the paper changes under layers of paint, the slippery smoothness of pastels, under the overlay of collages. All these changes need to be felt, caught as if they are a continuation of the artist himself, and directed in the right direction. If you are tired of the usual watercolor and oil - try to paint with acrylics, which combine the properties of both materials. The peculiarity is that the dried paintings are not afraid of water and sun, so they remain forever the way you created them. To master such creativity, use the instructions below. Drawing with acrylic paints for beginners in stagesAcrylic is often used for arts and crafts. It is universal, and unlike watercolor, it allows you to superimpose one layer on another, without the danger of damaging the already applied drawing. The scope for creativity is expanding - you can create any picture. The main thing is to know how to paint with acrylics correctly and take into account all the recommendations for this process. How to use acrylic paints for paintingFor a beginner artist, 6 colors are enough. By learning how to use acrylic, you can expand the palette to 12 or 18 shades. In addition, you will need something on which you can paint with acrylic paints. What to use:
You need to dilute acrylic paints for drawing on a palette with a special solvent or water, adding them little by little to acrylic so that the consistency becomes like watercolor. When applied to the picture one by one such translucent layers, a very interesting effect is obtained. For undiluted acrylic, only synthetic flat and wide brushes are suitable, but you need to paint quickly, because the speed of drying of the paint increases. drawing techniquesBefore painting with acrylic paints, it is worth familiarizing yourself with the techniques in which the paintings are made. Among the main methods of creating canvases are:
How to paint with acrylics
You can paint with acrylic paints on different surfaces, but for each case, a general instruction is suitable, following which it is easy to create a real masterpiece:
On fabricPainting with acrylics on fabric for beginners will be a little more difficult, so it's worth practicing. Of the materials, silk or a cotton surface is more suitable - the pattern will fit better on them and will hold well. Before starting the creative process, the fabric must be prepared - washed, ironed, stretched on a special frame or laid out on a flat and hard surface. Do not forget to separate the front and back of the thing, otherwise the paint can only spoil its appearance - put cardboard or oilcloth. Then use the following instruction:
on canvasFor the first time, it is better to choose a smaller canvas. In addition, you will need a sketch made in a simple pencil. For the basis of the future picture, use ready-made photo drawings or rely on your imagination. On a separate sheet, throw in the options and transfer it to the canvas. Then prepare brushes, a spray bottle with water, a palette and a rag. Start painting from the background and large details, thinking through the combination of shades. To prevent the paint from drying out, use a spray gun - so the transitions between colors will be smoother.
On the paperPaper is better to take thicker, for example, designed for watercolor. Of all materials, it is more economical and suitable for beginners, because it has a shallow embossing, which is easy to apply strokes. You can buy either an album or a folder with individual sheets of any format. You need to prepare a palette, a set of several brushes and water, if you need to dilute the paint. Acrylic paints for drawing are suitable for the simplest ones. If you have already decided on a drawing, then start with a sketch too. Then start working on the background part, using a wide rectangular brush - the movements should be quick so that the paint does not have time to dry. For watercolors, dilute it with water or paint on damp paper, and for oils, use it neat, using a brush with uneven bristles. On glassThe most original is acrylic painting on glass. For this you will need:
The glass painting technique is as follows:
What can be painted with acrylicHaving mastered the technique of drawing with acrylic paints, you can create any kind of picture, whether it is a light landscape with airy clouds or a portrait of a loved one. An individual T-shirt design and even wall painting will be beautiful. Standard waterproof acrylic paints for drawing beautiful patterns on nails can also be used - for example, for a French-style manicure. They are applied directly over shellac. If you are creating children's toys, then acrylic is perfect for drawing eyes on a textile doll.
Video tutorials for drawing with paintsMaterials and even the body are painted with acrylic - the drawings on the skin look very original and bright, so they even perform in various competitions with such works. Such creativity has already a more complex technique and requires a certain experience and diligence. To learn how to use acrylic correctly, watch interesting videos about the stages of drawing a particular picture. On gel polish
Flowers
By numbers
Hello everyone! You really asked me to publish watercolor painting lessons, and I thought for a long time where to find suitable material, because this topic is not new, and there is already a lot of different information on the Internet, so I decided not to invent, but to use the materials of foreign authors. This article is the first, but not the last. I hope you enjoy it and find it useful! This article covers the basics you need to know to get started with watercolor. However, if you keep scratching your head after reading this, then please feel free to ask questions in the comments! I will answer you with pleasure! Before I started writing this article, I decided to do a little research on the Internet on painting watercolor for beginners. That way, I reasoned, I wouldn't miss a single moment and write a better post. But good God.. I've been painting with watercolors all my life, and the information I found on Google stunned me. After three too many overwhelming articles, I threw up my hands and decided that I would show you how I, personally, work with watercolor - and the adjective for my watercolor approach is “simple”. Tools and materialsFirst, I want to talk about the materials and tools that you will need. Of course, the most obvious tool would be a watercolor set. I prefer the set from Greenleaf & Blueberry. It's a little pricey, but I love it! However, if you are just starting out, there is no need to invest in expensive kits.
Finally, you will need clean water and cloth(I use an old dinner napkin) or paper towel to blot the brush.
Any dish will do, I use an old mug. Watercolor transparencyThe great thing about painting with watercolors is that you have complete control over the transparency of the paint. Watch how one color can change depending on the ratio of water and paint on the brush!
The picture on the left shows what a stroke looks like when there is a lot of water and a little paint. In the illustration in the middle, a more equal ratio of water and paint. The right picture has more paint than water. You might be thinking, “That’s all well and good, but how can I control this water/paint ratio?” Before you do anything, apply a drop or two of water directly to the cuvette you plan to use. This will dampen the paint and make it ready to go. Then, you can do one of two things: 1. Use a palette
Apply about five drops of water to the second recess. Again, dip the still wet brush into the watercolor and transfer the color into the water. Be sure to shake the brush so that all the paint comes off it! If this new color is very similar to your first, add more paint.
For the darkest shade, you'll just be working directly with paint from the pan, the shade should be very saturated. 2. We work directly from the watercolor set
MixingThe reason we learned about transparency is the blending and overlaying of colors. With the help of various shades of the same color, you can make any image real. I'm going to show you how to turn a circle into a ball using watercolor blending and transparency: 1. First, draw a circle of the lightest shade.
2. Assume the light is in the upper right side as shown in the picture. Accordingly, the shadow will be in the lower left corner of the circle. To start painting the shadow, take your medium shade with a brush. Draw the shadow as if it is "embracing" the circle in the form of a crescent, like this:
3. You can see that there is now a certain separation between the shadow and the light part. To get rid of this difference and create a smooth transition, you need to mix the colors together - this is an easy task when painting with watercolors! To mix, dip the brush in water to wash any remaining paint off the brush. Dry the brush to make sure all the paint is gone, then wet the bristles of the brush again with water. Then, put the brush on the separation between the shadow and the light part and drag the middle shade with water, it will blur. Soon, you won't be able to tell where the midtone and light ends and where the shadow begins!
4. Now it's time to add a dark shadow to the bottom of the circle. Go with a darker shade around the bottom of the sphere, as in the photo.
5. Mix the dark shade the same way you did with the medium shade, and voila!
6. You can add a drop shadow if you like. To do this, draw a thin line on the opposite side of the light below the sphere, like this:
Then, you need to draw the color with a brush dipped in water until it disappears.
You may find it easier to understand the concept of blending/shading if you watch the video: If you want to practice mixing and shaping more, I would recommend drawing these shapes in different colors:
You could make a sphere green, a cube blue, etc. Drawing shapes like these helps you understand how to make objects look three-dimensional. Yes, it can be a bit boring... but so rewarding! Mixing watercolor To mix watercolor, you definitely need a palette, whether it's built into your kit or standalone. The process of mixing colors is simple: you need to put one color on the palette, and then add another color. Mix them together and you get a new color!
If you have a small selection of colors in a set, knowledge of blending will come in very handy. There are many sources that tell you what colors to mix together to achieve the desired result.
If your mixed color dries up in your palette, don't worry. You can re-wet it and it will be as good as new, no matter how much time has passed. |


| Read: |
|---|
New
- Salad "Krasnaya Polyana" Salad "Krasnaya Polyana"
- Nigiri - sushi recipe at home Nigiri sushi at home
- Harvesting mushrooms for the winter - recipes
- Sweet omelet with semolina
- Egg and milk casserole
- Oven-roasted pumpkin soup Roasted pumpkin soup
- Easter recipe from cottage cheese from our grandmothers
- Salad for the winter with vodka
- Prunes with walnuts in sour cream: gourmet dessert recipes in a hurry
- Talisman tiger - the best defender of the house


