Sections of the site
Editor's Choice:
- Love horoscope for December Aquarius man
- Compatible zodiac signs in marriage Test which zodiac sign are you compatible with?
- Online fortune-telling “Book of Witches Fortune-telling of the old witch
- How does a surname influence a person’s destiny?
- Fried buckwheat. Simple recipes. Crumbled buckwheat with fried onions and carrots Buckwheat with carrots and onions recipe
- Venison stewed with vegetables
- Moist orange cake Recipe for orange cake in the oven
- Fortune telling with Tarot cards for money “Full Cup”
- Dream Interpretation of going blind, why do you dream of going blind in a dream?
- Online fortune telling whether I will get married 18 years old
Advertising
| How to draw a winter forest easily. Winter forest outline of a drawing lesson (middle group) on the topic. What's there outside the window |
|
Already drew +10 I want to draw +10 Thank you + 75 Winter is a very cold time of the year. This is not to say that it is not as beautiful as spring, summer or autumn. Winter has its own characteristics and beauty. Snow-white snowdrifts, crispy snow underfoot and small snowflakes that fall straight from the sky. Well, isn't it lovely? Today we will find ourselves in a village in the winter season. A frozen river, roads covered with snow, small houses standing in the distance, and behind them the silhouettes of a winter forest. This lesson will answer the question of how to draw a winter landscape.
Drawing a winter village landscape
How to draw a simple winter landscape with a pencil step by step 
Drawing a winter landscape with a Christmas tree and a snowman
Drawing a winter landscape with a lake
How to draw a winter forest landscapeEvery season the forest is transformed. In the spring it begins to come to life, covering the trees with young foliage and melting snow. In summer, the forest is fragrant not only with flowers, but with ripe berries. Autumn colors the trees of the forest in various warm colors, and the sun palely warms with its last rays. Winter exposes the branches of trees and covers them with a white blanket of snow, freezing the rivers. It's hard not to convey this beauty in illustrations. Therefore, today we will choose the last season of the year and learn how to draw a winter forest landscape using colored pencils.
How to draw a winter mountain landscape step by stepYou can often see incredibly beautiful mountain landscapes on postcards or find similar ones on the Internet. The stone giants covered with snow are mesmerizing. At their feet stand blue spruce trees, frozen from the cold. And there’s not a soul around, just a blue snow flicker. Is it possible to resist skipping to the lesson and learning how to draw a winter mountain landscape with a pencil step by step? The lesson is perfect for novice artists who will be able to depict this beauty of the icy mountains the first time if they carefully follow the steps.

Snow. It envelops the earth in a soft, sparkling white blanket, and, together with low, thick clouds, creates magical atmosphere. So let's capture some magic with watercolors! For of this project we will need:
First, let's learn how to draw a regular spruce. Step 1Mix the colors of the paints you prepared to get a dark green. Draw a thin and short line, starting from the top of the sheet. This is the top of the tree. Step 2Make some small branches just below the top. Place the brush close to it and move it down and to the side, twisting the ends a little. Keep in mind a triangular image with small bumps along the edges. Step 3Continue drawing the branches, but making them a little longer with each level. Leave some space between levels. Spruce looks much more realistic with small spaces between the branches. Step 4Draw a short, thin line at the bottom of the tree to represent its base. Now let's decide on the shades.Before you start painting the entire forest, you need to make a scale to determine the shades of paint on any unnecessary piece of watercolor paper. This will greatly help to keep the colors consistent in your work. So use this scale when drawing whenever necessary.  To make it, divide a piece of paper into 3 equal sections. Paint the first section with a very light shade. The second is medium, and the third is dark. Let the paint dry. Now you are ready to paint a spruce forest in watercolor.Step 1: Light Blur Using the first and lightest shade from your scale, paint a row of trees. They should be barely visible. Start drawing them near the top edge of the paper and finish somewhere in the bottom third. Step 2: Second, medium wash Using a medium shade, paint another row of trees on top of the first. This row is darker and should displace the previous one. Start drawing them just below the tops of the light spruces, and finish closer to the lower end of the sheet. Step 3: Dark Layer Using the darkest of the shades, draw the next, third line of trees above the previous two, starting it slightly lower than the second. This row is much darker and will stand out a lot. Draw them to the very bottom of the sheet.  Several of these drawings harmonize perfectly. So you can draw a couple more, frame them, and put them together on the shelf. Now you can enjoy the mesmerizing view of the winter forest at home! 
Kurichenkova Elena Valentinovna Winter landscape. Gouache.It’s already December outside, and we have no snow at all. I look at photo reports with beautiful winter landscapes and envy. So I decided to cheer myself up, why not draw winter! Maybe then winter will come to us in Yaroslavl! A drawing then it can be used on speech development classes and to decorate a corner of nature. So I thought and got to work. First I tinted the entire sheet with white gouache. 
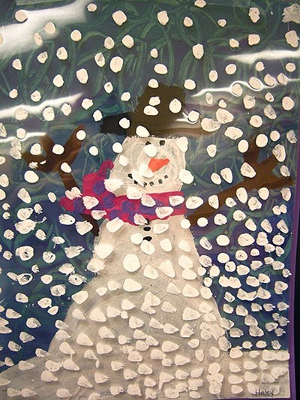
 Now I have outlined the composition. Background and partially foreground. Selecting dark areas on our drawing.  It remains to draw the foreground objects  And now the small details, applied highlights and shadows where necessary.  Bewitched by the invisible The forest slumbers under the fairy tale of sleep, Like a white scarf A pine tree has tied up. Publications on the topic: Summary of a lesson on speech development in the preparatory group “Journey to the Winter Forest” LESSON SUMMARY ON SPEECH DEVELOPMENT IN A PREPARATORY GROUP ON THE TOPIC: “JOURNEY TO THE WINTER FOREST” Starodub Elena Viktorovna teacher. 3D drawing. Master Class. Good afternoon, dear visitors of my page. Today I would like to present to your attention a drawing master class. Hello Dear colleagues, I really liked the technique of drawing on foil and I decided to continue, I present to your attention the master. In this math game You can play alone or with a group of children. Recommended for older children preschool age. for the manufacture of. Dear colleagues, in my work I have encountered the fact that it is very difficult to teach children to maintain proportions in drawing, to focus on. In honor of the 70th anniversary of the Victory, the children decided to make a festive drawing “Victory May” using an unconventional drawing technique called. Today I present to your attention the “Owl” master class. I really wanted to try the “drawing on foil” technique. They turn out extraordinary. Abstract of the educational activity for speech development “Walk in the winter fairy forest” (senior group) Objectives: Learn to select definitions for given words. Expand children's understanding of characteristic features winter,. I found an interesting selection on the Internet. (the most interesting, for me, is at the end)) 1. Winter drawings. "Volume snow paint" If you mix equal amounts of PVA glue and shaving foam, you will get wonderful airy snow paint. She can draw snowflakes, snowmen, polar bears or winter landscapes. For beauty, you can add glitter to the paint. When drawing with such paint, it is better to first outline the contours of the drawing with a simple pencil, and then paint it with paint. After some time, the paint will harden, and you will get a voluminous winter picture.
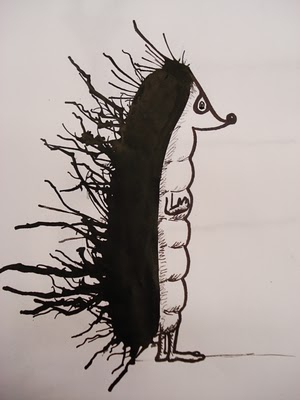
2. Winter drawings of children. Using electrical tape in children's creativity
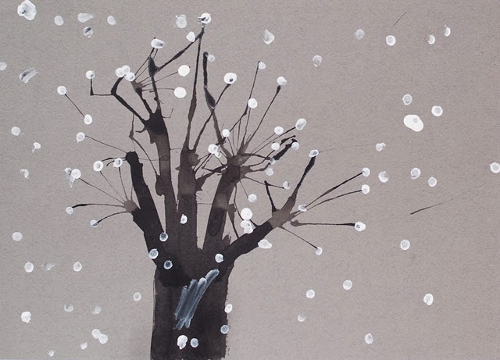
If there is snow outside the window, you can depict it using a cotton swab.
Or use a brush to put snow on each branch.
11. Winter drawings. Drawings on the theme of winter An interesting idea on the topic of children's winter drawings was suggested by the author of the blog Homeschool Creations. She used putty to paint snow on the transparent film. Now it can be applied to any winter pattern or appliqué, simulating falling snow. They put the film on the picture - it started snowing, they removed the film - the snow stopped.
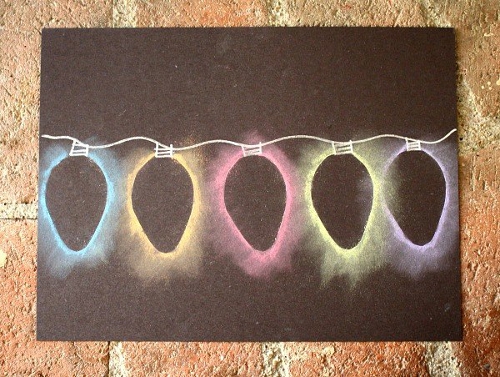
12. Winter drawings. "New Year's lights" We would like to tell you about one interesting unconventional technology drawing. To draw a New Year's garland like in the photo, you will need a sheet of thick paper of a dark color (blue, purple or black). You will also need regular chalk (the kind you use to draw on asphalt or a blackboard) and a light bulb stencil cut out of cardboard. On a piece of paper, use a thin felt-tip pen to draw wires and light bulb sockets. Now apply the light bulb stencil to each socket in turn and outline it boldly with chalk. Then, without removing the stencil, smear the chalk on the paper using a piece of cotton wool or directly with your finger to create rays of light. You can replace chalk with colored pencil graphite chips.
It is not necessary to use a stencil. You can simply paint over the light bulbs with chalk, and then gently rub the chalk in different directions to make rays.
Using this technique, you can also draw a winter city, for example, or the northern lights.
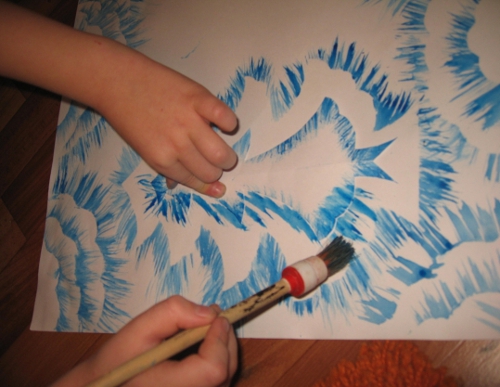
13. Drawings winter's tale. Winter forest drawings On the site already mentioned above Maam.ru you will find interesting master class on drawing winter landscapes using templates. You will only need one base color - blue, a coarse bristle brush and a white drawing sheet. When cutting out templates, use the cutting method from paper folded in half. Look at what a magnificent drawing of a winter forest the author of the painting created. A real winter fairy tale!
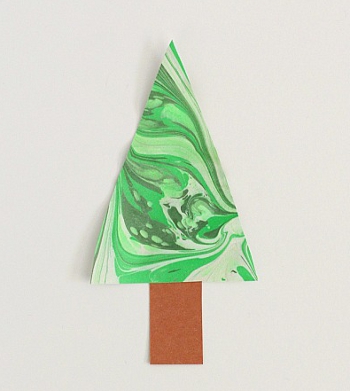
14. Winter drawings. Drawings on the theme of winter You are probably very eager to find out how the wonderful “marble” Christmas tree in the photo below was painted? We'll tell you everything in order...To draw such an original drawing on the theme of winter you will need: Shaving cream (foam)
1. Apply shaving foam to a plate in an even, thick layer. Simply amazing! Underneath the shaving foam you'll find stunning marble patterns. The paint has time to quickly absorb into the paper; you just need to let it dry for a few hours. 15. How to draw winter. How to paint winter with paints Concluding our review article on winter drawings for children, we want to tell you about another interesting way how you can paint winter with paints with your child. To work, you will need any small balls and a plastic cup (or any other cylindrical object with a lid).
Place a piece of colored paper inside the glass. Dip the balls in white paint. Now put them in a glass, close the lid on top and shake well. As a result, you will end up with colored paper with white streaks. Do the same colored paper with white streaks of other colors. From these blanks, cut out the details of the applique on a winter theme.
Material prepared by: Anna Ponomarenko Every 4 seconds, an area of forest equal to a standard football field is cut down around the world. This is statistics. Fastest rate of deforestation in Southeast Asia. The Chinese are multiplying, but they have nowhere to live. So what should I do? We need drawing paper! I want to tell you how to draw a forest with a pencil. This won't restore our fauna, but it's worth a try. Forest Facts:
Let's try to draw. How to draw a forest with a pencil step by stepStep one. Let's start with a simple thing: draw a horizon line, and draw a path with two vertical lines.
Step two. On the sides of the invented path we draw tree trunks, large and small.
Step three. Let's draw the trunks higher and draw their bottoms with a pencil. We’ll also add some grass at the base of the trunks.
Sha is the fourth. Finally, let’s draw the tops with branches and add shadows.
Step five.
|


| Read: |
|---|
Popular:

New
- Compatible zodiac signs in marriage Test which zodiac sign are you compatible with?
- Online fortune-telling “Book of Witches Fortune-telling of the old witch
- How does a surname influence a person’s destiny?
- Fried buckwheat. Simple recipes. Crumbled buckwheat with fried onions and carrots Buckwheat with carrots and onions recipe
- Venison stewed with vegetables
- Moist orange cake Recipe for orange cake in the oven
- Fortune telling with Tarot cards for money “Full Cup”
- Dream Interpretation of going blind, why do you dream of going blind in a dream?
- Online fortune telling whether I will get married 18 years old
- Fortune telling: how to find out what awaits you


