Sections of the site
Editor's Choice:
- How and for how long to cook squid so that it is not tough and tasteless
- Dietary potato casserole with minced meat for children
- Simoron rituals for buying an apartment
- What does tiramisu cake look like?
- Buckwheat porridge recipes
- Affirmations for material well-being
- Oatmeal with milk, how to cook oatmeal with pumpkin (recipe)
- Education and formation of conditioned reflexes
- Organs of flowering plants Presentation on the topic of plant organs
- Presentation on environmental pollution Presentation on environmental pollution
Advertising
| Dry felting three-dimensional paintings of micro animals. Pictures made of wool. Master class on dry felting. Images made from wool: a step-by-step master class for beginners |
|
At first glance, it may seem that such a hobby for modern needlewomen as felting appeared relatively recently. However, what can you say about the fact that about 8,000 years ago people were already practicing making various things from wool? Later, entire workshops began to appear, specializing in working with natural wool. Let's see where anyone can start getting acquainted with this handicraft today. Felting for beginners: master classIt’s too early for beginning needlewomen to make toys or paintings right away. But something simple like jewelry is quite possible. Let's try to do flower brooch. So, For the “Lilies of the Valley” brooch you will need:
Let's get started:


Next decoration - bright summer beads using the felting technique. For them will come in handy:
  Let's get started:


  Materials and tools for felting wool
 wool for felting is varied wool for felting is varied
  Wet felting from wool: techniqueThis technique makes excellent bags, scarves, mittens, slippers. The peculiarity is that It is necessary to use a soap solution in which pieces of wool are placed. At the same time, the wool shrinks significantly, which implies the need for harvesting several times larger than the desired dimensions of the product.  
 
 Dry felting from wool: techniqueA person who has not previously encountered felting should start with dry felting, as it is less labor-intensive. Using this technique you can create the most interesting toys, flowers, beads.   Place a piece of wool on the sponge, and then, using a needle, begin to form a product from this piece - that's all the technology. Please remember that The wool shrinks by about a third, so you will have to stock up on a large amount.
Craftsmen usually start working with thicker needles, and in the process of compacting the material, replace them with thin ones. At the same time, the needles kept perpendicular to the product to avoid breakage. The material must be located on the surface, and not float on weight.  Felting wool toys: master classFirst, let's try to make a cute little sheep using felting. It is made as follows:


  Felting paintingsThe uniqueness of paintings created using felting lies in the fact that the master does not have to be a painter at all. And the result is very similar to watercolor paintings.   There are several techniques:
 
  
The nuances of creating paintings using feltig:
   Felting is an excellent family activity. Wool is absolutely safe unless there are allergic reactions to it. This means that even children can be involved in such an activity, instilling in them hard work, perseverance and a sense of beauty. Improve yourself over and over again with felting! Video: How to buy wool for felting?
Video: Felting, or how to felt a panda?
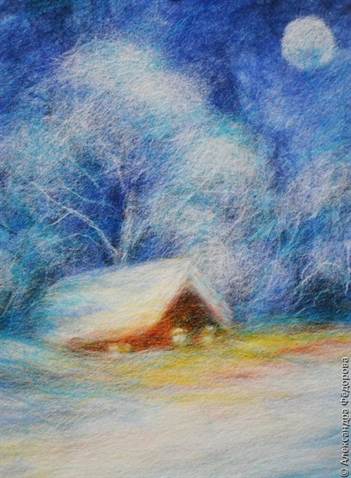
Nowadays a lot of women are engaged in needlework. Cross-stitching, knitting, origami - all this, of course, is very interesting and requires effort and talent, but it has become banal and not so interesting. But felting paintings from wool is definitely an original activity, the paintings turn out simply amazing, they can be a wonderful accessory for decorating your interior or a gift for any occasion. In our article we will tell you everything about this unusual activity. There are two felting techniques - dry and wet, we will try to tell you about both options. Our first lesson will be in the dry felting technique; after each stage of work, the product should be held under glass to secure it; this technique is not used in wet felting. "Winter night"
We bring to your attention a master class that is perfect for beginner needlewomen, because the painting itself is not complicated, and the lesson will be very detailed, with step by step instructions and photos of each stage of work. To work you will need:
We take strands of wool and cover the surface of the base (non-woven backing) with them. We lay out our pieces in different directions, the wool should protrude beyond the base by about two centimeters (a little less is possible). Now cover the craft with glass and cut off the excess pieces.
Now we need to make the background. We lay wool in different shades (from dark to light). Then we put the glass on again and cut off the excess particles.
Since our painting will depict winter, we need to make snowdrifts. To do this, take white wool and lay it horizontally at the bottom of the picture.
Now we take dark blue wool, twist it into small “sausages” and lay out the silhouettes of trees with them.
It’s winter here, our trees need to be “dusted” with snow. We take white yarn, twist it into a “sausage” and lay out snow-covered trees.
Again, we make a tree crown from white wool; to do this, the wool needs to be fluffed up a little.
Now we make a ring out of white or yellow wool and place it on the picture, thus we have outlined the outline of the moon. We cut the wool into small pieces and fill our moon. Now we “build” a house from brown and dark brown wool. The wall located on the side of the moon should be lighter; this should be taken into account when working.
Now we make dense pieces of white wool and make the roof of our house from them. The edges should be smooth and crisp; it is best to trim them with scissors.
The lower part of the house needs to be covered with “drifts”; it is not worth mentioning what color yarn we make them from.
Now we make windows and a door from yellow or white wool.
Now let's give our picture even more realism by adding light pouring from the windows. We make shimmers from orange wool, yellow color. You can use tweezers to drape white and yellow wool over the house.
Our painting “Winter Night” is finished. Now place it in a beautiful frame under glass and you can safely hang it on the wall or give it to family or friends.
We invite you to look at some other paintings, perhaps you will gain new ideas or be inspired to create a new masterpiece.
Wet felting
As noted above, there is another technique for creating paintings from wool - wet felting. It is a little more complicated in its execution, but the resulting paintings are no worse, unusual and beautiful.
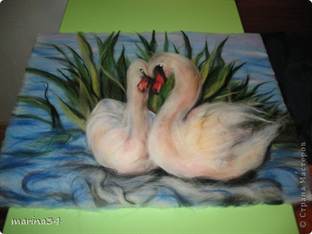
We invite you to look very interesting view eo-lesson from which you will learn how to make a three-dimensional picture with cats. The master class is very detailed, every action is explained accessible language, the instructions will be clear to both beginning needlewomen and experienced girls who have been familiar with the technique for a long time wet felting. This work will be a little more complicated, but no less interesting and exciting.
Video on the topic of the articleNow you can proudly call yourself an experienced felter. As you can see, this work is painstaking, but it is addictive, and what beautiful paintings come out. Of course, it is very important to choose the right sketch, drawing that you want to immortalize in an unusual way. We invite you to familiarize yourself with the materials in this video collection, thanks to which you will be able to consolidate your acquired knowledge and acquire new interesting ideas.
If you like to draw and generally do things with your own hands, it's time to try an interesting form of art - felting wool paintings. Having learned this simple type of needlework, you will be able to decorate the interior with it, as well as present your work as a gift. We felt a picture of wool ourselvesThe first thing you need to learn is that even an untrained person can do felting. All that is required is enthusiasm and a small set for this activity:
Having prepared everything you need, you can start working.
Since we are just learning how to create wool paintings, here are some tips for dry felting wool paintings for beginners. 
Ready felting kitsNowadays all kinds of craft stores offer various options ready-made sets. The set for felting wool paintings includes:
Prices vary depending on the complexity of the work and size. The simplest sets can be purchased from 2,000 thousand rubles. Experiment, create and enjoy the result! Wool is an ordinary material, but in skillful hands it turns into a real work of art - a landscape or still life. Felting is a process by which air felt becomes dense. In this article we will tell you how to make wool paintings for beginners. Only natural fabric has the ability to fray: the fibers adhere to each other due to their scaly structure. Anyone can learn the skill. Images made from wool: a step-by-step master class for beginnersFirst you need to buy a frame from a craft store, prepare it and disassemble it. Separate the wooden backing from it - the future basis for the fluffy canvas. Using a stapler and several paper clips, place a special napkin on the tree to secure the material. Take pre-prepared wool of any color you like. You need to start felting from the background, and then lay out small elements on the finished base. Take a small skein and wind it around forefinger. Using tweezers, pluck the desired strands. Use a colorless glue stick to mark the places where the wool pieces will be glued. Carefully attach colored plucked skeins for the background. You can make a gray base for them. Try to ensure that its edges extend a few centimeters beyond the wooden backing. When creating the background, be sure to follow the “dark to light” principle. Cover the borders of the frame with blue or black wool. Gradually approaching the center of the still life or landscape, add light strands. After the background will be finished, iron the painting with reverse side. To avoid damaging fragile elements, place a sheet of paper or thin cloth under the iron. This will help secure the wool fibers. Start laying out the main elements of the drawing using the method described above. After creating each one, iron the design on the reverse side. When the image is finished, trim it with nail scissors. Before hiding the object of your creativity under glass, iron the landscape again. After such instructions, the question of how to make a picture from felted wool with your own hands will not arise.
Types of feltingThe technology can use sheep fur, as well as alpaca, camel, llama, or even cashmere, angora and mohair. There are two main types of creating such images. Dry feltingThis method was invented not so long ago. Even in the last century, most pictures were made from wet material. This is not surprising: for the dry version you need large quantity time. But the image turns out clearer and has defined contours. For the base you need a wooden backing from a finished frame. A napkin made of synthetics is suitable as a background. If you plan to knit it yourself, be sure to wash it before working on the picture. Select a delicate wash cycle of 50 degrees and a spin force of about 400. This is necessary so that the materials shrink a little and no gaps or debris appear in them. You can also use sticky non-woven fabric as a base. For ease of use, attach the canvas to a soft pillow with artificial filler. Start laying out the main background elements. Manipulate fiber density to create translucent clouds and bright blue skies. Sometimes it makes more sense to lay out the composition on a colored napkin. Create one small element and secure it with a crown needle. Use a thin blade to pierce the wool in the felting areas, trying to pull the fibers through the fabric. If we're talking about For a large painting with many elements, you can purchase a four-needle tool. Attach the finished image tightly to the prepared wooden base. Please review it carefully for any defects. If you notice an empty space, attach a piece of patch that matches the color and attach it with a needle. Wet feltingTo create such a painting from wool, you will need to follow the following steps step by step:
What tools are neededYou can buy a simple picture frame at a hardware store. Use standard size. Wooden frames with a noble natural shade look good with such pictures. If you can’t buy these, buy regular plastic and coat it with varnish. For dry felting you will need a small non-woven napkin. You can buy it at a handicraft store in your city. If you don’t have this material at hand, you can use regular felt or flannel. The main requirement is that the fabric used must be fleecy and sticky. In stores you can find so-called combed tape or tops. It is most often used for laying out paintings. All fibers used have already been combed out and arranged into neat bundles. This type of wool is suitable for both the base and the background. The background can also be laid out using carding. Unlike combed tape, the fibers here do not look very neat. Most often they are sold in the form of runes or regular skeins. They help create artificial chaos. Suitable for creating snowdrifts and skies. For the base, the top layer of the background, a sliver is used. This is the same tape, but pre-cleaned. It is light, but not bleached and has no coloring. In addition, you will need thin tweezers. This tool is needed for working with small parts. Sharp nail scissors are used to straighten the painting. In order not to look for materials yourself, you can purchase a set of tools on the Tovarika trading platform in the “Hobbies and Creativity” section.
DIY wool watercolorUsing felting you can create a charming watercolor landscape. Unfortunately, you rarely get a perfect image the first time, but if you are already an experienced artist, you can safely take on this technique. Take a wooden base, preferably attached to the frame with a clip. Wet it with a non-concentrated soap solution to help the fur adhere better to the background. Take some tapes blue color. You can combine fibers of blue, white and scarlet. If you skillfully combine the palette, you can achieve a delicate shade of the winter sky. Lay the strands first from top to bottom, then from bottom to top, forming a dense sky. In the upper right corner, make a small oval using light yellow. Using tweezers, add a few bluish fibers to the improvised sun to make the contours fuzzy. Using the already described technique of perpendicular lines, create snow. For this you can use white or untreated wool. Use fibers to create an uneven structure, trying to imitate snowdrifts. Take the brown material and twist it into thin ropes. Outline the outlines of the bare winter trees. Cut the fibers with scissors and scatter the snow on the branches. Place small pellets of red rowan on top. Cover the finished work with varnish. This image looks simply amazing. All your friends will be delighted to see this beautiful and delicate craft. The Color World of Bright Ideas company creates a video featuring amazing paintings made from wool.
Wool painting: how to create a flowerUsing a soft and pleasant-to-touch material, you can make not only picturesque landscape, but also beautiful flower. Take a traditional solid base and glue it with non-woven fabric. Prepare colored skeins of mostly pastel shades. Use the pulling technique to extract a few fibers for the background. To make the image organic, use yellow, light green, lapis lazuli, lilac, blue and orange. In the center of the picture, select a place for a vase of flowers. Place the fibers so that they extend from the composition to the edges. Using light plucked wool, create a halo of a white vase. Try to make the element dense and clear, form boundaries. The flower jar should stand out from the background. Pull dark green, light and black material. Place some dark fibers in the center of the intended bouquet. Try to lighten and blur the edges. Form a chaotic sequence of stems. Use flagella to make single solid rods. Cut the white hairs into thin flagella. From them form the petals of future daisies. Add raised blades of grass with greenish centers to make the bouquet look natural. Use yellow fibers to make flower cores. You can lay out a thin cobweb of a bluish or greenish tint. Complete the flowers with details, focusing on your imagination and vision of beauty.
In the production of such work, a simple technique of felting wool paintings is used. Easy DIY landscapeUsing felting, you can create a picturesque landscape reminiscent of the beauty of golden autumn. But keep in mind that you will have to try hard to convey the naturalness of nature. Despite the fact that the lesson is designed for beginners, it is better to practice on still lifes and animals before it. We will tell you how to make such an image step by step.
Such a simple painting with wool will delight you in cold weather. winter evenings, reminiscent of a bygone golden age. Work examplesSkilled hands can paint extraordinary images of various subjects. This could be a bouquet of spring daisies.
But it’s not only daisies that receive the attention of craftswomen. You can also find your charm in sunflowers. The symbols of the passing summer always look towards the sun, trying to warm themselves under the last rays.
Poppies are no less popular. In August, when the golden rye is earing, scarlet inflorescences appear in the steppes. It is believed that the poppy field is one of the brightest. And with the help of the picture you can feel the unique steppe atmosphere.
Paintings using the dry felting technique show not only flowers. A striking example is in the image below. The red pet is very curious, he can’t help but pay attention to the little ladybug.
Artists often take wild animals as characters.
By skillfully combining various techniques, you can create a peaceful winter landscape. The blizzard subsided, revealing to us the rickety roofs of the houses. Dark light pours from the windows, and a thin haze curls from the chimney.
One of the most simple pictures for beginners - sunset over the sea. The surface of the water is painted in indescribable shades, which can only be replicated by mixing different fibers.
In this article, we told you how to make easy paintings from wool for beginners, and provided several photos of the work. It's quite simple, and even Small child. But to achieve the desired effect, you will have to learn.
To make the painting you will need:
Let's disassemble the frame. We put the clamps aside (they will be needed at the very end of the work. We put a backing on the hardboard (fibreboard) - non-woven fabric. It is designed to “hold” the wool fibers on itself. The working surface is ready!
We lay sliver (undyed, unbleached wool) on the prepared surface, evenly filling the entire area in any direction. At the same time, we pull the fibers from the wool tape in the form of wide thin strands (as shown in the photo Step 3) This stage is necessary to form the base layer of the painting, as well as to “feel” the wool (in my latest works, I do not use a sliver, I immediately lay out colored wool)
This method of working with wool is called "pulling". Indeed, it turns out that we pull wool fibers from a combed ribbon, which we hold in one hand, with the fingers of the other hand, forming thin strands. To make it more clear, I show it on dark wool.
Having laid out work surface layer of sliver, we begin to form the background of the picture. At the same time, we use another method of working with wool - “pinching” (see step 5)
The method of “pinching” wool is implemented as follows: we take in one hand a combed ribbon of the color we need, and in this case we take exactly the fold of the ribbon (see photo); With the fingers of the other hand, we pinch the surface hairs of the tape with frequent quick movements. A fluffy ball forms in our hands, which we lay out on the work surface.
Go With blue and blue wool we form the background (background) of the picture. We also use the pinching method.
We continue to draw the background. Using white wool, we highlight the middle of the picture, creating something like a haze.
Using the pulling method, we form strands from which we make snowdrifts. We use white and blue wool.
Using white wool we determine the place for the moon. It will be a halo of light emanating from it.
We add strands of yellow wool here and there to make the moonlight warm. We form the moon itself by cutting white wool. Those. We take a strand of wool and cut it thin enough so that the length of the hairs is 2-3mm. And place the resulting fluff onto the picture with tweezers, forming a circle.
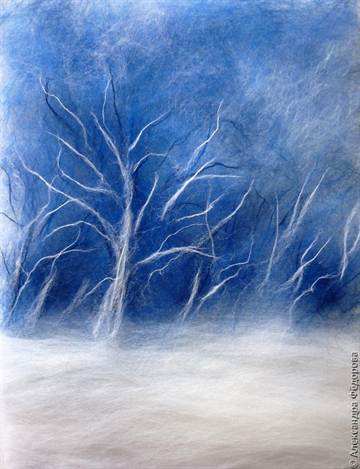
Using white wool we draw trees in the distance. At the same time, we cut the wool directly onto the picture, and use tweezers to correct what is “wrong.”
Fill the horizon with a forest of white snow-covered trees, as described in step 11.
Let's make the picture "warmer" by adding yellow wool to the snow.
Use brown wool to draw the frame of the house (you can “cut” the brown wool or roll a strand of wool into a ball and lay it on the surface). Use yellow wool to draw a window. White wool will help give our house a finished look - let's draw a snowy roof and a snowdrift at the base of the house.
We connect wool of dark green, blue and Brown, then we cut this strand into the picture, forming a Christmas tree. (a non-uniform color of the tree is preferable - it looks more natural).
Use white wool to draw snow on the Christmas tree, using the same technique as in the previous step.
We draw tree trunks with brown wool. To do this, pull out thin long strands and twist them slightly. We draw branches in the same way.
Using white wool we will make highlights on the trees.
We cut the white wool and place the fluff on tree branches. I tried to depict young pines covered with snow.
To the left of the moon we will draw a couple of trees. We form trunks and branches by twisting thin strands of brown wool, you can add a little white (highlight).
Use white wool to draw snowy branches. It is better to cut the wool directly onto the picture, forming the desired shape with tweezers.
Using yellow wool we will make a “moon path” in the snow, it should be quite “blurry”, and we will also make the moon, one side of the Christmas tree and the crown of the pine trees a little yellower.
We cover the finished picture with glass (be sure to clean the glass before doing this; for example, I use napkins to clean displays). We clamp with clamps glass and hardboard with wool painting between them, trim off the excess hair protruding along the edges. And this, in fact, is the picture already under glass (it somehow appears brighter under it):
|


New
- Dietary potato casserole with minced meat for children
- Simoron rituals for buying an apartment
- What does tiramisu cake look like?
- Buckwheat porridge recipes
- Affirmations for material well-being
- Oatmeal with milk, how to cook oatmeal with pumpkin (recipe)
- Education and formation of conditioned reflexes
- Organs of flowering plants Presentation on the topic of plant organs
- Presentation on environmental pollution Presentation on environmental pollution
- Biology quiz presentation for a biology lesson (8th grade) on the topic Biology riddles


