Sections of the site
Editor's Choice:
- How and for how long to cook squid so that it is not tough and tasteless
- Dietary potato casserole with minced meat for children
- Simoron rituals for buying an apartment
- What does tiramisu cake look like?
- Buckwheat porridge recipes
- Affirmations for material well-being
- Oatmeal with milk, how to cook oatmeal with pumpkin (recipe)
- Education and formation of conditioned reflexes
- Organs of flowering plants Presentation on the topic of plant organs
- Presentation on environmental pollution Presentation on environmental pollution
Advertising
| Paintings by numbers: why and who needs them. Paintings - coloring by numbers Creating paintings by numbers |
|
Do you want to feel like real artists and paint their famous masterpieces? Then you need to familiarize yourself with how to paint pictures by numbers. How to draw paintings by numbers on canvas?
Do you want to feel like real artists? Then you need to buy a painting by numbers template, but it’s easier and cheaper to download it. For beginners, it is better to color the outlines of larger objects for the first time. The following example is perfect for this. So that you will soon see juicy strawberries with emerald leaves and white flowers, then we suggest downloading the following diagram for such a picture by number.
In the background there is a chicken, which is watching the harvest or trying to drive away the pest so that it does not eat the berries. But the snail cleverly hides in the foreground, away from the hen. It’s not at all difficult to complete such paintings by numbers. As you can see, the palette is presented on the right, each shade is assigned a number. So:
At the beginning of creativity, you can use the most different colors: gouache, acrylic, watercolor. Even colored pencils and markers will do.
Subsequently, you can draw pictures where several colors are used, each of them is indicated by a specific number. To get darker or lighter shades, mix two colors at a time. So, to turn green into light green, you need to add white to it. Red will turn pink if you add a little scarlet to white. These issues also need to be addressed when creating such masterpieces. To make the colors more saturated, wait until the first layer dries and apply the second one. If you want to buy a painting by numbers, then pay attention to the level of difficulty, it is indicated by asterisks. The more there are, the more colors you will have to use and the higher the complexity. Usually there are from 1 to 5 stars. What paints, brushes, finishes to choose for paintings by numbers?About paintAcrylic paints are an excellent option for creating such artistic masterpieces. The intermediate layer will dry in just a couple of minutes. Once you have used the paint, seal it well enough and it will keep for several months. If you are putting off starting creative process, you bought paint in a can but didn’t open it, don’t worry, it can be stored in this form for several years. But keep in mind that acrylic paint, if it has dried, cannot be diluted with anything. Therefore, after opening the container, it must be closed very well. If there is a dried layer on the lid of the jar or on its edges, remove it, and only then tightly seal the container so that the seal is not broken. As mentioned above, it is better to first cover the fragments of the picture with paint of the same tone. This is due not only to the convenience of painting, but also to the fact that then you will not have to open a jar of paint of a certain color several times, which will significantly extend the shelf life.
About brushesIt is important to choose the right brush. If you need to paint a large area, then use a flat one. If it is necessary to draw individual parts, in this case, take round brushes. To ensure that the paints are the desired shade, rinse the brush well in water after using a certain color, then blot it with a napkin. If this is not done, water may get into the already applied paint and change its tone. It is necessary to wash the brush every 5-7 minutes if you paint with one color for more than this time. For those who like to drink a cup of tea or coffee during a break from creating their masterpiece, the following recommendation: before you go to relax this way, rinse your brush, otherwise the paint will dry out and the painting tool may become unusable. At the end of the work, this also needs to be done, wipe off excess water, dry the brushes well, then they will last you a long time. How to draw color by number paintings
For beginners, it is better to use cardboard, it is cheaper than canvas. It has less grain, making it easier for beginners to create their first masterpieces. It is a cheaper material than canvas. To make a picture on cardboard look complete, it needs to be framed. To do this, you can take a photo frame, which is relatively inexpensive. A canvas requires a more expensive frame and the canvas itself costs more than cardboard, but if it is already stretched on a stretcher, then it is not in danger of deforming due to moisture, like a painting with a base on cardboard, if it is not framed. When you become more experienced in this craft, you will be able to draw on canvas and feel like a real artist.
The following recommendations will help the painting remain in great shape for a long time.
Examples of paintings by numbers on cardboardTo paint by numbers, take:
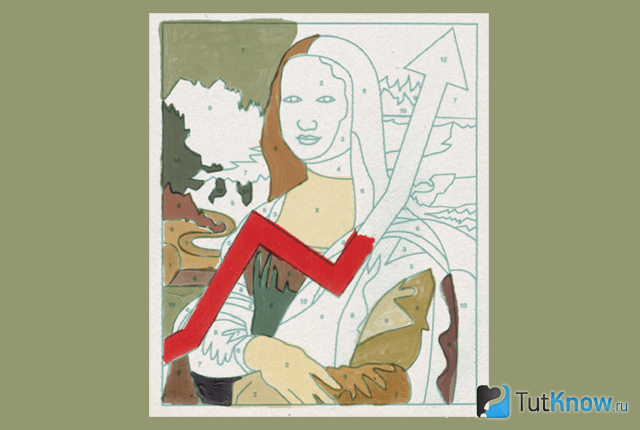
Of course, to make a masterpiece look like the original, you need to practice for a long time. There are many shades used in such art, so these paintings are quite challenging for beginners. They can be advised to use a more simplified version, for example, this one.
This Mona Lisa portrait idea uses fewer colors, so it will be easier for you to replicate such a masterpiece. If those who come to your house have a good sense of humor, then you can do work on such a topic to make them smile. In this case, you don’t need to try very hard to convey the features of Gioconda. This person will become a parody of famous painting Leonardo da Vinci.
If you still want to draw a picture by numbers so that it is as close as possible to the original, then you need to print a thematic image with numbers arranged. Then, relying on it, gradually paint your masterpiece.
Start with the background, use sand and shades of green here. The heroine's hair is black, her robe is dark brown. The face, hands and area from the neck to décolleté are painted with flesh-colored paint. To make it, you need to take white, yellow and a little brown paint. After it has dried, coat the work with varnish and frame it. If you like village landscapes, cozy houses that look like fairy tales, then for the next paint-by-numbers picture, use the proposed plot.
Anyone who loves animals will probably like the next one.
If you are interested in this type of needlework, then watch the intricacies of creating works included in the video. From the first one you will learn how to draw pictures by numbers to depict your parents or other loved ones here. The plot shows the intricacies of such work and what is required for this. So that you also enjoy the process and result of creating a painting by numbers " Golden autumn", watch another video.
This is a picture with a specific image, which is pre-divided into numbered zones, each of which should be painted with the paints included in the set. By painting all the numbered zones one by one with the colors corresponding to them, you get a finished image that will look like a real masterpiece of a professional artist. After drying, the picture can be placed in a frame and decorated with any interior, or presented as a gift to friends. Surprisingly, Leonardo Da Vinci himself used the paint-by-numbers method; his students painted numbered areas on the sketches he drew. The Paint by Numbers kit includes:
1. Before you start coloring pictures by numbers, choose a comfortable and well-lit place to work. 2. In addition to the coloring set, prepare:
3. Depending on the manufacturer, the paint jars may either already be numbered, or the kit contains a set of stickers for the lids of the paint jars, which should be applied to them before painting. If the set includes 2 jars of the same color, then you can use a permanent marker or pen to mark the second jar; for convenience, you can duplicate the numbers on the side of the jars. 4. Before starting work, prepare paints for painting.
5. Open cans of paint carefully, without using force, otherwise you may damage it, break it, or spill some of the paint. 6. After opening the jar, inside lids may not remain a large number of paint, which should be removed back into the jar with a brush. After this, thoroughly stir the paint with a toothpick. 7.
Before you start painting, you need to adjust the viscosity of the paints. If the paint is too thick, it must be thinned with water by adding water using a brush. There is no need to try to make the paints too liquid, otherwise they will become too transparent and will not be able to paint over the outline on the coloring page.
8. Work with the brush correctly! The brush should be held like a pen. And the picture must be positioned so that it is convenient to color it. 9. Try to dip only the tip of the brush into the paint, and not the entire brush. 10.
Be patient! Paint with the tip of the brush without bevelling it to paint the area faster. Do not press the brush too hard, use gentle pressure to glide it easily across the canvas.
11. The sets, as a rule, come with brushes with a small base diameter for easy painting of small areas of the picture. Painting large areas with a small brush is not always convenient, so if you have larger diameter brushes, you can use them. 12.
Rinse your brush thoroughly before you are ready to take a different color so that the paints in the jars do not mix, because even the smallest drop of dark paint will turn a light color into a completely different shade. If you accidentally stain light paint, carefully remove the dark shade from the surface of the paint using a cotton swab.
13. Do not try to put a lot of paint on the brush; it is better to dip the brush into the paint a little and more often than to drop a drop of paint on the drawing, thereby ruining it. If you do accidentally drop paint on your drawing, you can carefully wash off the drop with water, removing the excess with a dry sponge. 14.
After drying, the picture will acquire a slight gloss. In order to “extend the life” of your creation, you can optionally coat it with varnish, which can be purchased at any art store. You can choose 2 types of varnish: glossy - will enhance the brightness of colors, or matte - will remove glare.
15. To preserve the effect of the painting, you should not place it under glass, just frame it. Do not forget that you need to look at the picture and evaluate it from a distance of about 2-3 meters. If you think that only artists can draw, then you are mistaken. Holding a brush in your hands and moving it over the host is very popular even for those who do not know all the intricacies of this art. Using paint-by-numbers kits, even schoolchildren can become real artists. Have you bought a painting and can’t wait to start working on it? Absolutely right, there is no need to put off creativity for later. The handmade market is regularly replenished with new products, offering needlewomen more chances to realize their talents and hidden capabilities. Craftswomen who have experience in drawing note that the choice of a picture and the technique of coloring it plays an important role in the drawing process. Before you start coloring by numbers, learn 6 simple but important points that will help you draw a real hand-made masterpiece!
Drawing pictures by numbers is by no means an activity only for children. Did you know that students of Leonardo da Vinci himself used this technique? Yes Yes! The apprentices painted over fragments of Leonardo's works based on the sketches he made. Therefore, not much, not little, you join in truly high art. Which deserves nothing but praise. Any creativity can paint the world with bright colors, and when it comes to drawing, then it’s up to you to paint everything around. And what color your today or tomorrow’s mood will be depends only on you! Pick up a brush and start painting!
Tip No. 1. How to paint with acrylic paints Basics of working with acrylic paints Brief technical information: Acrylic is a paint consisting of three main components. Pigment, synthetic binder (acrylic polymer emulsion) and water. The latter is especially important for us. Acrylic paint dries as soon as the water evaporates from it. That is why it is difficult to adapt to them at first - they dry very quickly both in work and on the palette. It is worth remembering that acrylic paint becomes darker as it dries. Tools and materials Acrylic paints can be found in jars and tubes. One of the advantages of acrylic is that in combination with it you can use a huge number of additional artistic means. It’s worth stopping here and talking about one more thing. important point- fresh acrylic is easily removed with water. Dried paint requires solvents (! After working with acrylic, rinse your brushes thoroughly with water! Acrylic that has dried in a brush can ruin the brush forever!). Keep your paint in working condition. Since acrylic paint dries very quickly, squeeze it out of the tube a little at a time. If you use a regular plastic palette, buy a spray bottle to spray water onto the paint, dampening it. Brushes. Wipe the brush. Important properties. Generalization and something new. And so, we have already said that acrylic paint dries very quickly. And this is its big advantage. Beginning of work Choose a good location. As with most things, drawing is best done in natural light. Sit near an open window or in a room with plenty of natural light. You'll be able to see little nuances in your brush strokes and colors that you wouldn't be able to see in other lighting. Lay out all your materials.Every artist has a different approach to organizing their materials, but it's best to arrange them as you see fit before you begin. Fill the jars with water, take out the brushes and paints you want to use, and place your palette in the perfect spot. You may also want to wear a robe or an old shirt. Find a light source. Color changes depending on how the light hits it, so before you start painting, determine the position of the main light source. Pay attention to this throughout the drawing process. You should use lighter colors near the light source and darker colors away from it. This may seem basic, but identifying your light source before you start will help your flowers sit as they should. Shutdown Cover the picture with a layer of varnish. Although it is not necessary, many artists choose to coat the painting with a layer of varnish to seal the acrylic paints. This helps the paint chemically bond with the canvas and better protects the paint from damage. Clean your brushes and work area. Be sure to wash your brushes immediately after finishing using them. Acrylic paint can seriously damage and ruin brushes if left to dry on the bristles. Wash the bristles of your brushes with soap and water cold water until the water runs clear (warm/hot water will set the paint on the brushes). Wipe off any paint from your workbench and wash out your water cans. Save any unused paint.Acrylic paint can last for several months in a tightly sealed container, so if you have any left over, save it for later. Leave the painting to dry.Place the painting somewhere where it can dry in 1-2 days. Acrylic paints have a very a short time drying, but they must be placed where they will not be disturbed so that they can dry properly. Purpose of brushes: 1.FLAT BRUSH WITH STANDARD EXHIBITION Combines hairs of different lengths for the best maneuverability: make bold strokes with the wide part of the brush and thin strokes with the edge of the brush. FLAT FRUMINATED BRUSH Used for precise strokes, as well as for serpentine lines and curves. HAZEL SHAPE BRUSHIt has the advantages of both a flat and a round brush. Great choice for better color mixing. SCHLEPPERBrush for long straight lines. Long pile allows you to hold a large amount of paint. Simply hold the brush without pressure, almost perpendicular to the surface, and allow the paint to flow onto the paper. Tip #2. By coloring pictures by numbersSo, in front of you is an open set of paint-by-numbers coloring books and you can’t wait to start creating your masterpiece. The tips below will help you draw a picture in such a way that you can be proud of your work, and after finishing painting you will hardly be able to guess that the picture was painted using this method (by numbers). Of course, in this article it is impossible to tell and describe all the nuances that exist, since painting is a real art. We simply tried to summarize the practical drawing experience we have already accumulated along with the recommendations of various manufacturers and present it in the most accessible form. INTRODUCED THE DRAWING SEQUENCE Preparing paints Before you start painting, you need to carefully prepare your paints. They do not require any mixing of paints to obtain the desired shade and effect: everything is already completely prepared and numbered, since the manufacturer took care of this in advance! In our paint sets, the paints are perfectly matched to the color scheme and are presented in the right quantities so that your future masterpiece is guaranteed to be similar to the original, and maybe even better. Everything depends on you! pay attention to numbering of paints in containers When painting by numbers, it is extremely important that the numbers on the containers match the numbers on the canvas. Some plots involve the use of several containers with the same color of paint, respectively, these paints have the same number. Therefore, the numbering sequence is as follows:
Opening bottles Open bottles of paint carefully, without using force - this may damage the bottle. To prevent paint from drying out, always open only those paints that you really need at the moment. Drawing For convenience, place the following items near you: an image of the finished painting, paints, a brush, a canvas with an outline, a control sheet, a glass of water, a piece of cloth and matches for stirring the paints. It is better to choose a place with good lighting. Outline large surfaces first with a thin brush, and then paint over the surfaces with a thicker brush. Make sure you paint over contour lines. It is considered normal if dark paint covers better than light paint. If the outlines or numbers show through, apply paint to them several times. How to hold a brush Hold the brush like a pen. For stability, place your hand on the surface and rotate the picture so that its location is convenient for you. Drawing order There is no single approach to the order of painting. There are several drawing techniques: 1)You can draw a picture using the “line by line” method, from the top edge of the picture to the bottom. 2)However, you can achieve better results if you paint using the "background to foreground" method, first painting the objects in the background and then the ones in the foreground. For example, you are drawing a landscape. In this case, the drawing order is as follows: 1. sky, 2. clouds, 3. meadow, 4. trees, 5. leaves, 6. flowers. Sometimes the question may also arise: should I paint a picture by numbers or by colors? Empirically and experimentally (Attention: such conclusions were made by “practitioners” and are not official recommendations of the manufacturer), some users identified two options: 1) In the sequence of numbering of paints in the set:
2) In sequence from lighter shades and colors to more saturated and dark ones. This is due to the fact that if there is an error in coloring, it is much more difficult to paint dark segments with light paint than it is to paint light segments with dark paint. In other words, in order to paint a dark segment with white paint, you need more layers and vice versa: you can paint a light segment with dark paint in one layer, i.e. much easier. As you can see, there are many variations and interpretations of the paint by number technique. Various combinations and alternations of techniques and methods are also possible, which provides us with an endless number of options. In other words, you are absolutely not limited by anything except your imagination, desires and skills. You shouldn’t get hung up on anything: you need to draw in a way that is convenient, pleasant and comfortable for you. Just start drawing a picture and in the process you will understand which technique and method of drawing is most pleasant and convenient for you. For a perfect image of the finished painting paint over unpainted areas and visible numbers. As in art galleries, you need to look at the picture and evaluate it from a distance of 2-3 meters. Notes to skilled artists The painting effect can be enhanced by applying different thicknesses of paint. To do this, apply the remaining paint in a thick layer to the elements of the picture that you would like to highlight. This will give the picture a relief effect. Varnishing Acrylic paints, after drying, acquire a light gloss and beautiful appearance. The surface of the painting can be wiped with a slightly damp cloth. No additional care required. If desired, a week after the painting has dried, you can coat its surface with a special varnish for paintings. Glossy varnish will enhance the brightness of the colors, and matte varnish will remove glare. Varnish can be purchased in special stores for artists and craftsmen. Frame By placing the picture in an appropriate beautiful frame, it will become a real masterpiece! To preserve the effect of the painting, you do not need to place it under glass. You can decorate your painting with a regular frame from self-service stores, or an elegant frame from specialty stores or galleries. RULE FOR USING PAINTS To paint without problems, you must follow the rules for using paints. This is extremely important! Therefore, we ask you to carefully read the following rules and follow the drawing instructions. Important: Once the paint cans are opened, the paint has a limited shelf life! Rule 1 Open paint cans just before you start painting. It is very difficult to package quick-drying paints in such a small volume (about 3ml) so that they can be stored in a store long time. MENGLEI's latest generation of paint cans fulfill this requirement. However, once they have been opened, the paint may dry out. Therefore, the amateur artist should complete the painting as soon as possible after opening the paint cans Rule 2 Using a brush, remove any stuck paint from the lid back into the jar. Boxes in a store or warehouse could be stored vertically. Therefore, when opening the jar, some paint may be on the lid. Rule 3 Despite the fact that paint containers are tightly closed and are specially designed to preserve all the properties of the paint, the paint in them may thicken slightly during storage, for example, due to temperature changes. To “revive” paints and use them again, simply add a couple of drops of water to them and stir thoroughly. The paints are ready to use again! Rule 4 Once the paint cans have been opened, try to complete the painting without taking long breaks. After opening the jars for the first time, there is a possibility that the paints may dry out. Therefore, after opening paint cans, try to use them within a maximum of 12 weeks. Rule 5 If you want to take a break from working, close the containers tightly, first removing traces of liquid or already dried paint from the lid itself, from the edges of the lid and the sealing grooves of the lid.
In Figure AThe container is airtight because the edges of the container fit smoothly into the clean sealing grooves in the lid. The lid fits tightly to the edges of the jar. In Figure B improperly closed jar. It can be seen that the remaining paint prevents the lid from closing tightly. Therefore, air entering the container dries out the paint. Therefore, clean each jar thoroughly before sealing it. Remove any remaining paint from the edge of the container with your fingernail or rag, and the round sealing grooves with a toothpick or large needle. Before closing the jar, make sure its rims and lid are clean.
Rule 6 If you plan to take a break from painting for a few weeks, tightly seal the paint pots as described above, then wrap them in a damp cloth and place them in plastic bag or in a plastic box. This will help protect the paints from drying out. However, this cannot guarantee that already opened paints will remain ready for use and retain their properties for many months or years. Rule 7 After each break in painting, the viscosity of the paints should be slightly adjusted to ensure proper application. Basically, when painting by numbers, acrylic paints are used. They are very popular in the art community because of their versatility. Suitable for beginners and professionals alike, ideal for learning a new technique or expanding your creativity. The texture is very similar to oil paints. A good result requires little patience or accuracy; the manufacturer also plays a big role. The quality of the paint is important outline drawings should be, on the one hand, clear and easy to read, on the other hand, invisible under a layer of paint. Special paper or canvas on which the paint will (or will not) adhere well. 1. Acrylic is a quick-drying paint. If you are not going to draw now, do not open the cans. Their original packaging allows them to be stored for an almost unlimited period of time, but after opening their service life is significantly reduced. If you have never tried this type of creativity, buy a small painting, since first you will need some time to develop the skill of drawing by numbers.2. If the paints have thickened a little during the painting process, you can add a few drops of water; this does not affect their properties. But if they are completely dry, it is impossible to restore them! 3. Paints are stored for a minimum of 12 weeks after opening, subject to certain rules. Be sure to close the jars tightly and correctly, cleaning the edges of dried paint (this may prevent the lid from sealing tightly) Use a toothpick to clean hard-to-reach places In case of long breaks in coloring, wrap thoroughly cleaned and tightly closed jars in a damp cloth and pack them in a plastic bag or sealed plastic container. This will protect them from drying out. During prolonged painting, the paints may become thicker. Don't be afraid to add a drop of water and mix thoroughly 4. Before you start coloring, prepare a jar of water (to wash your brushes), several rags (to wipe your brushes, hands, table, etc.), toothpicks - stir the paints and use them to paint the smallest details. A saucer, plate or palette - for mixing paints. 5. The sets, depending on the manufacturer, the size and complexity of the painting, include from one to 5 brushes. We recommend purchasing additional brushes in different sizes in advance. They are inexpensive, sold in any office supply department, but will greatly help you when coloring. And, most importantly, you will be able to separate the brushes - some to use only for light colors, some - only for dark ones, which will completely eliminate the mixing of paints when carelessly washing the brush. 6. If you often paint by numbers, we recommend purchasing a set of acrylic paints (base colors) in art stores, which will allow you to eliminate the problem of paint drying (of course, choosing a shade will take some time) and enhance the relief of the work. However, the paint sets contain enough paint for complete painting in 2-3 layers. 6. Open jars carefully, following the manufacturer's instructions to avoid damaging them. 7. Hold the brush the way you would hold your hand. Don't bend your hand to make drawing easier - rotate the picture! 8. Apply paint only to the very tip of the brush. It’s better to dip the brush into the jar twice than to ruin the design by dripping on it. If, however, this happens, use wet cotton buds to remove excess. 9. Color the picture in one of two ways - linearly, from top to bottom, to prevent smearing by hand, or from top to bottom, but first the background, then the foreground. 10. Start coloring with light colors, then darker ones, color the mixed parts last. 11. If, after finishing painting, numbers are visible somewhere, apply a second layer of paint to these segments. To give relief and a resemblance to oil, apply several layers to some elements. 12. After drying, the painting can be coated with glossy or matte varnish; this will “strengthen” it and allow it to be wiped with a slightly damp cloth. In the first case it will become brighter, in the second it will not glare. A frame will add completeness to your work. Canvas or cardboard??This is not to say that canvas is better. Or, better yet, cardboard. Let's talk about the advantages and disadvantages of both. Cardboard– it’s easier to draw on it; if this is your first painting, choose cardboard. Paints adhere better, paintings on cardboard are cheaper. But, if this picture hangs in a house with temperature changes (for example, at a dacha, where you only visit in the summer, but New Year) – the cardboard may begin to deform. True, if you put it in a frame, this will not happen. Canvas on stretcher– not afraid of humidity, looks more “real”, can be hung on the wall without a frame, it will look great. But. It’s harder to paint, it’s better to do it in a vertical position of the canvas (use an easel or build a stand from scrap materials, such as books), the paint goes on harder. If you decide to use a frame, you will have to order it from a framing shop due to its thickness. Higher cost.How do paintings from different manufacturers differ?We sell paintings by numbers only from the best manufacturers, but they also differ very significantly. Let's talk briefly about each.Schipper– Germany, premium class paintings. The kits do not require mixing paints. Material – cardboard, top layer – special paper, similar in texture to canvas. Bright colors, large selection of painting reproductions famous artists. There is a large selection of sizes, including 50*80, there are triptychs that look very impressive. High price, which is fully justified by its unsurpassed quality. “Solid” packaging, such a picture is an excellent gift (and if you take a large one, the gift will be simply magnificent). According to many - best coloring pages by numbers. Menglei– the largest manufacturer in Asia, paintings of the highest quality. The paints do not require mixing. Material: canvas on a stretcher (self-assembly required). Full feeling of “real” drawing. Affordable prices at high quality, many reproductions, landscapes, still lifes. Various sizes, from 10*15 to 120*240 cm!! Reeves– England, manufacturer with 200 years of “experience”. Paint mixing required. Material: cardboard, special texture very similar to canvas. This manufacturer’s assortment also includes sets for coloring with pencils, watercolors, colored pencils and others. Copying site materials is permitted only if there is an active backlink and attribution. |


New
- Dietary potato casserole with minced meat for children
- Simoron rituals for buying an apartment
- What does tiramisu cake look like?
- Buckwheat porridge recipes
- Affirmations for material well-being
- Oatmeal with milk, how to cook oatmeal with pumpkin (recipe)
- Education and formation of conditioned reflexes
- Organs of flowering plants Presentation on the topic of plant organs
- Presentation on environmental pollution Presentation on environmental pollution
- Biology quiz presentation for a biology lesson (8th grade) on the topic Biology riddles


