Site sections
Editor's Choice:
- Justin Timberlake: “Having a son completely changed me
- Tina Kandelaki: I am a television creature, everyone shouldn't love me
- The Zaitsev sisters: biography, age and other interesting information
- The Zaitsev sisters, singers - biography, year of birth
- Volochkova is not the only one: which of the stars is paid for sex
- Rita Kern - photo, video, news, biography and personal
- Dmitry Isaev: who is this, personal life, Instagram Dmitry Isaev personal life
- The love story of the main lover of russia - alina kabaeva
- Older children of Maksakova: How do they live without a mother?
- Ringo Starr: "I am a drummer, this is my life"
Advertising
| Hand drawing process. Learn to draw a human hand. Straight contour lines of the fingers |
|
Any skill is necessary to develop and bring to perfection, even having talent from birth, you need to constantly develop and hone it. That absolutely everyone can learn to draw, and we hope that you have already started following our tips. Today we want to touch upon another "sore" topic of novice artists, namely, drawing such complex parts of the body as the hands, feet and, of course, the eyes. As a rule, these body parts are always the most difficult to draw and that is why it is worth giving them a little more of your time and attention when you learn to draw. How to draw handsA few basic rules: 1. It is necessary to practice drawing the palm in different positions. The same principle works here as elsewhere - Practice, practice and practice again. 2. Children's palms are thicker than fingers. 3. The female palm is thinner and more graceful. 4. To make the palm more masculine, add angularity to it. 5. On the palms of older people, we put more emphasis on the knuckles and draw more wrinkled skin. First, we need to understand a little about the anatomy of the palm. Take a close look at your hands. Your main goal is not to memorize what is called, what part of the brush, study the proportions and shapes. Please note that the phalanges of the fingers are not in one line, and the fingers cannot be perfectly straight and are always tilted to one side.
The index, middle, ring and pinky fingers are quite closely related to each other and cannot be far from each other, in turn, the thumb has a fairly wide range of motion. Try to trace your hand and fill in the outline with details. This will help you understand a little better how the palm should look in the drawing.
Before you start drawing a hand, first of all it is worth sketching out its overall size and the points at which the ends of the fingers will be located. Only after that the sketch is divided into several parts. When drawing hands, there are generally accepted proportions. For example, the length of the palm is equal to the length of the index finger multiplied by 2. The index finger is equal to the ring finger, sometimes the ring finger may be slightly longer than the index finger. The little finger reaches the upper phalanx of the ring finger.
The nail should occupy half of the phalanx. Women's nails are drawn more rounded, while men's nails are more square. If you find it difficult to draw fingers, imagine that the phalanges are cylinders connected to each other. Don't forget to add shadows to make the hand look more realistic.
When starting to draw, first try simpler options, for example, open or unfolded palm. Gradually complicate the task, for example, by drawing a hand folded into a fist. How to draw feet
As in the first case, before starting drawing, you must carefully study the anatomy of the foot.
Another note, if you are drawing the foot from above, then the toes will be longer than in the drawing of the foot from below. The lower part of the nail is on half of the upper joint, the width of the nail is longer than its height. The thumb is about the width of two second fingers. How to draw eyes
If, of course, your goal is to be able to draw portraits, then your eyes will have to devote a lot of time. Glance - what first of all needs to be conveyed when drawing eyes. The first step is to draw the shape of the eye. In the future, when drawing portraits, you will have to devote quite a lot of time to this step, since an incorrectly shown shape will ruin your whole drawing. Then outline the cornea. Apply highlights to the pupil immediately. Don't miss a single little thing that you see. The iris of the eye should not be completely round. From below and from above it is cut off by the eyelid. The iris that falls under the upper eyelid will always be slightly darker. The rest of the shadows and highlights will depend on your desire or who you are painting. Darken the white of the eye. The shadows should be slightly darker along the edge. The eyelashes are drawn with the final stage. They are thicker at the base than at the end. Note that the eyelashes are slightly reflective in the eyes.
Finally, we remind you once again that the main thing is practice. Start simple and gradually improve your skill by gradually increasing the complexity of your tasks. Draw and get inspired with us. Main photo taken from the site When drawing a person, special attention should be paid to both the face and the hands. First, apart from the head, the arms are the most exposed areas of the body. Secondly, they are also expressive and mobile. Along with this, due to the complexity of the connecting joints, convex and flat parts of the hand, the hands can become, and usually are, the most difficult part when studying the structure of the human body. The first mistake when drawing is too small hands. And here the ability to draw a head comes to the rescue. If you know how to correctly proportion the head, then you can assume that you already have the correct proportions for drawing a hand. If you put your hand on your face, the tip of your middle finger will be in the hairline, and the brush will end at the level of the chin. Here's your main way to measure brush parameters.
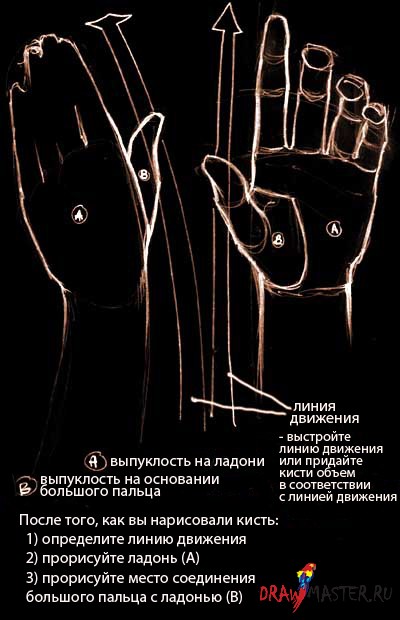
Let's go back to the topic - Building a hand. The hand has two volumetric bulges: one - at the base of the thumb (B), the second - the palm (the rest of the hand) (A). Double rows of finger bones, or wrist bones, are joined to the arm to form one whole. The wrist does not exist in isolation, and it is not attached to the hand by a ball-shaped joint, like wooden dolls. Hand movement begins at the wrist. It tapers slightly at the junction with the forearm. The wrist can also be considered a universal connector because it moves in all directions - up and down, side to side, and can rotate.
The center of the palm is slightly lower than the rest of the hand. For example, if you place your straightened hand on a table, palm down, you will notice that your wrist is not touching the table surface. You will notice that the wrist lifts up where it meets the arm. The area of the thumb is significantly larger than the area at the base of the little finger. The hand is wider at the base of the fingers than at the junction with the wrist; however, it is higher closer to the wrist. Now pay attention to your hand: the palm is longer than its back. The thumb is attached to the palm of the hand by an independent and highly mobile ball joint, which allows it to actively move independently of the rest of the hand. The palm consists of elastic and soft areas - pillows. The surface of the fingers and the entire palm are covered with many pads. The tips of the fingers are pointed, the middle finger - the longest - is the highest point of the hand. The cushions at the tips of the toes are pointed so that they go in the middle towards the middle toe. If you measure the length of your thumb from the top side, it will be equal to the length of your middle toe. The thumb is more powerful than the rest. The constituent parts of the fingers are more square in shape than it might seem at first glance, on the last square is the nail, almost triangular in shape, with bulges on both sides, forming the place of growth of the nail. You will better memorize the structure of the hand if you study the structure of the skeleton of the hand, after which problems with drawing the hand will never arise again.
Knowledge of the structure of the joints, their movement and limitation in movement is very important. The first joint of the thumb and the first two joints of the remaining fingers are articulated. They can only move up and down, but not sideways and rotationally. When you spread the fingers apart, the top-most joints of each toe are bent backward. The lower joints of the fingers will bend forward, while the upper joints or the tips of the fingers cannot be bent even at right angles. Note that the top two pivot joints can only flex at 90 degrees. The lower joints of the fingers, like those on the wrist, are ball joints. There are tons of hand positions and structures to learn. Even when drawing, you can use your free hand as a model. Place a mirror in front of you, and this will give you more opportunity to study the positions of your free hand.
1. The first step in drawing a hand in motion is the position of the fingers and hand. Draw a hand in motion and determine the approximate position of the hand. 2. Then select the volumetric areas - divide the brush into parts, this will help you determine where are convex and where are flat areas. 4. Add shadows at the end.
Memorize this lesson, buy an anatomy textbook and study it. You can study the structure of the hand forever, and you may never be able to draw a hand in the same position twice. Every time you practice hand drawing, you learn something new. Remember, your hands are just as important as your face. And they require the same attention and close scrutiny. Hope you find this tutorial helpful. Step 1.Let me remind you beforehand that we have already managed to practice well, started to study, examined in some detail in full growth, as well as men with examples and. And it was the turn to pay enough attention to the hands. This is the eternally not receiving part of the person's drawing that can ruin everything. First, start drawing your hand with anatomical tips! We will try to refresh or replenish our knowledge about the structure of the human body. This is very helpful because most aspiring artists can have a hard time getting their hands on. Well, let's start with anatomy and you will better understand the drawing of a human hand!
Step 2.Here is a slightly enlarged anatomy of your fingers so you can get a better look at the bones and remember their main parts. We will always use them for the base of the hand drawing.
Step 3.It may not seem important, but when you are drawing larger hands you will need help choosing the type of nails. You can choose the best ones for your character in the picture!
Step 4.And here is some extra help in the drawing so that you can clearly notice and compare the difference for your character's age and gender!
Step 5.Here are some hand sketches to give an idea of the realistic hand drawing style! You should start in any style based on their actual appearance.
Step 6.And now options for hands from comics or fairy-tale characters. These are just a few examples. You won't notice too much difference between realistic and comic or fantasy style.
Step 7.In the cartoon style, there are more noticeable differences from the realism. It's always helpful if you look closely at this particular detail in the cartoons you're watching, and then you can pick a style you like and start creating your own for that part of the drawing.
Step 8.If you have animal characters, then these examples will come in handy! Basically, when your animal character is walking on two legs, his / her front arms or paws are more like real hands and arms, so you should draw them like human hands, only with some specificity and style of animals.
Step 9.And now, the last part of preparing to draw the hand. These are the options, angles and positions of the hands and fingers. First, let's look at the simpler options and grasp the basic principle for the joints and proportions of the fingers and palms. For a woman's hand, you can increase flexibility, and for a man's, increase angularity.
Step 10.Now the drawings are a little more difficult, from a different point of view and angle! This is the expression of emotions, gestures, accompanying words and actions.
Step 11.This part of the preparation will already be really difficult, but not impossible! When you start drawing hands harder than these, you will remember with a smile. We're just looking at the tip of the iceberg in terms of base and shapes, and we'll start to grow towards hatching, shading, and color grading and editing. And now we are still just warming up! Step 17.The next step is unnamed. The fingers become less and less visible. But the joints line up and the proportion and beauty of the lines is noticeable. Step 18.And now your last finger in the basic shape is the drawing for the little finger - the little finger! And you did everything quickly in the basic hand shape from the first step! Step 19.Now draw your fingernails as you can see them in yourself or in photographs. Step 20.Draw small details of the folds in the joints and folds of the skin. They are on both sides. The hand in a relaxed state tends to clench. Step 21Here are some small details that you also need to paint in order to make the drawing look realistic / Step 22.You did it! Now you have to apply shadows and lights yourself. In the next lessons, we will pay more attention to this when drawing with pencils in the first place. I hope you liked the lesson and you leave me a positive review and comment at the bottom of the lesson. Good luck to you! Not everyone can paint like great artists. But you can learn to draw if you try hard. A lot about a person can tell his hands. It is very difficult to depict them on paper. But the problem of how to draw a hand can be solved with work and diligence. Anatomy to helpA complex system is the human body. The hands alone consist of several dozen elements. And in order to draw them correctly, you need to know the structure of the hands. Conventionally, the hands can be divided into three main parts: the wrist, the metacarpus and the fingers.
Knowledge of the basics of anatomy will allow you to correctly draw the hands in stages so that they turn out to be "speaking". It will be easier to draw if, while sketching, you decide what the subject of the image looks like - something simple, even primitive. Agree that the human hand looks like a shovel not only in appearance, but also in functionality? From this you can start sketching - draw a contour that looks like a shovel: the wrist is the handle of the shovel, and the outline of the palm with fingers is its canvas. It is difficult to immediately decide how to draw a hand with a pencil step by step, which is why it is worth starting with an elementary sketch.
The main thing is proportionsIn order to correctly and beautifully draw any object or detail, it is necessary to observe proportions - the ratio of different parts to each other. This rule also applies to the image of a person. So how do I draw a hand brush? We start by determining the correct proportions. The ratio of the length of the metacarpus to the fingers is, on average, 1: 1. Naturally, this ratio will vary slightly for different people, because some have long fingers, and some do not. But on average, the proportions will be equal. Depending on the length of the fingers, the contour of the palm will be either more elongated or square. Using thin lines (even before drawing the hand), draw the outline of the brush according to the proportions. The thumb does not fit into the overall silhouette, it is always somewhat apart from the other four "brothers".
How to draw fingersThe fingers are mobile and flexible due to their articular structure, each of the three or two phalanges, when it comes to the thumb, is attached to each other with the help of joints and tendons. The bones of the phalanges, located one after the other, become shorter and thinner, so the fingers gradually become thinner. Ideally, each phalanx is 2/3 the length of the previous one. These proportions are called the golden ratio - it is perceived by the eye as the most perfect. Again, when drawing details, it is necessary to make allowances for individual characteristics - not every person's hands have harmonious proportions. It should also be remembered that the fingers are not the same in length: the longest finger is the middle, index and approximately the same and shorter than the middle finger, the smallest are the little finger and thumb. Although the big one is rather the thickest. Its length corresponds to the length of the little finger.
Lines are the basis of certaintyBefore drawing a human hand, analyze again what parts the hand consists of. Remember that the contours of the palm and fingers, taking on specific shapes in the drawing, become more and more rounded. For example, the line connecting the fingers and the palm has the shape of an arc, just like the outline of the hand itself - different lengths of the fingers allow you to get a semicircle when drawing the fingers pressed together. The thumb is slightly turned in relation to the rest of the palm, its contour will not be straight, but somewhat rounded.
Small details are importantWe sketched the outline of the palm, then we begin to deal with the details. So how do you draw a hand reliably? This is impossible without drawing small details - folds, thickenings, fold lines, the contour of the nail plate on each finger. These seemingly minor touches will make the drawing more realistic. Let's start with the fold lines on the fingers. As mentioned, the wrist, palm, and fingers are made up of many elements. They allow the fingers to perform the functionality for which they are given to a person. How do I draw a hand to make it look as natural as possible? By drawing all the nuances. In places where the bones are connected by joints, there will certainly be folds both on the inside and on the outside of the palm. If the hand is drawn from the inside, it is necessary to draw the so-called "life lines" - rather deep grooves in the places where the joints of the palm work. Each finger at the end is protected by a nail - a rigid plate that must be traced for a realistic image. The nail plate is another essential element in solving the problem of how to draw a hand. Nails can be of different shapes - from elongated almond-shaped to almost square. Fingers indicate a person's age. Children's fingers are rounded, with a uniform thinning along the entire length. The older a person becomes, the more clearly the traces of time appear on the hands. For example, in older people, the thickness of the fingers will be uneven - the joints become more and more swollen with age, many years of work and illness affect. Also, the joints are very visible in thin people.
How do I draw the hand in different positions?Hands not only gradually participate in the conversation, but often they themselves serve as a "language", for example, in deaf communication. The palms and fingers will clearly tell what a person is thinking at a given moment in time, what his mood is, what he is doing. How to draw a hand so that it truly reveals all the secrets? When depicting the human body, it is always necessary to rely on the basics of anatomy. Hands are no exception. The size of the fist, for example, is determined by the length of the fingers. And the rule of the golden ratio will be important in any position of the fingers, even clenched into a fist. When drawing an open palm, you need to pay special attention to drawing the lines of the metacarpus and slightly bent fingers. How do I draw a hand on the side? In this case, it will be important to draw the viewer's attention to the fact that on the back side the palm and fingers will be drawn with almost straight lines, but from the inside both the fingers and the palm itself have pads, which must be drawn with rounded, smooth lines.
Step-by-step drawing of human hands, with a systematic transition from sketch to drawing small details, however, like any other object, will allow you to get a realistic drawing. Drawing hands is actually very difficult. There is an anecdote that still lives among the walls of art institutions, which tells about an artist who, so as not to be ashamed, painted his hands in his pockets and his feet in the grass. Hands are also a volumetric shape, and it is the volume that needs to be conveyed. But this is not the worst thing. The most difficult thing is to correctly capture the proportions. Already in second place is the transmission of movement, anatomical features. I am not belittling the importance of knowledge of anatomy, it should be. But if from the very beginning the proportions are not observed, further work will not bring a positive result. For example, a model is sitting in front of you. His hands are in the right position, in a certain angle. So you need to correctly capture the position of the hand in the foreshortening. And for this, look for proportions. The slightest inaccuracy and the "correct" picture will not work. And you notice this inaccuracy halfway to the completion of the work, no matter how regrettable.
When you draw from life, the hand will most likely be in the foreshortening, which will complicate the task for you. It will be necessary to convey the proportions of the "picture" itself, taking into account the proportions of the hands. You need to start drawing the hand not separately, but as a total volume. Outline the volume with all the fingers and only then "break" into sections, eventually selecting each finger.
After outlining the shape and all the details, you can come to the transfer of chiaroscuro. We first define (in general) a light spot and a dark one and put a soft stroke on the shadow. And then we do everything according to the principle, as described on the page.
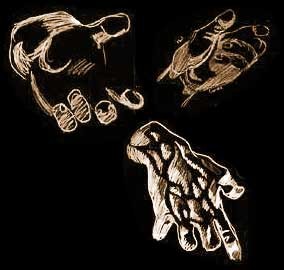
Showcased here are works by artist Andrew Loomis. The structure is shown very well, all volumes are perfectly reproduced. You can directly take and copy taking into account all proportional ratios. It is very well shown that a ball is at the heart of the structure of the palm. See how the fist is drawn. Start by transferring base proportions, height and width, base masses. When this is outlined in the sheet, proceed to the construction of the main volumes. Mark your nails last, sometimes it’s just easy to mark with a pencil. After that, you can proceed to the transfer of light and shadow, which will help to convey the volume. Note that here the light-shadow serves as an additional function. It is used in light hints, clarifying the volume and shape. Below are his drawings of children's hands. The hands of babies, they differ from the hands of adults in that the palm is more weighty and fleshy in relation to the fingers. The joints are almost invisible on the plump arms. From this there may be problems with misunderstanding - the baby's handles may turn out to be "wadded". Already somewhat understanding the structure of an adult hand, you need to move on to draw the hands of babies. Schematically, a baby's hand can be inscribed in a rectangle close to a square, or even in a square in general. Hands of older children. Small differences begin to appear between the boy's hand and the girl's hand. The boy's hand is bigger and stronger. Muscles and joints are better visible. A distinctive feature of the girl's hand is that they are larger, narrower, not muscular, the fingers are thinner, the nails are narrower. Joints and muscles are less visible. In drawing children's hands, tendons are not transferred. They are still practically not expressed.
Women's hands have noticeable differences from men's. Like everything in a woman - a face, a figure, and the hands themselves. They are drawn more delicate, with light rounded surfaces, more graceful. For more grace in a woman's hand, the middle finger should be about half the length of the palm, oval nails also add grace. Joints are easily transmitted, can be transmitted by hint, small dimples, like in infant children's hands. Hands are difficult to draw, especially from the perspective. Many artists believe that the indicator of a master is precisely the ability to draw hands. And this is achieved only with practice and diligent work. It won't work right away. |


| Read: |
|---|
Popular:

New
- Accounting for transactions with shares of other companies
- Design of electrical lighting for industrial premises
- Analysis of profit from sales of products (works, services) Dynamics and structure of profit from sales of products
- Main goals and tools
- Types of mortgages advantages and disadvantages
- Battle of Grunwald - briefly Fight against crusaders Battle of Grunwald
- The role of personality in the course of history
- Geometry Treasure Pythagoras pants in all directions are equal theorem
- Energy Vampire: Who Is This?
- The current state of the Crimean energy sector


