Sections of the site
Editor's Choice:
- How and for how long to cook squid so that it is not tough and tasteless
- Dietary potato casserole with minced meat for children
- Simoron rituals for buying an apartment
- What does tiramisu cake look like?
- Buckwheat porridge recipes
- Affirmations for material well-being
- Oatmeal with milk, how to cook oatmeal with pumpkin (recipe)
- Education and formation of conditioned reflexes
- Organs of flowering plants Presentation on the topic of plant organs
- Presentation on environmental pollution Presentation on environmental pollution
Advertising
| Patterns on the crown of the snow queen. How to draw a crown? As easy as pie! Royal lace crown |
|
Snow queens, princesses and snowflakes have always been popular. But after the release of the cartoon “Frozen,” beautiful ice ladies are simply in trend. Both little and big girls like to be the mistress of frost and blizzard. Of course, demand creates supply, and buying a crown for such a costume will not be difficult. But such crowns are either very primitively made or are not cheap. But making a snow queen crown with your own hands is not at all difficult; you can save a lot and get your own unique decoration. Simple and budgetThe simplest crown for a snow queen is made with your own hands from a minimal set of materials. You will need:
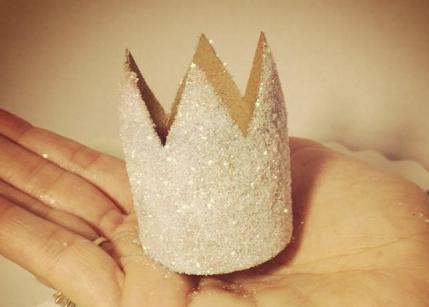
The work needs to be neat, so you may need a three or two liter jar (depending on whether the crown is large or small). It will be convenient to put jewelry on it and calmly work with a needle or glue. To begin, place the elastic band against your head so that it fits snugly but does not cause discomfort. Cut off the required amount. Then measure the circumference of your head and make a strip of fabric of the desired length. Sew it into a tube of such a size that the elastic fits evenly in it. Don't make the common mistake of cutting the fabric as much as the elastic, because it will stretch. Glue snowflakes around the circumference, taking into account the future tension of the fabric. Based on "Frozen"For little girls, it is suitable in the style of the cartoon sorceress Elsa. To make it, use this master class. The snow queen's crown is made with your own hands from inexpensive materials that are easy to find even without leaving home. You will need:
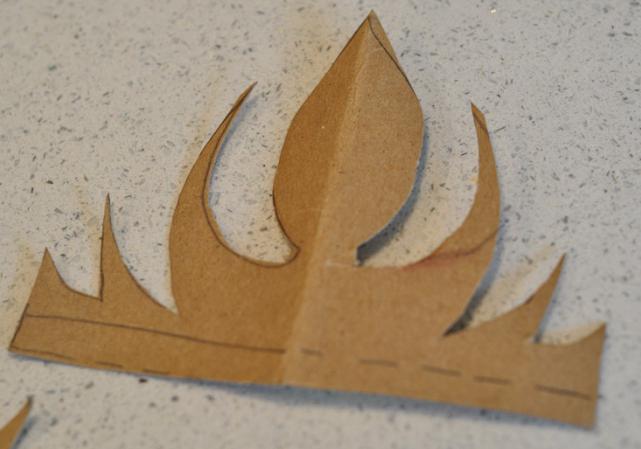
This crown is made like this: fold the cardboard in half and draw the outline of the crown.
Look at the pictures from the cartoon, notice that the base of the crown is a central sharp protrusion, and three curls extend from it. It’s not difficult to repeat the shape, but if you can’t do it at all, print out a picture of the crown and draw it. Add 1cm along the bottom to attach to the comb and cut out carefully.
Elsa's crown has a notch and a turquoise stone in the center. Make this cutout, but be sure to leave some cardboard to glue the bead on. Paint it with gold paint and glue on a pebble. Lightly press the crown into a rounded shape and glue on the scallop.
More ideas for paper crownsUsing a similar principle, you can make a snow queen crown with your own hands from cardboard, glue and glitter for manicure.
To make it functional, you need to glue a strip of cardboard inside, buy a white or shiny hairband and glue this crown to it. Well, another more complex variation made from cardboard, sparkles, a headband and a brooch.
Crown of sparkling iciclesFor an older girl, you will need a more elegant snow queen crown. It’s also easy to make with your own hands. For production you will need:
A large crown for a snow queen with your own hands takes longer to make than its children's cardboard counterparts, but it will easily survive more than one carnival or photo shoot.
First you need to prepare the base of the crown. To do this, cut the required amount of wire to fit the circumference of your head, leaving a 2 cm margin on each side. Bend the ends into a loop and treat them with colorless varnish so that they do not scratch the skin or cling to the hair. The crown can be left in this form and secured in the hair with hairpins, or you can thread an elastic band through the loops and securely fasten it on the head. Then we attach a thin wire to the base with a couple of turns and begin to make an imitation of icicles. To do this, we string 10 beads, one teardrop-shaped and one oval. We pass the wire back through 11 beads, except for the top one. It turns out to be a small icicle made of beads. We do the rest similarly, but of different lengths. In order for the icicles to stand straight, you will need to intertwine them with each other horizontally. It turns out sparkling, like a snow queen. You can make earrings or a bracelet to match your suit with your own hands from leftover materials. Draw with your child the heroine of your favorite children's fairy tale, the Snow Queen. The Snow Queen, a cold and beautiful woman who commands frost and cold, lives in a palace made of ice and collects the word “eternity” from ice cubes. Those whom the Snow Queen chooses also have their hearts turned to ice, and they remember nothing and live in icy silence and icy eternity. Let's try to draw this cold and heartless Queen. We will try to do it beautifully. After all, in famous cartoon, as in Andersen's fairy tale itself, the Snow Queen was cold but beautiful. How to beautifully draw the Snow Queen with a pencil step by step for children?Let's make the contours of the Snow Queen's face. Her face should be clearly defined.
Portrait of the Snow Queen in pencil: stage 2.
Portrait of the Snow Queen in pencil: stage 3.
Portrait of the Snow Queen in pencil: stage 1.
Portrait of the Snow Queen in pencil: stage 5.
Portrait of the Snow Queen in pencil. Next we will draw the Snow Queen in full height, so she will look more representative and impressive. She should have a floor-length fur coat, on which snowflakes and diamond pieces of ice sparkle. Let's also make her a fur trim from white fur.
Full-length Snow Queen: stage 1.
Full-length Snow Queen: stage 2.
Full-length Snow Queen: stage 3.
Snow Queen in full growth
VIDEO: How to draw the Snow Queen: instructionsHow to draw the Snow Queen's crown?Now let's reverse Special attention on how to draw a crown for the Snow Queen.
Drawing of the Snow Queen for children The evil and cruel Snow Queen can be copied from these pictures.
Drawing for children to copy: The Snow Queen. VIDEO: The Snow Queen. WatercolorLyubov Lisenkova I bring to your attention a master class on making a crown for the Snow Queen. To work we need: 1. Thick paper (preferably cardboard or Whatman paper) 2. Self-adhesive film (ideally silver, but you can also of blue color) 3. Glue gun 4. Glue gun 5. White beads 6. Mother of pearl sequins on a thread 7. White snowflakes 8. White half-beads with adhesive base 9. White half-droplets on an adhesive base. 11. Scissors  Manufacturing: 1. I made a crown pattern on thick white paper.  2. I glued a blue self-adhesive film (before the New Year I couldn’t find a silver film anywhere).  3. Let's start decorating the crown. 4. Using a glue gun, I glue mother-of-pearl sequins on a thread along the contour.  5. I decorate the crown with snowflakes (you can use ready-made ones, or you can squeeze them out with a figured hole punch) 6. Since the Snow Queen's crown has corners, I decorate them with white half-beads on an adhesive base. 7. In the central part I add white half-droplets on an adhesive basis to the rays of the snowflakes.   8. I string beads onto a thread or thin wire and glue the resulting pendants to the crown.   This is the crown I got.  Publications on the topic:
Scenario of the holiday “Tricks of the Snow Queen” Goal: to create a festive mood for children and adults who came to the holiday; to form love for mother, respect for women; develop. Summary of a music lesson for children of a combined group aged 6–7 years “Tricks of the Snow Queen” Tricks of the Snow Queen (Children enter the music room) M. R: I am glad to welcome you to music hall. (Communication is underway. Integration educational areas: cognitive development, speech development, social and communicative development, physical development.
Holiday scenario for children of the preparatory group “New Year's Adventures of the Snow Queen” Characters Adults: Leading Snow Queen Father Frost Children: Snow Maiden Gerda Kai Snowflakes (6) Three white horses (3) Atamansha Robbers. New Year's party "Tricks of the Snow Queen" Presenter. A wonderful day is coming. comes to us New Year. A holiday of laughter and inventions. Fairy tale holiday for children. How beautiful it is in our hall, We. Every girl dreams of being a princess. To do this, it needs special attributes: Nice dress and shoes and, of course, a real royal crown. A crown or kokoshnik will also be useful for children. New Year's party, a fun New Year's party, a birthday celebration or a family performance. Motherhood.ru reveals the secrets of making a real crown and kokoshnik for a little princess. We will look at different materials and manufacturing techniques: frame, knitted, models made from ribbons, plastic, fabric, birch bark and straw, beads, cardboard and even food. Let's start with the easier-to-make royal headdresses for the festive masquerade, gradually moving towards more labor-intensive masterpieces. Crown made of paper, cardboard and cardboard cupA simple and quick crown to make is made from a piece of flat cardboard. In this case, you can use colored and holographic cardboard. We apply the image of the crown, cut it out, and glue it along the edge of the joints. We decorate with sparkles, paints, rhinestones, beads, and nail polish. We thread it with a thin hat elastic. Now the small crown will rest securely on the little princess’s head.The same model can be made from a leftover toilet paper roll. Then it will not need to be glued.
Using pressed paper cup for seedlings, you can make a stronger crown. Cut out the top of the cup to create teeth. Paint the base in White color. Then use a scouring sponge to lightly apply gold paint using a dabbing motion. There is no need to paint with solid “gold”. Light white gaps will give the crown more elegance and transparency. We decorate the crown with rhinestones and “ precious stones" We glue a hairpin holder on the bottom side. Now you can pin it directly to your hair!
You can glue together a lightweight crown design from colored paper. Cut equal squares of paper. We make diagonal bends. Now we glue the resulting triangles together, as in the image. With this simple option Even small children can cope. Get crafting together!
Crown made from ready-made semi-finished products: headband, three snowflakes, bright berriesWe buy a white headband, several ready-made plastic snowflakes, bright berries or beads for decoration. Glue snowflakes and berries onto the base. If desired, we decorate with carved braid or lace, rhinestones, and gold spray. Instead of a headband, you can use a plastic wreath, hoop, or cardboard blank.
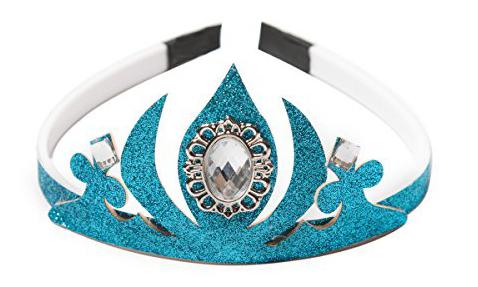
The result was an elegant tiara for a girl playing the role of the Snow Maiden, Snowflake, and Blizzard at the New Year's party. Royal lace crownTo make such a crown you will need:Beautiful carved lace braid 40-45 cm long. The length depends on the desired diameter of the final product. We place our lace on wax paper and coat it with PVA glue 2-4 times until completely dry. After complete drying, paint the workpiece in the desired color. Each layer of paint must dry well. Glue the crown along the edge, matching the pattern. We use hot melt glue or Crystal Moment glue. We decorate the crown as desired. It can be gold or silver:
Or match the tone of the royal outfit: soft pink, yellow, blue.
Plastic crownAs a material for this crown, you can take transparent packaging from children's toys or household appliances, or a large plastic bottle. We cut out the base of our crown. We apply a patterned design. We brush it with thick colored gel with glitter, paint, glue glitter or rhinestones, and paint it with nail polish. And the crown is ready!
Tinsel crownThe essence of making this crown is to wrap the wire base with shiny tinsel. It turns out bright, shiny and voluminous. It can be made gold, silver or colored.
Crown and kokoshnik using quilling techniqueYou can make a crown entirely using the quilling technique - from intricate paper curls. In this case, you can use colored paper and varied designs: winter flowers, snowflakes, curls. It is very beautiful and unusual, although the work is quite labor-intensive.
You can make your work a little easier without reducing the originality of the product. We cut out the base of the kokoshnik from colored cardboard. We make fastenings from satin ribbons or bows of a suitable color. Now we decorate the dark kokoshnik with a snow-white pattern using the quilling technique. The result is a kind of frosty design.
Look what they wear with this kokoshnik. This is a “winter” snow-white fluffy cape, decorations in the Russian style.
When choosing a kokoshnik uniform for a carnival costume, you should be inspired by ancient paintings and photographs of Russian beauties in rational clothing.
Royal crown made of wire and ribbonsMaking a wire blank in the shape of a crown Russian Empire. We decorate it with white and gold ribbons, braid, large stones and pearls. Use the basics of the macrame technique to weave ribbons and braid. Such a masterpiece will be remembered for a long time by all participants New Year's holiday!
Birch bark or straw crownProducts made from birch bark and straw are not only bast shoes, hats, boxes, but also crowns. Here, for example, is a luxurious crown in eco-style!
The essence of the kanzashi technique is the production of masterpieces from fabric “petals”. Petals are often made from satin ribbons, which are cut into 5x5 cm squares. They are used to make round petals, simple sharp open petals. Look step by step wizard class on making a red satin crown using the kanzashi technique.
The kanzashi technique produces delicate winter flowers that can be used to make hairbands, small or large crowns.
A kokoshnik for the New Year's holiday using the kanzashi technique is made from satin petals fastened with wire and threads. They are attached to the rim. Look how beautiful it turns out!
Crowns made using macrame techniqueWe all remember flowerpots, funny dogs and owls made using the macrame technique. However, this is far from the limit of skill. You can make a crown from macrame for a little or big princess.The simplest option is to weave a headband for the crown using the macrame technique and decorate it with additional details. This can be a ready-made flat crown, a wire model with ribbons and beads.
Real craftswomen will be able to create truly royal works with gold threads, woven stones and beads, and figured designs.
Wire crownThe crown can be made from “gold” or “silver” wire. At the same time, it is not at all necessary to overload it with decorations. It is enough to make an ornate lace pattern and decorate it with several large stones. It turns out concisely and tastefully. But do not forget about safety - all ends of the wire must be perfectly bent.
Crowns made of beads and stonesThe royal crown can be made from “golden” beads. To do this, we string it on a wire and give it the intended shape.
The crown can be literally “studded with precious gems.” Abundant decoration made of beads, bugles, beads, and pearls will create an atmosphere of royal luxury. The crown can be made according to color scheme festive dress.
A crown made of beads and stones can be soft snow-white. This is a great option to complement a New Year's carnival costume and for wedding ceremony. This way, once you make a masterpiece, you can use it over and over again.
The crown can be monochrome, like in chess. You can organize a party-tournament on this topic: “Whites versus Blacks.” Come up with various competitions: active and intellectual, comic tasks. This New Year's Eve will be remembered for a long time! Make the crowns in a fancy shape.
Such black and white crowns will also be useful for creating the image of Odette and Odile from Swan Lake. Knitted kokoshniksCraftswomen and skilled knitters should pay attention to the theme of kokoshniks that suits them. We crochet individual elements in winter colors - snowflakes, curls, flowers. We starch them and attach them to a base rim or kokoshnik with a wire base.
Frame kokoshniksWe make the frame of the kokoshnik from wire, wrap it with tape, and sew on a transparent fabric base. For example, tulle or tulle. We apply a Gzhel style ornament to it. This painting fits perfectly with the winter theme. But you can use others too folk paintings. We color the ornament, decorate it with a ribbon of beads along the edge, and make a fastening in the form of a half-cap or satin ribbons. Large rhinestones can be glued to the fabric base.
An original kokoshnik hat in the shape of a green spruce is an excellent themed accessory for celebrating the New Year. Extravagant, stylish and to the point!
You can make a kokoshnik professionally according to the following scheme: make a frame from wire, cover it with a base fabric, glue brocade to it using paper clips, decorate the kokoshnik with pearl thread, sparkles, rhinestones and bugles, and tulle.
You can combine a frame kokoshnik with a cardboard one. Make carved designs in cardboard and glue translucent fabric over it. Decorate to your liking and the kokoshnik is ready!
And this kokoshnik would look great on the head of Nastenka, the heroine of the fairy tale “Morozko”.
We make a real costume for the Snow Queen from a wire base and fabric decor. We decorate the outfit in the same style. The stand-up collar with large “cold” decorations is especially chic.
Crown of foodYou can decorate the cardboard base of the kokoshnik with almost anything. There would be a desire to create! Small, “grainy” products are perfect: peas, corn, lentils, rice, beans, buckwheat, millet. We glue our future “stones” to the base. We color it with pearls and precious stones.
Now let's get down to business! After all, before the New Year you need to have time to build your own crown or kokoshnik design. We wish you creative inspiration and good mood! Photo sources: Among girls, such characters as the snow queen, snowflakes or princesses always remain popular. However, after the release of the animated film “Frozen” on the big screens, almost all the girls wanted to feel like the mistresses of snow, frost and ice. A hand-made crown for the majestic and formidable Snow Queen will be an excellent and bright addition to the fairy-tale image of your little ice queen. Let's look at a quick and easy way to make a crown for the snow queenThe simplest crown for interesting character DIY snow queen is made from a minimal set of materials and tools. To work on the snow crown you will need the following equipment and materials:
The work must be very careful, so you may need a three- or two-liter jar (depending on the size of the planned crown, which is definitely needed for the snow queen - large or small). It will be convenient to put jewelry on it and calmly work with a needle or glue. To begin, apply the elastic band to the head so that it fits snugly to the limb, but does not cause discomfort. Cut off the required amount. Then measure the circumference of your head and make a strip of fabric of the required length. Sew it into a tube of such a size that the elastic fits evenly in it. Don't make the common mistake of cutting the fabric as much as the elastic, because it will stretch. Glue snowflakes around the circumference, taking into account the future tension of the fabric.
A beautiful and simple DIY crown is ready.
To work you will need the following materials and tools:
Take a ruler and measure how big the teeth on your royal crown will be. Cut the wire to a length of twenty-five centimeters. In order for the frame of the crown to be strong enough, it is necessary to make it from wire folded in three times, and do not forget to twist another layer of copper wire on top. You now have a large wire ring. Divide the completed frame into eight equal parts. Select the locations on the copper wire where the bases of the teeth will be attached. Beads must be secured to the peaks of the crown. Large beads are suitable for this task. They can also be secured using thin copper wire - the wire is threaded through the bead and secured to the peak.
A crown made of openwork lace will look very beautiful and impressive. This royal crown is very easy and quick to make. Even a novice craftswoman can handle this process. Prepare everything for work required material and tools:
First, cut the openwork lace to the length you need and roll this strip into a circle. Stitch very carefully so that the threads are not visible on your crown. After you have sewn the frame of the product, you should starch it well. After this, straighten your crown and put it on the three-liter glass jar. Leave your structure in this position until it dries completely.
After the entire crown structure has dried, begin painting it with a brush and paint. The paint can be applied only to the edges of the crown or to its entire surface.
When the paint is completely dry, use glue to attach beads, rhinestones, sequins, stones or beads to the crown. Your lace lace crown is ready. A selection of videos on the topic of the articleIn conclusion, we present to your attention a small selection of videos on the topic described in the proposed article. We hope that after viewing this material it will be much easier for you to make your own crown for the snow queen.
|


 I needed a crown for my character for a lesson with the kids. I thought about this for a long time - what to use and how to make it so that it would turn out...
 Purpose: New Year's decoration, attribute for


New
- Dietary potato casserole with minced meat for children
- Simoron rituals for buying an apartment
- What does tiramisu cake look like?
- Buckwheat porridge recipes
- Affirmations for material well-being
- Oatmeal with milk, how to cook oatmeal with pumpkin (recipe)
- Education and formation of conditioned reflexes
- Organs of flowering plants Presentation on the topic of plant organs
- Presentation on environmental pollution Presentation on environmental pollution
- Biology quiz presentation for a biology lesson (8th grade) on the topic Biology riddles


