Sections of the site
Editor's Choice:
- Is it difficult to get into police school (College of the Ministry of Internal Affairs)
- Mindfulness: meaning, stages, lifestyle and development of the mind What does awareness mean?
- Specialist in the field of commerce and trade International commerce who to work with
- Gap year: what is it and is it possible in Russia? What do they do in gap year?
- Specialty law enforcement who can work
- Pavel Grudinin, biography, news, photo Pavel Grudinin candidate and his state farm
- Atomic “seam” of Grigory Naginsky Grigory Mikhailovich Naginsky state
- Semaphore of the “friend or foe” system Koschey the Immutable is our candidate
- Childhood and education of Vladislav Surkov
- Noah's Ark - the real story
Advertising
| Drawing in Word - overview of tools and main features. How and what you can draw in Word - from the simplest shapes to complex diagrams |
|
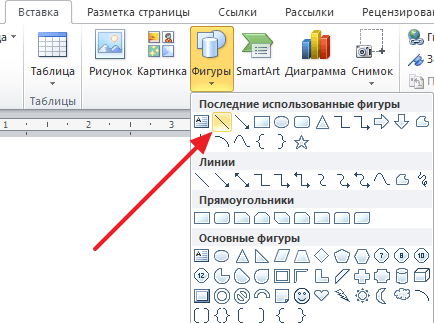
Few people remember how convenient it was to draw directly in Word. In versions of the application starting from 2007 there is no drawing panel. However, the ability to draw still remained and even acquired wider functionality. But the drawing panel itself is missing here and opens only when necessary. And in order to be able to draw, you need to insert a picture into the text, as described in, and click on it with the mouse. However, the drawing toolbar can be opened in another way by going to the “insert illustration” tab. Here you need to click on the arrow (in the form of a triangle) located near the “shapes” button. And at the very bottom of the window that opens, find and click on the “new canvas” button.  Opening the Drawing Panel Opening the Drawing Panel As a result of such manipulations, a field (canvas) for drawing will appear in the place where the cursor was, and the drawing panel will be expanded in place of the usual toolbar. This is what the drawing panel looks like in WordHow to draw lines and shapesAt first it may seem that drawing here is only possible with the help of ready-made shapes and arrows, i.e. drawing up block diagrams. However, you can also find real drawing tools here, such as draw curve and polylines. Using which you can draw not only diagrams, but also real drawings. It is especially convenient to use “polylines”, since to draw any contour you only need to click on the turning points of the drawing outline with the mouse. And all lines will be drawn automatically between successively located points, and no shaking of the hand or mouse will spoil the picture.  Convenient to draw using polylines Convenient to draw using polylines Shape Styles and EffectsAfter drawing the outline of the object, you can fill it different colors or patterns. To do this, use the “Shape Fill” button. The color of the outline of the figure and its thickness can be adjusted using the “shape outline” button.  Shape styles Shape styles The tools for creating shadow and volume effects are interesting. Using these buttons, you can give the effect of three-dimensionality to a figure or the shadow it casts. Moreover, you can choose not only the direction of the shadow and its length, but also its color. The effect of volumetric drawingsGroup and ungroup objectsAfter drawing, several drawings on one canvas need to be linked to each other so that during further editing, especially when dragging, individual elements of the drawing do not accidentally “spread” in different directions. To connect different elements into one picture, use the “Group” button. To edit elements of the picture individually, you can then ungroup the object. Rotate a picture or its elementIn the new Word you can also deviate the drawing in the desired direction. And not only 90 and 180 degrees - here you can set your own any angle of rotation of the picture.  Rotate an image Rotate an image It is often necessary to hide some image elements behind others in order to create a realistic effect for the entire picture. Such a tool is also available here. The selected shape can be brought to the foreground or pushed to the background of the drawing with one click of the mouse. Thus, the drawing panel in the modern Word application is hidden, and opens only when needed. And you can draw here no worse than in a specialized editor. Tools for working with graphics are on the panel "Illustrations" tapes "Insert". Creating a graphic primitiveButton "Shapes" serves for quickly creating graphic primitives. To create the desired primitive, you need to select it from the drop-down list and “draw” it in the document by dragging the mouse with the left button pressed. In order for the figure to have the correct proportions, you must hold down the Shift button while drawing.
When the shape is drawn, the context tool appears "Drawing Tools" with ribbon "Format". As a rule, a graphic primitive has blue corner markers at the edges, by pulling which (the left mouse button must be pressed) you can change the size of the figure.
The yellow square inside the primitive also serves to change the geometric dimensions of the figure. The figure can be rotated. For these purposes, a green circle located above the figure is used. To rotate a primitive, you need to place the mouse cursor on the circle and, pressing the left button, move the mouse. In this case, the figure will rotate in one direction or another.
Formatting a Graphic ObjectPanel window contains advanced formatting options "AutoShape Format". Most formatting settings can be made in this window.
The most common settings are displayed on the ribbon "Format". The panel contains a set of ready-made styles.
And also three buttons: "Shape Fill", "Figure Outline", "Change shape". If none of the proposed styles suits you, then using these buttons you can create your own formatting style. Button "Shadow Effects" serves to adjust the parameters of the figure's shadow.
To interactively adjust the shadow, use the buttons located on the right side of the panel "Shadow Effects". Button "Volume" Allows you to apply 3D effects to a figure. In this case, you can configure parameters such as: Volume color, Depth, Direction, Lighting, Surface.
To interactively adjust the volume, use the buttons located on the right side of the panel "Volume". Tools located on the panel "Arrange" are intended for setting parameters for the interaction of a figure with the text of a document.
Button "Position" specifies the location of the graphic object on the page.
Use the button to set text to wrap around a shape. "Text Wrap". If several shapes are inserted into the document, overlapping each other, then their relative placement order can be adjusted using the buttons "Bring to Front" And "To the background". Button "Align" serves to align an object relative to page boundaries. Using the button "To turn" the figure can be rotated. The exact size of the shape can be set in the Size panel.
There are situations when several objects are placed in a document and some actions need to be performed with them at the same time (enlarge, reduce, move). In this case, it is advisable to group objects. To group shapes, they must first be selected. This can be done using the button "Select" on tape "Home".
To select the desired objects, you need to click on them with the left mouse button while holding down the Shift key. After this you need to go to the panel "Arrange" and use the button .
All selected objects become, as it were, one object, as evidenced by the corner markers.
Now you can perform all the necessary actions with them. After this (if necessary), the objects can be ungrouped. Working with inscriptionsA special type of graphic primitive is Inscription. This primitive can contain text. Such graphic elements containing text can be linked to each other. In this case, the text will be placed inside the inscriptions sequentially (depending on the sequence in which they were connected). To link blocks, they must first be placed in the document. Then select the inscription with which the text will begin. After that on the panel "Text" use the button "Create a connection".
The cursor will change to a circle. Move the cursor to the inscription following the main one (the mug will begin to “flow out”) and press the left mouse button. Now the text will flow from one inscription to another.
Please pay Special attention to this graphic primitive. With the help of inscriptions it is very convenient to place text anywhere in the document. At the same time, the borders of the inscription can be made invisible, and the direction of the text can be changed. 04.03.2017 Microsoft Office Word is not only a tool for creating and editing text documents, but also a wonderful drawing program. However, you won’t be able to create a masterpiece in Word. But still, the standard set of functions will be enough for the average person. Using templates you can create a simple drawing. First steps
You can also create a canvas where you can also draw. Its advantage is that the text will only appear outside its boundaries. 
As a result of the above-described manipulations, we obtain the following result: In order for the resulting drawing to become a whole object, it is necessary to combine all those figures from which it was actually assembled.
Changing the fill of shapesBy default, drawn shapes have Blue colour fills, so if necessary, you can easily replace their color with a suitable one. To get started, double click left mouse button select a picture, and in the tab that opens at the top in the item "Fill" select the desired color. Ready. Change the outline color of a pictureThis is also a simple procedure that is performed similarly to the previous one. After the object is selected, in the paragraph "Figure Outline" select your desired color. It is also possible to change the lines that will outline the image. Figure Style Changes Adding EffectsWhy not add something special to decorate your design? For example, glow, shadow, reflection and many others. In this case, a special menu will be used where you can select special effects to suit your taste. You can also experiment with advanced settings. They are located at the bottom of each effect group.
Foreground and backgroundWhen creating a drawing, the shapes are superimposed on each other. For example, like in the picture below: That is, in order to move the crescent behind the clouds, you need to click on it RMB and select item "To the background." If you have to move it back, you can use the option "Bring to Front". What should I do if a shape moves when I move text?This problem is very easy to fix. Just right-click on the created picture. On the menu "Text Wrap" select option “Fix position on page.” Voila! Advanced image formatting optionsWould you like to edit the created image in more detail? Use the menu "Shape Format", which is called by clicking right mouse button. "Shape Format" consists of three tabs: And now about each tab in more detail. In this tab you can change the fill of the picture and the lines that make it up. This tab contains advanced tools for adjusting special effects. For example, here you can more accurately adjust transparency, size, and color. It is also possible to add blur and many other decorations. The functions on this tab allow you to adjust the position of the text that wraps around the picture and allow you to set the size of the margins in your document. Drawing three-dimensional figuresIt is also possible to create three-dimensional images in Word. After drawing a regular shape, go to the menu "Shape Format", where in the tab find the sub-item "Format volumetric figure» . Then enter your parameters. Using the instructions above, you can create enough interesting composition in Word. We hope this material was useful to you. In addition to its direct purpose - creating and editing text documents - it can be used for other purposes. So with its help you can draw and add simple illustrations to your text. If you are not yet familiar with this feature, we will tell you how to draw in Word and describe the process in detail for each version of the program. How to activate drawing in Word 2003id="a1">To enable this feature in Microsoft Word 2003, open View/Toolbars/Drawing. To enable drawing in Word 2007, 2010 and 2013 versions:id="a2">After this, a drawing field in Word will open in front of you, and all the necessary tools will appear above it.
Overview of drawing tools in Word:id="a3">Naturally, there will be no talk about drawing in the full sense of the word: in Microsoft Word There are no sets of brushes, pencils and erasers. Instead, there is a large selection of geometric shapes from which you can create absolutely any illustration.
 Show video instructions
When designing text documents, it is not uncommon to need to draw a line, for example, in order to separate one part of the text from another. In the Microsoft Word text editor, there are several options for solving this problem. In this article we will look at three of the most simple ways draw a line in Word. The material will be relevant to everyone modern versions Word. Including Word 2007, 2010, 2013 and 2016. Method No. 1. Inserting a dash or underscore. Perhaps the easiest way to draw a line in Word is to use a dash or underscore. Inserting in a row a large number of such signs, you will get a horizontal line. For example, to draw a line using a dash sign, simply hold down the CTRL key and, without releasing it, press the minus key on the additional keyboard block. Then hold this key combination until you get the line of the length you need. In a similar way, you can draw a line using an underscore. To do this, hold down the SHIFT key and the underscore key. Then you need to hold down these keys until a line of the desired length is drawn.
This method of creating lines is convenient because such a line is easy to draw and easy to remove. If the line turns out to be unnecessary, then it can be deleted just like any other text. Method No. 2. Inserting a finished line. Another way to draw a line in Word is to use the button to create borders. This button is located on the “Home” tab and it allows you to quickly draw a line anywhere in the text. All you need to do is place the cursor where you want the line to be, click on the button and select “Horizontal Line”. As a result, a horizontal line will be drawn at the selected location on the page.
Advantage this method is that the line drawn in this way can be changed. The line can be made thicker, thinner, longer or shorter. To do this, you need to select the line with the mouse, after which its size can be adjusted by moving its corners. In order to delete such a line, you just need to select it and press the Delete key. Method number 3. Inserting a shape. On the Insert tab, there is a Shapes button that allows you to insert various shapes into your document. Among other things, there is a figure in the form of a line. To insert it into the document, click on the “Shapes” button, select the line and draw a line of the length you need in the document.
The advantage of this method is that such a line can be placed at any angle. In order to delete such a line, you just need to select it with the mouse and press the Delete key. |


New
- Mindfulness: meaning, stages, lifestyle and development of the mind What does awareness mean?
- Specialist in the field of commerce and trade International commerce who to work with
- Gap year: what is it and is it possible in Russia? What do they do in gap year?
- Specialty law enforcement who can work
- Pavel Grudinin, biography, news, photo Pavel Grudinin candidate and his state farm
- Atomic “seam” of Grigory Naginsky Grigory Mikhailovich Naginsky state
- Semaphore of the “friend or foe” system Koschey the Immutable is our candidate
- Childhood and education of Vladislav Surkov
- Noah's Ark - the real story
- Baburin Sergei Nikolaevich Childhood and education of Sergei Baburin


