Sections of the site
Editor's Choice:
- Buryat State University
- Siberian Institute of International Relations and Regional Studies (simoir): address, faculties, practice and employment
- The best books on economics and finance for beginners and professionals “Undercover Economist”, Tim Harford
- Tax received from abroad
- Choosing a university and training format
- Graphic patterns as the basis of a trading system
- Is it difficult to get into police school (College of the Ministry of Internal Affairs)
- Mindfulness: meaning, stages, lifestyle and development of the mind What does awareness mean?
- Specialist in the field of commerce and trade International commerce who to work with
- Gap year: what is it and is it possible in Russia? What do they do in gap year?
Advertising
| Drawing lesson for beginners: Exercises for developing the eye. How to draw a straight line in Photoshop: regular, broken or at an angle How to draw straight lines without a ruler |
|
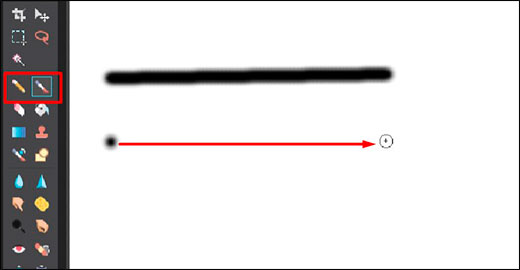
Good day to everyone, my dear friends and guests of my blog. Today I would like to tell you how to draw a straight line in Photoshop or its online version. Of course, the segment looks much neater than something drawn with a trembling hand. Oh, this trembling hand)). Well, okay, let's not pull the cat by the rubber band. Go! The easiest wayFirst, let's look at the simplest drawing methods. Draw lines horizontally and verticallyThe easiest way to draw a straight line is to take any drawing tool (pencil or brush), hold down the key SHIFT and lead in the direction you need (up down or left and right). Rest assured while you hold shift, there will be no trembling hand, everything will be recorded. Drawing lines at an angleIf you want to draw a line at an angle, select the brush (pencil) tool from the toolbar in the same way, and then put a dot in the place where you want the beginning to be.
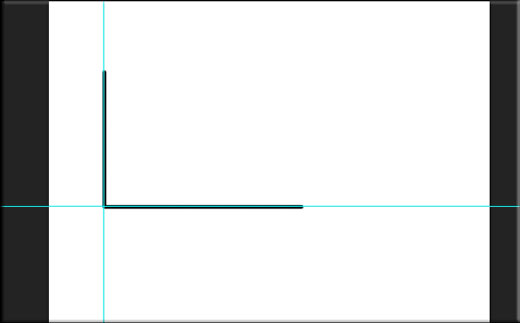
Now, hold down the key SHIFT and click in the place where the end should be. After this, the line will be instantly drawn automatically from the start to the end point. In addition, you can make a real broken line. To do this, you just need to poke in the places where it should break. Just remember to do this with the Shift key held down. Drawing straight lines using guidesJust yesterday I published an article about that, and today this topic will also be very useful to us. To do this, pull out the guides from the ruler area with the mouse button held down and place them in the places where you need them, and then take the pencil again and draw along it. Thanks to its binding property, it will magnetize your drawing to itself.
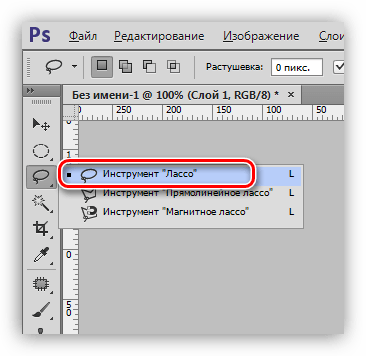
Only, unlike the previous method, you will not be able to move away to a long distance, since after all, the guide really acts like a magnet. As long as you draw close, the drawing is attracted, and as soon as you move away, your trembling hand comes into play again. FiguresAnd of course, we must not forget about the main tool, namely the figure of the same name. In order to draw a straight line in Photoshop this way, you need to go to the “Shapes” tool and select the “Line” tool there.
Before you start drawing, go to the tool settings above and see what you can customize here:  Now just left-click anywhere on the sheet, after which you will see the beginning. It will be as if nailed down, and at this time you will be able to decide where the end will be. You will end up with what we expected. It is noteworthy that with this tool you can draw lines at an angle, and not just vertically or horizontally. Drawing lines with the Pen toolPreviously, we used as one of the selection tools. But of course, this is not all of his abilities, and now we will draw a straight line using him.  Now everything is displayed as it should, and you can make not only straight lines, but also broken ones. So this once again proves that Photoshop is just a versatile program and the same tool can perform different functions for different jobs.
Rectangular Marquee ToolA rather unusual way to draw a straight line, but nevertheless, some Photoshop users really like to use it.  As a result, we got a black stripe that you can turn into a line. To do this, just go to the transformation mode ( CTRL+T) and simply increase or decrease the length and width by left-clicking on the edges.
Well, if you want it to be at an angle, then use the same transformation to turn it over. To do this, place the mouse cursor next to the corners of the selection until the cursor changes to a curved arrow.
How to draw a line in Photoshop onlineI know that not everyone is ready to install a cumbersome program on their computer, so we will try to make do with a special service. In fact, it’s not difficult to draw a straight or broken line in Photoshop online, simply because this version is highly neutered, there are very few ways there. The first method is that you will need to select the Brush or Pencil tool and poke anywhere on the canvas to create a starting point. Now hold down the key SHIFT and click the one where you would like to see the end point. After this you have a straight line. This method is similar to what we did in the program.
The second method is that we select the Draw tool, assign any color (or leave the default one), hold down the left mouse button and start drawing a black rectangle. You yourself can control how thick or long it will be.
But it is important to remember that Photoshop online does not have a Transform tool, so the segment you draw cannot be changed, enlarged, reduced or rotated at an angle. Well, that's basically all I wanted to say. I hope you now understand how to draw a straight line in Photoshop different ways and without any effort. Well, if you don’t know Photoshop or don’t know it well, then I recommend that you watch these wonderful video tutorials, where they will tell you and show you from A to Z how to work in Photoshop. All lessons are told in simple terms human language and with great interest. If you don't mess around, you can learn Photoshop in just a couple of weeks. Highly recommend. Well, this is where I end my lesson, I hope that you liked my article today. Don't forget to subscribe to my blog and share the article materials on in social networks. I'm waiting for you again. Good luck to you. Bye bye! Best regards, Dmitry Kostin. Drawing circles of various diameters is far from the most necessary skill in life. However, sooner or later the need to draw a circle without a compass and other round-shaped auxiliary objects takes everyone by surprise. Therefore, it is better to find out in advance without a compass, regardless of its diameter. How to draw an even circle without using a compassYou can be a schoolchild who came to a geometry lesson, forgetting his drawing tools, a student, an adult forced to draw a perfectly straight circle - different situations happen. It will be useful for every person to know how to draw smooth circle without compass. We offer you several ways to solve this problem. A compass can easily be replaced by another tool found in every student’s pencil case, namely a protractor. Place it on paper, marking the central point on the straight part, this will be the center of the future circle. Trace the inside of the semicircle, then rotate the ruler about ninety degrees and draw a third of the circle. Rotate the protractor one more time and complete the circle. If you're in a meeting or at work and don't have the tool you need on hand, just use the CD. Trace it from the outside or from the inside to get a smaller shape. In an office setting, you can also use a glass. To do this, take a glass of water, take a sip and place it on a sheet of paper, lightly circle the bottom. Drink some more and set it aside. All of the above items can be found in any office; the protractor will also be available to students. With their help you can draw a circle evenly without a compass. Draw circles of different sizes without auxiliary objectsWhat to do if you need to draw circles of different diameters? It is not at all difficult to cope with this problem, having only paper and a simple pencil on hand. Take a pencil in one hand and place the other on a piece of paper. Place the little finger of your first hand on the sheet so that it is the center of the future circle. Hold this position well. With your other hand, start turning the paper around your little finger. You will see how a smooth circle is obtained, just like when using a compass. A larger circle is drawn in the same way, but in this case bend your little finger, as if you were clenching all your fingers into a fist. With your left hand, start turning the sheet until you see the resulting circle. It is advisable to use a pencil with a soft lead. A circle with an even larger diameter can be drawn by repeating all the above tips, but now the right hand should touch the sheet with the protruding bone on the wrist.
These are the most simple methods how to draw a circle without a compass. The most important thing in these methods is to learn to hold right hand motionless (left if you are left-handed). How to Draw a Perfect Circle Using a RulerIf you have a regular ruler on hand, then you can use another tip on how to draw a circle without a compass. Take a ruler and place it on the paper, the "0" mark will be the center of the circle, so place it in the right place. Draw the second point near the digital value corresponding to the radius of the circle. Move the second edge of the ruler slightly so that the middle remains at zero, and the third point is located slightly above the second.
Do this procedure several times. As a result, you should have a circle drawn. The more often the dotted line, the easier it will be to connect everything into a solid line. This is perhaps the easiest, but at the same time the longest way to draw a circle without a compass. Many people who cannot draw believe that it is simply not possible. One day, having tried to draw something, they saw a cruel discrepancy between what was so clearly represented in their heads, and how clumsy they ended up on paper. In fact, all beginners in drawing lack a sense of proportion, an eye. And few people think about what this is, in fact, a skill. A skill that can be developed. And after some time of effort and effort, it suddenly turns out that your hand completely obeys your mind and draws what you imagined and the way you planned. Of course, such things as talent and talent have not been canceled. But still, anyone can learn to draw decent drawings if they make special efforts. Drawing lesson for beginners: exercises for developing the eyeAnd so, in order to correctly depict objects on the surface, you need to develop a sense of proportion. And for this it is necessary to develop an eye. Which, in turn, can be developed through simple exercises. Let's talk about them now. The exercises are very simple and understandable. Learning to draw begins with them, even in children's art schools. But as simple as the exercises are, they are also boring. Everyone wants to immediately draw beautiful landscapes or similar portraits. But you shouldn’t neglect these exercises, because they are basic and will make your work much easier later. And it’s better to learn the basics right away, because later it will be more difficult to relearn. So, a drawing lesson for beginners: exercises for developing the eye.1. Draw parallel lines (segments)The first exercise can be performed on any convenient sheet of paper (even in a notebook). We draw by hand, without a ruler, straight parallel lines. The longer they are, the more difficult it is. If it’s very difficult for you and your hand is not full at all, then start with a checkered notebook. We simply fill the sheet with parallel segments. At first your stripes will be crooked, shaky, and not always even parallel. But with practice you will get better and better.
Do not try to draw long lines at once, start with segments of 8-10 centimeters in length. Use a convenient technique for performing this exercise. Mark with dots or lines (as in the figure) the beginning and end of the segment. Then, in one motion, connect them with a horizontal line. These marks are very helpful in mentally mapping out the path that your hand will take. Namely, we achieve obedience by hand. Gradually lengthen the lines, make them without marking the beginning and end and try to keep them the same and at the same distance from each other. It is difficult to say in advance how many such exercises will be needed. Practice until your hand can confidently draw straight lines. 2. We develop our eye: we learn to divide segments into different numbers of equal partsDrawing monotonous lines is boring, so, after “training your hand” a little, you can add a second exercise to develop your eye. A very important exercise! We will divide our drawn segments into equal parts. To start with even number parts: two, four, eight. First, divide the strip in half. Then each formed part is also halved, and so on.
WITH even number parts are more or less clear. As soon as it turns out smooth, we complicate the task for our eye and divide our lines into an odd number of pieces: 3, 5, 7.
We rely on even division. For example: to divide into three parts, you first need to divide the segment in half, then on both sides of the central mark we separate a small piece of such a size that in the end all 3 parts are equal in length. When dividing into an odd number of segments, the middle of the middle part coincides with the middle of the entire line. Division into five and seven parts is done according to the same principle: first we divide into an even number of parts. There will be 1 less of them than it is planned to get odd ones (that is, out of 4 we make 5, out of 6 we make 7). Dividing a line into five or seven parts is difficult, but only at first. Even a little practice makes noticeable progress. 3. Drawing geometric shapes and dividing them into partsAfter we have become proficient in drawing lines, we move on to geometric shapes. The essence of the exercises is the same: we draw by hand geometric figures and divide them into even parts. Everything by hand, everything without a ruler. The ruler in these eye training exercises is used only to check your result: how accurately you managed to divide the line and in which direction to make the correction next time. It’s better to start working with shapes with a square. We divide it horizontally, then vertically, then diagonally. We try to draw the lines evenly. We divide the square in half in different ways: either diagonally, or by connecting the midpoints of opposite sides. Take different shapes, complicate and diversify your task: triangle, parallelogram, rectangle.
4. Drawing geometric patternsAnd now the culmination of our eye training - ornaments. As you can see, half of all ornaments are based on the repetition and alternation of various simple geometric shapes. There will be room to expand on the ornaments: there are even parallel lines, and division into equal and unequal segments, and equal spaces between the lines (which is also not unimportant), and there is room to use your imagination. Now that you know how to develop your eye, there is only one thing left - practice and more practice.
Lines, as well as other geometric elements, are an integral part of the work of a Photoshop master. Using lines, meshes, contours, segments of various shapes are created, and skeletons of complex objects are built. Today's article will be entirely devoted to how you can create lines in Photoshop. As we know from the school geometry course, lines can be straight, broken and curved. StraightTo create a straight line in Photoshop, there are several options using various instruments. All the main construction methods are given in one of the existing lessons. Therefore, we will not linger in this section, but will immediately move on to the next one. BrokenA polyline consists of several straight segments, and can be closed, forming a polygon. Based on this, there are a couple of ways to build it.
 As we said earlier, such a line is a polygon. There are two ways to construct polygons - using the appropriate tool from the group "Figure", or by creating a free-form selection followed by a stroke.
CurveCurves have the same parameters as broken lines, that is, they can be closed or open. You can draw a curved line in several ways: with tools "Feather" And "Lasso" using shapes or selections.
Such a line can only be drawn "Per"(with a contour outline), or “by hand”. In the first case, the lesson, the link to which is above, will help us, and in the second, only a steady hand.
This concludes the lesson on creating lines in Photoshop. We learned how to create straight, broken and curved lines in different ways using various program tools. You should not neglect these skills, since they are the ones that help you build geometric shapes, contours, various grids and frames in Photoshop. Another way to draw is to use the Line Tool, available in Photoshop's Toolbar: This line is vector form(Vector Shape), so that later you can easily change its shape, color and size without losing quality. You can also use the Shift key to draw horizontal, vertical, and 45° lines:
Broken, straight and curved line using the Pen ToolThe third common way to create a line is to use the universal Pen Tool:
First you need to switch the "Pen" to the "Paths" mode, this switch is located in the options bar in the upper left corner of the program window. Then click where you want the line to start, this will be the starting point, then add a second point, etc.
Let's do a simple one practical work. First, select the Brush tool, set the diameter to 3 pixels, hardness to 100%, color to black. But the outline created by the “Pen” is just an auxiliary object, and will not be displayed when saving the image. In order to visualize the outline, we need to outline it.
A new window will open, where you select “Brush” and click OK. A 3 pixel thick stroke will appear:
This operation is best performed on a new transparent layer. Now you can delete the outline created by the pen, or change its geometry in some way, the stroke will repeat all changes. |


| Read: |
|---|

New
- Siberian Institute of International Relations and Regional Studies (simoir): address, faculties, practice and employment
- The best books on economics and finance for beginners and professionals “Undercover Economist”, Tim Harford
- Tax received from abroad
- Choosing a university and training format
- Graphic patterns as the basis of a trading system
- Is it difficult to get into police school (College of the Ministry of Internal Affairs)
- Mindfulness: meaning, stages, lifestyle and development of the mind What does awareness mean?
- Specialist in the field of commerce and trade International commerce who to work with
- Gap year: what is it and is it possible in Russia? What do they do in gap year?
- Specialty law enforcement who can work


