Sections of the site
Editor's Choice:
- Buryat State University
- Siberian Institute of International Relations and Regional Studies (simoir): address, faculties, practice and employment
- The best books on economics and finance for beginners and professionals “Undercover Economist”, Tim Harford
- Tax received from abroad
- Choosing a university and training format
- Graphic patterns as the basis of a trading system
- Is it difficult to get into police school (College of the Ministry of Internal Affairs)
- Mindfulness: meaning, stages, lifestyle and development of the mind What does awareness mean?
- Specialist in the field of commerce and trade International commerce who to work with
- Gap year: what is it and is it possible in Russia? What do they do in gap year?
Advertising
| Do you know how to draw Luntik? How to draw a luntik with a pencil step by step for children |
|
In this article you will find outline pictures depicting characters from the popular cartoon for children "Luntik". Such thematic pictures for coloring may interest a 5-6 year old child. summer age, who liked the adventures of an unusual creature nicknamed Luntik and his friends. If your child is just starting to learn the basics of drawing , be sure to set aside a permanent “corner” for children’s creative activities, where tools for drawing and for coloring pictures will be openly laid out on the desk in boxes or cups. There is no need to hide colored pencils, crayons and markers in drawers - small children should be able to get creative at any time. Try to work together as often as possible coloring with your child . For the youngest children you can print simple pictures on paper for coloring , which depict large objects without detail, vegetables or fruits . Older children will be interested in thematic drawings - for boys: Spiderman, tanks, cars, airplanes; and for girls - Barbie Dolls, Winx, Monster High, little ponies. We recommend that you first teach your child to draw and color pictures with colored pencils. Make sure that the child's hand does not hang from the table during classes, and that the pencil is held between three fingers - index, thumb and middle. When your child gets tired, switch to finger games or just sit and relax. During the lessons, pay special attention to the even and neat coloring of the drawn contour object. - make sure that the child does not go beyond the color contour lines. Gradually, the child will learn to carefully paint over pictures and you can expand his creative skills: explain to the child that using different pressure on the pencil you can give volume to the drawn object; in the process of coloring a picture You can change the direction of strokes from top to bottom, left to right, obliquely. Before you print out free pictures of the characters from the children's cartoon "Luntik" for coloring, let's get to know this character a little. The cartoon about the adventures of Luntik has a multi-part series and is very popular among the youngest children - for last years it surpassed even such a popular children's animated series as "Masha and the Bear" in terms of views. . EXPAND AND PRINT COLORING PAGES (CLICK ON THE PHOTO):
Dear Parents! If your child has already colored several pictures with cartoon characters, please send a photo of his work by email: This e-mail address is being protected from spambots. You need JavaScript enabled to view it. We will definitely post everything creative works your child on this page!
This lesson will tell you how to draw Luntik- a cartoon character, a favorite of all children and adults. This is a very cute furry hero who was born on the Moon and fell to Earth. A very kind and affectionate character who understands the world around him. I took this picture as an example. So, sit down comfortably, take a sheet of paper and a pencil and start drawing. How to draw LuntikStep one. First, let's draw a trapezoidal head with a smooth line: you need to mentally imagine a trapezoid and, as it were, outline it. At the top is a zigzag line depicting Luntik’s hair. The whimsical purple animal Luntik from the Russian cartoon “The Adventures of Luntik and His Friends” is actually very easy to draw, especially using the step-by-step tips on our website vsrisunki.ru, by going to this lesson and trying to draw this cute animal, you can see for yourself . Luntik came to Zelya from the Moon, and as he himself says, he is a lunar bee and is related to ordinary bees. Some cartoon characters do not believe this and believe that Luntik is a dream. The animal has a very kind character and is always ready to help, although many, even very simple things, are not yet understood, but Luntik learns quickly and grasps everything on the fly. Moon Bee has a very unusual appearance. Unlike ordinary earthly bees, Luntik has funny ears and furry legs, and he also has a soft purple color. So, let's move on to drawing Luntik: Stage 1. We must start drawing with the stage of drawing two auxiliary circles (one of which irregular shape) and two straight lines that are at the top of the circles. Auxiliary lines are highlighted green and they must be drawn very thin so that later they can be easily erased with an eraser. After you have drawn everything that is highlighted in green, move on to drawing Luntik himself (the contours of Luntik will be highlighted in red), on at this stage we draw the contours of Luntik's head.  Stage 2. Below in the picture the contours of the body of the moon bee Luntik are highlighted in red, which must be drawn in the second stage. Then we move on to the next stage. Stage 2. Below in the picture the contours of the body of the moon bee Luntik are highlighted in red, which must be drawn in the second stage. Then we move on to the next stage.
Stage 3. The next stage is drawing Luntik’s funny face, this will happen in two stages. At the first stage (picture on the left) we will draw two large circles, without going beyond the straight lines, in these two circles we will draw smaller circles, this is how we drew Luntik’s eyes. At the second stage (picture on the right) we draw Luntik’s surprised eyebrows, his nose and a sweet smile.
Stage 4. Luntik’s funny face is ready, now let’s draw his furry paws, as shown in the picture below. First we draw his upper legs, and then move on to drawing the lower legs. This is what you should get:
Stage 5. Now we draw the unusual ears of our moon bee Luntik. Drawing such ears will not be difficult. When you draw the ears, you can move on to the penultimate stage of our drawing.
Stage 7. The final stage Our lesson today is to color the animal in soft purple colors as follows: 
This article will help you draw step by step the charming cartoon character Luntik and his friends: the grasshopper Kuzya, the ladybug Mila, Bee, the butterfly Elina and the mischievous caterpillars Pupsen and Vupsen. A charming cartoon character named Luntik, with his sincerity, kindness and responsiveness, won the hearts of kids and their parents. This purple alien, along with his friends: Kuzey, Mila, Little Bee, Elina and the mischievous caterpillars- wonderful decoration for a children's room. Cute cartoon characters can decorate a wall newspaper on the occasion of a child's birthday. You can draw the poster together with your child, adding interesting sayings from the cartoon and photographs of the child. How to draw Luntik step by step with a pencil for beginners?Both adults and small children will enjoy drawing a lunar alien with kind eyes. Beginning artists can draw Luntik in several ways: Method 1: Print the blank Find a drawing of Luntik with strokes on the Internet, print it out, give it to your child to connect the contours and color it. Print and circle Luntik. Method 2: Use a printed stencil For those who want to start drawing with their child, it is best to print out the drawing you like and, placing it under a blank sheet of paper as a stencil, trace the outlines together with your child. The main thing is to choose a clear drawing of Luntik.  Use the finished drawing of Luntik as a stencil. Use the finished drawing of Luntik as a stencil. Method 3 – Step by step, step by step Those who want to draw a lunar inhabitant themselves with a pencil should start from the very simple drawing, For example Luntika in eggshell. To do this you will need:
Draw Luntik from the picture.
You need to draw Luntik in stages, focusing on the provided drawings and diagrams:
Draw Luntik with a lantern Another drawing of a purple alien, taken from footage of an animated series called “Fear”. Let's try to reproduce Luntik step by step on our album sheet. To draw you need to take:


VIDEO: How to draw Luntik step by step: instructions
Luntik in cellsDrawing from Luntik's cells is not difficult. To do this, prepare:
  Luntik's diagram by cells. Luntik's diagram by cells. You need to draw Luntik based on the color indicated in the cells. How to draw Kuzya from Luntik?Grasshopper Kuzya - Luntik's best friend. It was he who was the first person the main character met after falling from the moon. Together with Kuzya, Luntik learns what good and evil are, what is good and bad. Unforgettable adventures of friends always end with educational and correct conclusions that teach kids the right actions. Figure No. 1 – Kuzya from the cartoon “Luntik” To draw step by step best friend Luntik, you will need:
You can draw a grasshopper in four stages: Stage 1. Let's draw a face.
Stage 2. Let's finish drawing the head.
Stage 3. Let's draw the paws.
Stage 4. Let's detail the drawing.
The drawing is ready, now color the grasshopper.
Figure No. 2. Kuzya the grasshopper in the grass You can draw Luntik's best friend step by step in a slightly different way. We make a drawing of Kuzi in four steps: Step 1. We make schematic sketches.
Step 2. We draw the face and body.
Step 3. Detailing the drawing
Step 4. The finishing touches.
VIDEO: Learning to draw Kuzya from the cartoon “Luntik”
How to draw Mila from Luntik step by step?Ladybug Mila- Luntik’s good friend. This cute character teaches little viewers kindness and justice. To draw Mila from the cartoon “Luntik” you will need:
Do you want to add this cute ladybug to your album? Then follow the step-by-step instructions:
VIDEO: How to quickly draw Mila from the cartoon about Luntik in 45 seconds with a pencil?
How to draw Little Bee from LuntikLittle Bee is a serious, thorough and hardworking bee who is friends with Luntik, Kuzya and Mila. Have you decided to draw this character with your child? Then follow our step-by-step instructions:
How to draw the butterfly Elina from Luntik?« Butterfly Elina“beautiful as a picture” - these are the lines Luntik dedicated to the butterfly Elina on her birthday. The beautiful, airy butterfly Elina will be a wonderful decoration for a girl’s children’s room.
To depict the butterfly Elina on paper, follow the images and step-by-step instructions:
How to draw caterpillars from LuntikCaterpillar brothers Vupsen and Pupsen- bullies and miscreants. These ambiguous characters often play pranks on Luntik and his friends, which they greatly regret at the end of the episodes.
These naughty fidgets can live in a child’s album if you follow the step-by-step instructions:
|


 Step two. Carefully draw the body with a thin line: a short neck, legs, a torso expanding downwards and legs.
  Step three. Let's add fairly long paired ears to the head. They are very unusual for Luntik.
  Step four. On the face we will show round eyes, in them there are pupils, small lines-eyebrows, between them there is a circle, on the cheeks there are two round circles.
 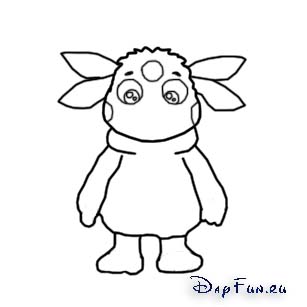 Step five. Two very short lines in the center of the face will give us a small nose. There is a wide mouth underneath. Let's draw fingers on the paws.
  Step six. And now the characteristic pattern on the tummy: one large circle and several small ones. Well, now you know how to draw Luntik. All that remains is to color it.
  See also.


| Read: |
|---|

New
- Siberian Institute of International Relations and Regional Studies (simoir): address, faculties, practice and employment
- The best books on economics and finance for beginners and professionals “Undercover Economist”, Tim Harford
- Tax received from abroad
- Choosing a university and training format
- Graphic patterns as the basis of a trading system
- Is it difficult to get into police school (College of the Ministry of Internal Affairs)
- Mindfulness: meaning, stages, lifestyle and development of the mind What does awareness mean?
- Specialist in the field of commerce and trade International commerce who to work with
- Gap year: what is it and is it possible in Russia? What do they do in gap year?
- Specialty law enforcement who can work


