Sections of the site
Editor's Choice:
- We draw flowers and landscapes in gouache in stages How to draw pictures in watercolor
- How to paint with acrylic paints How to draw different and beautiful drawings with paints
- Watercolor painting lesson for beginners
- How to paint with acrylic paints What can be painted with paints on paper in stages
- Learn to draw animals in stages
- How to learn to draw anime eyes with a pencil step by step
- Learn to draw a human hand
- Drawing anime character with a pencil step by step for beginners
- My Little Pony drawing lesson step by step
- Learning to draw Santa Claus correctly
Advertising
| How to draw the most beautiful ponies. Drawing lesson My Little Pony step by step. How to learn to draw a pony Friendship is magic |
|
This tutorial will show you how to draw characters from the My Little Pony TV series, and you will learn how to give your drawings a unique style.  Anatomy basicsFor any object, drawing anatomy, you should use the simplest shapes (circles, triangles, lines) and perspective guide lines. First, let's take a look at how the character anatomy is drawn in My Little Pony. Start with the basic shapes. They will help you locate the pony's head, chest and rear. Note that the head is the largest circle of all. When the character is facing forward or backward, overlap the circles. The circles never resize unless you are drawing in perspective.  Connect the circles with your neck and belly. Note that the connections should be curved, not straight lines. The legs are very simple, they look like curved triangles. Draw a line of eyes and a perspective guide on the head, this will help you further draw the eyes.  The simplest arrangement of wings and horns. Make sure to draw the horn in the center of the head and it is on the guide line. These steps are already enough to learn how to draw ponies from My Little Pony very quickly.  Head: Sketch perspective guide lines for the orientation of the head and eye level with a light pencil or semi-transparent brush. Place the eyes evenly apart and slightly above the line of the eyes. The ear is about as high as a third of the head. Pay attention to the distance between the eyes and the ear, it took me a long time to learn how far they should be from each other when I had to draw a pony for the first time.  Neck: The length and thickness of the neck remains the same in many poses and different looks, however there are many situations where a long or short neck can help accentuate a pony's emotions. Plus, if the head is mostly in front of the neck, you don't need to draw it at all.  Pose: overlap the circles and position them to help you achieve the pose you want. Overlapping can add depth to a character and render them more voluminous. Prompt: not necessarily every part of the pony should be visible, if it is hidden, then it does not need to be drawn.   Head: For many styles, this is the first thing to mention. Finding a unique approach to drawing a head can make your style stand out from others. The head can be oval, round, pointed, or square.  Eyes: On the head, this is the most important area that can help you stand out. There are many eyes I've drawn, ranging from the original style to the anime. Don't just copy what you see here, but try experimenting. There is no limit for cartoon eyes. Ears: I know a lot of people who draw pony ears in a variety of styles. They can be long, short, fluffy, and so on. Experiment with your ears and have fun! 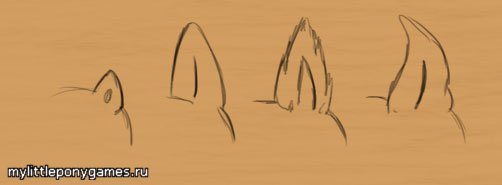 Mouth: When combined with the eyes, the mouth can express very strong emotions that will impress the viewer. The mouth can be small, large, cartoonish, or virtually nonexistent. See which one is closer to you and experiment.  Horn: For unicorns like Rarity or Twilight Sparkle, the horn is the most important part you need to draw after defeating Discord, of course. The length of this horn should fit within the meaning of the style you are aiming for. But sometimes his exaggeration also works. It doesn't matter the look or style in which you draw the ponies from My Little Pony, the correct position of the horn is in the center of the skull. However, the vertical position of the horn on the skull can give the unicorn a very interesting look. 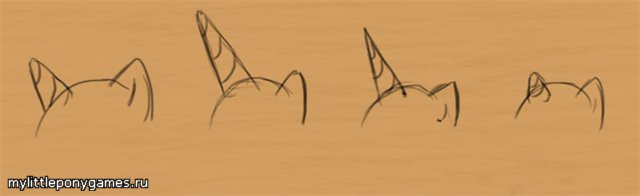 WingsOh, this is where the fun starts! Do not be afraid to draw wings, for inspiration use the wings of real birds or the standards of wings from other cartoons.  Spread wings: Make them big! Or keep it small. Hang a lot of feathers on them, or keep the minimum number of feathers. For characters like Rainbow Dash or Fluttershy, the wings can take a long time to draw and their appearance can change throughout the entire composition. Both large Rainbow Dash wings and small nimble graceful wings are common to many styles, but feel free to go against the general guidelines and experiment.  Folded wings: I find them the most difficult for me, and to be honest, a little tasteless. If you want a more realistic style, you need to pay attention to how real birds fold their wings to convince the viewer that they are folded. Cartoony, they are much simpler, although depending on the species.  Mane and tailThe mane and tail are perhaps one of the main main areas to look at when creating your own style. You can keep their style from the animated series, but we are creating our own style, so let's put the originals aside. (The first two pictures are original, the last one is more random).  Position: Where you place the hair in your drawing can really bring out the personality of the character and the composition of the drawing as a whole. Will you make them flutter in the wind? Will you make the hairstyle live its own life? Maybe it's straight hair? Imagine what they will look like, work on your idea and complete it. Diversity: Long and wavy, rough and pointed, square and stiff. Hair doesn't always have to look like real hair. State: You can go crazy over the amount of hair that looks like depending on the condition. Are they wet? Are they very dry? Dirty? Working with external elements such as the mane and tail makes them stand out, but still try to fit them into the composition of the whole drawing so that they look great. So now you have learned how to draw a pony from the animated series "My Little Pony: Friendship is Magic" and create your own style - stick to the basic rules, but feel free to experiment! How to draw a pony in stagesToday we are with you let's draw a cute pony in stages... The task, at first glance, may seem too simple, but this diagram is the basis of the process of drawing a realistic horse, only in a more complex form. You will learn how to build the "skeleton" of the picture and measure the scale with lines. You will need: - pencil (the softer the better); - two sheets of paper (plain paper for a printer will do); - ballpoint pen or felt-tip pen (for dark lines). You don't need an eraser!
Step 1 Take a piece of paper. Imagine an oval and transfer it to the paper without pressing too hard on the pencil. Don't draw everything with a solid line. Try to draw with short, dashed lines.  This will be the chest This will be the chest Step 2 Divide the oval into two equal parts. If you don't know how, here is one way: Determine the center of the oval and mark it with a dot. Then draw one point to the right and left, on the line of the oval. Connect them with a line - you just split the oval in half.
Step 3 Draw a circle next to the oval. Make it slightly smaller than the oval.  This will be the back of the horse This will be the back of the horse Step 4 Now connect both shapes with two curves. The horse body is ready!  
Step 1 First, draw two lines to define the desired location for the horse's legs. The first one (here: left) should be in front of the oval. The second must go through the closing half of the circle.  Step 2 Mark the points where both lines cross the torso (1) and the intended ground (2). Do you see the lines between these points? Mark the middle of each one.   Step 3 Now mark the midpoints of the resulting line segments.
Step 4 These marks will help us to correctly identify all parts of each of the legs. We can draw lines to outline the width of each one:
Step 5 Now draw the lines in an oval or circle: - Hoof and "elbow" - in an oval - "Knee" - in a circle.
Step 6 We now have enough lines to draw the hooves:
Step 7 To draw the lower legs, connect the hooves and knee joints. If you want to make them look more natural, connect them with curved lines.
Step 8 Now connect the knee and elbow bend, as well as the hoof and back of the torso.  
Step 1 Start at the neck - draw one curved line.
Step 2 Draw a tangent line to the neck. This will be the base of the head.
Step 3 Draw a tangent line in two circles: larger (head) and smaller (muzzle).
Step 4 Draw the eye, nose and smile.
Step 5 Connect the two circles with soft lines to complete the head.
Step 6 Now connect the head and torso with two lines similar to the line of the neck.  
Step 1 To draw the ear, draw a line from the center of the head.
Step 2 Then connect it to the head - you get a "curved triangle".
Step 3 Draw the mane in any style.
Step 4 To start drawing the tail, draw a circle towards the back of the body.
Step 5 Draw a curved line to outline the position of the tail.
Step 6 Draw an oval to enclose the tail line.
Step 7 Now you can connect all the lines for the tail.
Step 1 The base is ready! From this moment, real drawing begins. Take a ballpoint pen (or other object that leaves dark lines) and circle the sketch. At this point, you can mask any errors.
Step 2 Take a second sheet of paper and place it on top of the first. You will see sketch lines below the top sheet. If you do not see them, bring the drawing to the window.
Step 3 Let's go back to drawing. This time we will be working on the final version of the picture, so be careful. You can also draw with darker lines. Trace along the contour of the torso line.
Step 4 Draw two simple lines for the hooves.
Step 5 Draw the mane and tail. If you like, you can add lines to make them more fluffy.
Step 6 Circle the eye, nose and smile. Add a highlight to the eye.
Step 7 Darken the eyes and nose with small circles.
Step 8 Now you can remove the bottom sheet of paper and finish the drawing. For example, you can add wool (with short strokes along the path). You can also add another pair of legs.
Congratulations! You did it! But it's not over yet! Remember that stage when we drew hooves, knees and elbows? This is important for the next part of this tutorial, which we'll be in! The lesson was translated from design.tutsplus.com. Note: The author of this tutorial is our reader under the nickname MR-Kreker. If you also have your own drawing lessons and you want to publish them on our blog, write to me about it on the page:. Thank you for your attention, and now let's see what MR-Kreker has prepared for us. First, let's see what we need: type H and B pencils, a sheet of paper, a stand and colored pencils. I immediately apologize for the quality of the photos - the scanner is under repair. Since this is my first lesson and I was just too lazy to go to the nearest store for a stand, I built it for myself from a construction set. Check it out: How to drawMyLittlePony pencil step by stepStep one. Let's draw a circle. It will represent the head. Remember that it doesn't have to be completely perfect, but a little flattened. Then we will draw an oblong oval. This will be our body. Step five. Next, we will continue to create our little pony hair. Draw them with smooth lines. Let's fix it up a bit with an eraser and voila: our sketch is ready! Now let's move on to stroking and fixing minor bugs. For this purpose, I would advise you to take a soft type B pencil. First, we outline the head, eyes, ear, and then carefully shade the pupils. Are you a creative person, can't live without drawing? Or just want to teach your child how to create real masterpieces on white paper? We suggest you take up drawing ponies, which you and your child will definitely like. You can depict horses in different ways, and now we will consider each. Here you will see how to draw ponies in stages, you can easily create beautiful images of little horses from your favorite cartoon. Anyone will like such delightful pictures, they will immediately cheer you up and delight you with their beauty and innocence. And so how to draw a pony? Let's start learning just now! All true artists know that the slightest mistake can ruin the whole picture. Therefore, first, remember the important recommendations, the main nuances and all the tricks:
Now you will see how to draw a pony in stages. We will depict several small horses, each of which will have its own appearance and character. Remember! You do not need to immediately create with felt-tip pens or something else, it will be right if you first make the basis with a simple pencil. For coloring horses, you can use pencils, felt-tip pens, or drawing paints. Do as you see fit. Good luck! Draw MyLittlePonyThe popular children's cartoon made the heroes of MyLittlePony, the magnificent horses, very famous. Now we will portray this cute pony together. Listen to all the advice, carefully draw the main lines, then remove all unnecessary.
This little girl in your picture will be sitting with her eyes closed, with a fluffy combed mane and a cheerfully pulled up tail.
On the left side, the mane is slightly shorter, with a perky curl.
On the right, the mane remains grated in relation to us, but it is still clearly visible.
Pony RainbowRainbow Dash is an adorable horse with a ponytail and rainbow colored hair. She has an unusual rainbow-shaped tattoo.
Not sure how to draw ponyDash? Follow our algorithm and you will definitely succeed! Let's get started!
How to draw a pony Rarity
Would you like to draw an adorable Rarity from your favorite cartoon? Then start creating with us right now!
We depict the horse Sparkle on paperSparkle is a beautiful unicorn that children love very much.
For lovers of real creativity, we will demonstrate how to draw a pony in stages with a pencil on paper.
Learn to draw the famous pony FlatershyBig-eyed Flatershy has long become the favorite of many children. She's just gorgeous.
And right now you can learn to draw it. Unusually beautiful pictures with this princess will not leave anyone indifferent. Let's get started! First you need to draw a pony with a pencil.
How to draw Pinkie Pie correctlyCheerful, perky Pinkie Pie conquered everyone with her beauty. Her pink coat, bright mane and thigh pattern are striking. It is impossible to forget this charm.
All fans of this pony can easily and quickly learn how to draw it. Those who wish should heed our advice and revise the algorithm.
How to draw an adorable ApplejackThe magnificent Applejack fell to the soul not only of children, but also of adults. The apple princess cowboy hat makes it even more attractive. This fashionista wears rubber bands on her mane and tail. There is no end to her energy.
Let's draw this beauty together.
Now you know how to draw a pony from your favorite cartoon. Be creative yourself, draw with friends, teach your kids. The world famous animated series My Little Pony has gained an army of fans both among children and adults all over the world. The cartoon tells us about the life of little ponies in the wonderful country of Equestria. Incredibly cute and mischievous horses show an example of true friendship, kindness, miracles and magic. Each character of this cartoon is unique, each new episode tells about adventures and events in a magical land, riveting the attention of the child and his parents. And, of course, after watching, many are wondering how to draw a pony. Drawing these cartoon characters is an incredibly fun process for both kids and adults. We have prepared for you a simple lesson that will teach you how to draw ponies on paper as similar as possible to the original characters.
First, decide on the pony hero you want to draw: Pinkie Pie Pony, Rainbow, Apple Jack. Or maybe you want to start with Princess Twilight? One way or another, the first step is to understand the anatomy of the pony. Some characters have wings, others are unicorns, even the ponies have their manes combed differently. It is very important to know the characteristics of each character: take a close look at the horses, trying to catch the characteristic features, this will greatly facilitate the drawing process. Funny ponies do not tolerate boredom and pale colors, so stock up on bright pencils and a good mood. What you need to draw
Choose a pencil with which you will draw the outline of the horse, it should not be too bright and must be erased well with an eraser. Be prepared to tweak your sketch frequently, so the eraser should wear well and leave no residue. Rainbow ponies can be colored with crayons, wax crayons and felt-tip pens. And, perhaps, you would like to paint funny horses with bright watercolors or gouache. Drawing instructionThe very first and most important point is drawing in a well-lit place, while taking your time and enjoy the process. Before starting to use bright colors, draw a sketch of the future drawing with a simple pencil. Now let's go directly to the general algorithm and each character. General instructionAll the heroes of the cartoon of the same name are united by the fact that they are all ponies, which means that having learned how to draw one little horse, the image of the rest of the characters will not be difficult for you. You should start drawing horses in stages, based on our instructions and advice.
The front hooves of all ponies are located clearly under the muzzle, be sure to take this fact into account when drawing the character.
Drawing a pony Rainbow is quite simple if you already know how to draw a horse from the top description. Pony Rainbow from other characters is distinguished by a voluminous rainbow mane, the same rainbow tail and wings. The Rainbow itself is painted in sky blue. Rainbow's bangs are not as neat as those of the rest of the characters. A slightly disheveled hairstyle shows the character of an active and restless horse well. Color the eyes purple. This horse is a unicorn, so when drawing an oval head, immediately determine the location of the future horn.
Rarity is the owner of curly mane, also on the character's thigh there is a special mark - 3 blue crystals, because she has the ability to find these stones. Rarity is painted white and her mane is bright purple. The pony's eyes are blue with very expressive and long eyelashes.
Pony Twilight, like Rarity, is a unicorn, but Princess Twilight's bangs are straight, the tail ends in a neat horizontal line, as if the horse had just been taken to the hairdresser. The Sparkle itself is pale purple in color, and pink and purple stripes stand out clearly on the dark blue mane and tail. The final stage of drawing: on Sparkle's thigh, draw 4 small stars and one large one.
When drawing Flatershy, pay attention to the fact that this horse has wings and a very voluminous mane and tail. Therefore, when drawing the mane, take enough space for the wing and other attributes. Color Flatershay herself yellow, and the mane and tail with a pale pink color. Draw 3 small butterflies on the horse's thigh. Note that this magical character has green eyes.
Draw a blank pony using the above algorithms. Pinkie Pie has a bright pink curly mane, big blue eyes, and draw 3 balloons on her hip - the hallmark of this cheerful and bright cartoon character. Pony Apple Jack
Sketch the pony as described in the general flowchart. Pony Apple Jack is wearing a brown cowboy hat, and the horse's mane and tail are tied at the ends with an elastic band. Color Apple Jack orange, draw 3 small neat apples on the thigh. Shade the eyes with green and the mane with yellow. ConclusionWe hope that by following our instructions you will learn how to draw little ponies. If you wish, you can even draw them on the wall, using the image of your favorite characters when decorating various children's events or just to cheer up, because looking at cute little horses, it is impossible not to smile! Once you've mastered the process of drawing these horses, you can create new illustrations and stories yourself! Supplement the pictures with new elements, use the entire palette of colors, give free rein to your imagination, and the drawing will delight not only you, but also those around you. And children who drew ponies according to this instruction will happily show their picture and be proud of the work done. Learning to draw your favorite cartoon characters is an exciting pastime for a person of absolutely any age. It will definitely cheer up both adults and children. Mother of two children. I have been running a household for over 7 years - this is my main job. I love to experiment, I constantly try various means, methods, techniques that can make our life easier, more modern, richer. I love my family. |


 As you can see, you can always find a way to draw, if you wish. And now I will tell you more about the drawing process.
 Step two. Let's create a markup for the eyes. This is a line that goes through the middle of the head and depending on how you look at the face, it can go either down or up along the edges. In our case, it goes up.
  Step three. Let's draw the approximate outlines of the eyes. At this stage, it is important not to put pressure on the pencil, so that later you can correct mistakes. By the way, for many of the artists it is important to know what they are getting before the final result. This helps them to get inspired and not quit their jobs. Therefore, we will continue to detail the face of our pony. We continue to detail: we will more accurately and smoothly outline the contours of the head, draw the pupils and reflections on them, select the nose, mouth, as well as part of the hair and the ear. Be aware that the nose should not be higher than the eyes, otherwise you will get a badass. 🙂 And here's what we ended up with:
  Step four. See what happened? The drawing seemed to have changed and now I want to continue it. Draw over and over again!
  Oops, we got a jamb: due to the fact that I strained my convolutions, my body turned out to be too long and I had to tinker a little to get the proportions to match the original. Tip: to draw the proportions correctly, squint with one eye and look at the drawing: what seems strange, but not too much, gently erase with an eraser and correct. Also at this stage we draw the legs of the pony and the wing.
 Step six. We outline the hair. At this stage, try to improve your sketch a little and make the lines smooth. We outline the body and legs. And now - the donkey is ready!
  Step seven. We take colored pencils and paint. And this is what it should look like:
  Let's give a name to our pony and sign the drawing.


 Have some pencils and a good eraser ready, you may need to erase and adjust the lines often. Stock up on several sheets of paper, be sure to use one sheet as a draft, on it you will try the thickness of the lines and check the sharpening of the "tools".


Popular:

New
- "Mahmud is in place, we can start" or interesting facts about the papakha
- I never took off my hat crossword clue
- Types of genres of literary works Large narrative work of fiction with a complex plot
- Compilation of Dramas Featuring Lee Jong Suk Films with Lee Jong Juice
- So Ji Soo Kim Ji Soo Drama
- Park Shin Hye - filmography, biography and personal life Where Pak Shin Hye is filmed
- How Perm people live now, who won millions on TV shows
- Does 21st Century India Need Castes?
- Violin post briefly
- Bach: biography in short for children Biography of bach johann sebastian in short for 6


