Site sections
Editor's Choice:
- What to feed a hedgehog at home?
- How to make a poster with chocolates and inscriptions with your own hands?
- Do-it-yourself hazel onion
- What do you need for a picnic
- Pike head ear
- Rating of winter spinners for perch
- How to salt pike caviar
- How to make cheese at home - recipe
- How to care for a hedgehog at home
- How to make a hunting bow with your own hands?
Advertising
| DIY paper hat with photo and video selection |
|
Once upon a time, in the distant Soviet years, a do-it-yourself paper hat was very popular with builders. Having created it, people provided themselves with a reliable, quick to manufacture and cheap headgear. Of course, you don’t look like it in winter and you won’t put it on a museum, but in their field such hats are widespread. At present, there are many variations of them. Yes, and there are quite a few new ones. Let's try to form a certain classification. All paper hats can be divided into two groups, depending on the method of manufacture. The first group includes varieties of hats that are constructed by folding. This method is also called - origami. The second group includes hats made by cutting, gluing, or otherwise fastening parts. Also, this group is characterized by the use of paper of various types and colors, with the addition of decoration elements. This is a more labor intensive process. But the result is very colorful and original. Purpose of paper hats
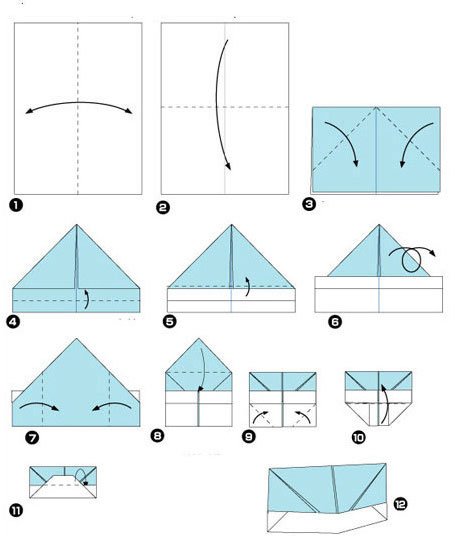
Types of hats - paper origamiTheir representatives are different in complexity and appearance. And they are also divided according to purpose. Some hats are universal and are in great demand among different generations. Consider the presented schemes and try to start with a simple option that we have known since childhood. Cap cap origami
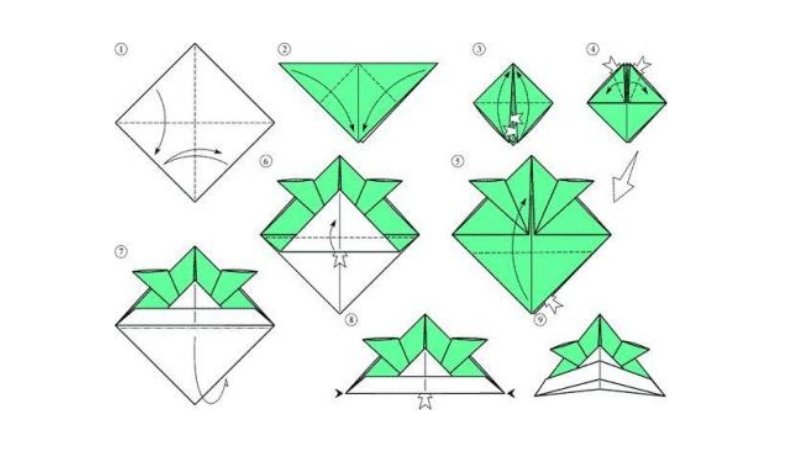
Rain hatOf course, it is difficult to believe that paper can save from water. But, if you don’t stay out in the rain for a long time, and the paper is strong, then it makes sense to use it. Moreover, it is not at all difficult to do this. The steps are the same as in a simple hat, only one side is not wrapped and remains open. This is provided to protect against drops falling behind the collar. Medic hat or, another name, samurai hatWe offer to see the scheme for the formation of this product. Also at the end of the article added video materials on this type of origami helmet.
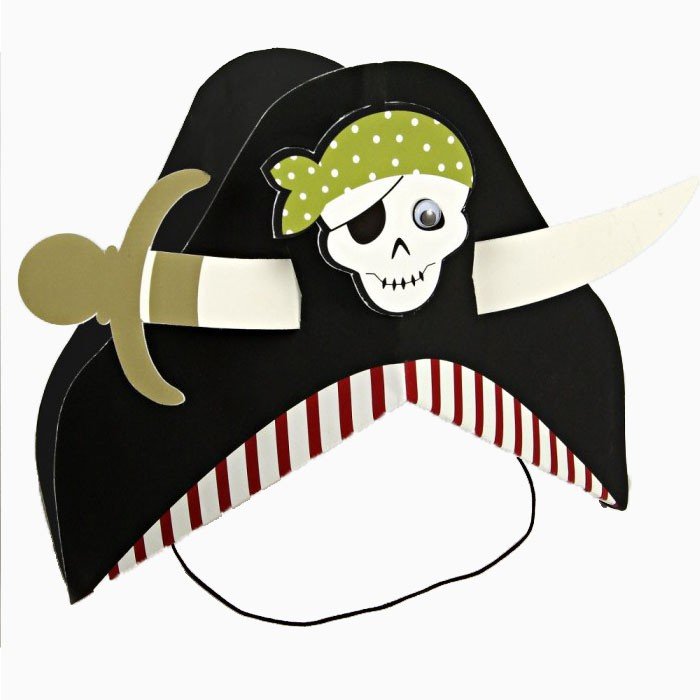
The presented models are not the limit. There are options for a paper cowboy hat, skullcap, different types of helmet, and more. Paper carnival hatsThere are many ideas for using paper to create costumes. And more ideas are in the air. There are, for example, several varieties of pirate hats. The principle of their creation is similar: two cocked hats are cut out of two sheets of thick cardboard and connected to each other. At the same time, it is necessary to make an extension to the bottom, and attach the bezel from the inside. This headband will hold the hat on your head. And the only thing left is to decorate and add pirate elements (skull, bones, etc.).
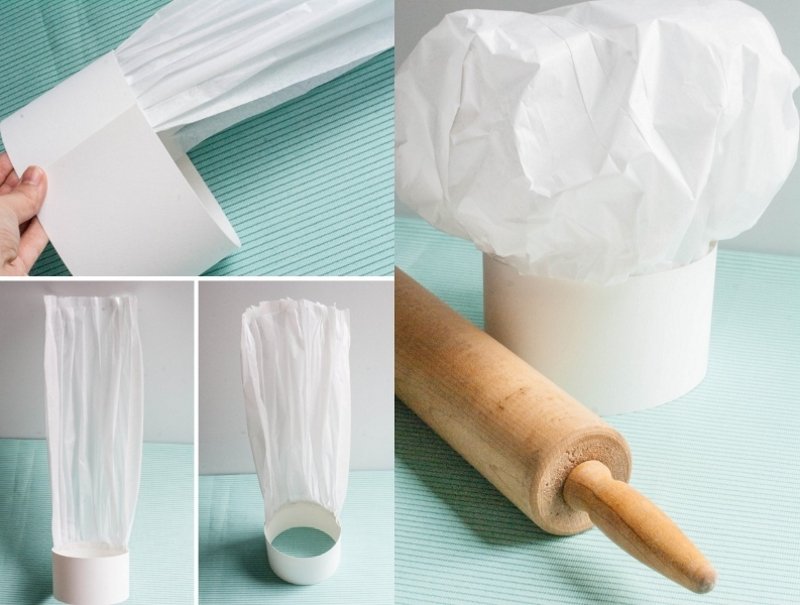
Another representative of past centuries is the top hat, which exudes nobility and respectability. To make it, you will also need thick black cardboard. Structural elements are made separately (high pipe, top and brim of the hat), and then fastened together. Cap for a real chef.Protects and looks impressive, but gentle. As you can see from the photo, this is a fairly simple process and even a child can handle it.
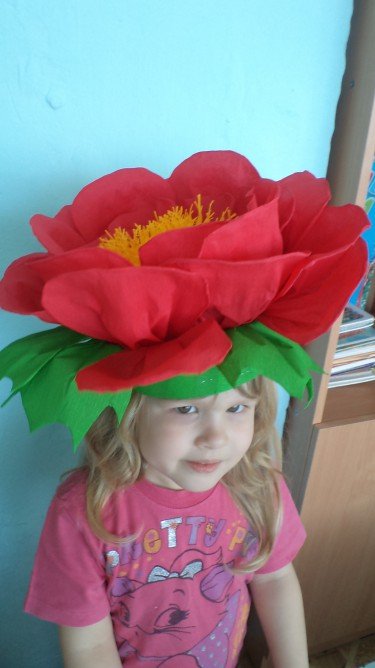
"Scarlet Poppy"We suggest you try to make a hat in the form of a poppy flower. This is a very bright and original detail for a children's costume. Such an accessory is suitable for a New Year's party and for celebrating a birthday. What girl will deny herself the pleasure of trying on such a charming little thing and feel like a fairy of flowers. And kindergarten teachers will take note of such an idea to add beauty and solemnity to any children's holiday. Below is a step by step photo.
The first thing to do is to prepare all the necessary materials. You will need:
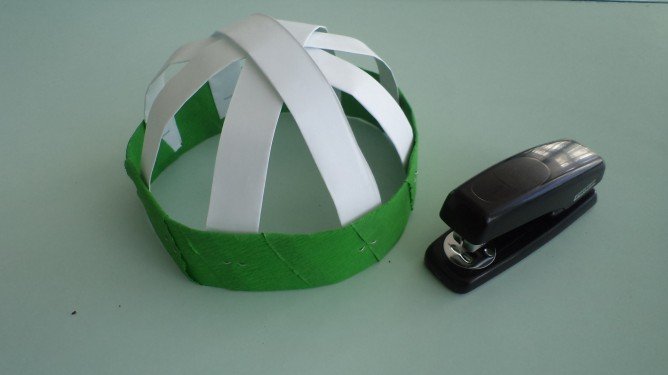
We connect a wide strip so that we get a rim. Try it on the child's head so that it fits snugly. And fasten with a stapler. After that, it is necessary to wrap the rim with a narrow strip of green paper so as to cover the entire surface. And also fasten with staples. Now we form the top of the cap so that it fits well on the head. To do this, attach the remaining strips of cardboard to the rim along the inside.
From the red corrugation we cut out the flower petals, rectangular in shape, rounded on one side. The petals are approximately 7cm long. It can be adjusted, depending on how much you want to get a flower. We form the petals by folding the non-rounded edge so that we get a slightly convex shape. We attach the resulting petals alternately to the rim and upper strips so that we get a bud. We cut a long strip from yellow paper and twist it into a tube. On the one hand, we cut it so that we get a fluffy crown and fasten it in the middle of the flower.
Our original head decoration is ready. If you show imagination, then on the basis of this master class you can embody many different flower (and not only) ideas. Video CompilationAt the end of the article, we suggest that you familiarize yourself with the video material on this topic. This will help to consider certain nuances that are not visible in the diagrams, and more accurately follow the instructions. What will help to get a quality result. |

| Read: |
|---|
New
- Vinaigrette with beans calories per 100 grams
- How to deliciously cook diet cottage cheese pancakes Pp cottage cheese pancakes
- Soybean sprouts - sprouted: a description of their benefits, calories, as well as a photo Soybean sprouts are useful
- Chicken breast stewed in sour cream in a pan - he, you and me will like it!
- Protein Recipes Helpful Video Recipes
- Preservative Sulfur dioxide: impact on the human body
- Pickled Cucumber Are Pickled Cucumbers Caloric
- Sausage cheese: the benefits and harms of the product for the body Smoked sausage cheese calories per 100 grams
- Why does not accept the disc on the computer
- The classic recipe for cottage cheese casserole in the oven


