Site sections
Editor's Choice:
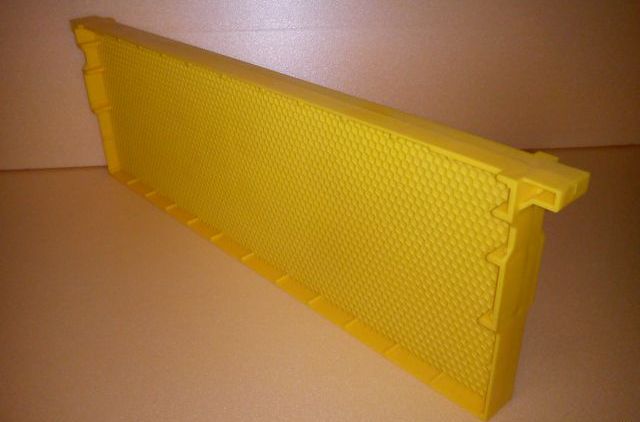
- Making bee frames
- Pollack in the oven with carrots and onions
- Zelenushki and parsley: description, collection sites and cooking options
- How to make a paper out of paper cap - step by step
- How to get a loan from the Rosselkhozbank for LPH
- All about fishing. The concept of rod test
- Technique fishing carp on technoplankton
- Beach Volleyball: Basic Rules
- The most dangerous reptiles on earth
- Dictionary of football terms
Advertising
| Making bee frames. Making frames for hives |
|
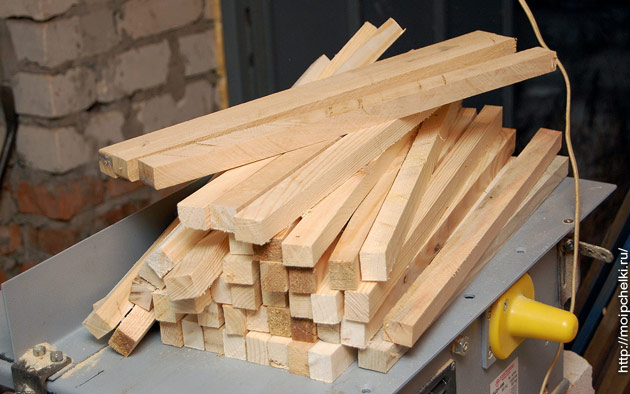
Still, I found a place where in the winter you can put a woodworking machine and combine the useful with the even more useful. This place is at a construction site. Three days later, I guard the whole nine-storey house (unfinished). In one of the entrances, I decided to equip myself with a temporary workshop and master the production of frameworks for hives. Only mhhhhhhhhh, a celibate shouldn't know In winter, no one appears here at all; it is possible not only to frame, but also to plane the hives until spring, it would be possible. So don't give me up ... Such a simple household machine was kindly given to me for use by one good friend.
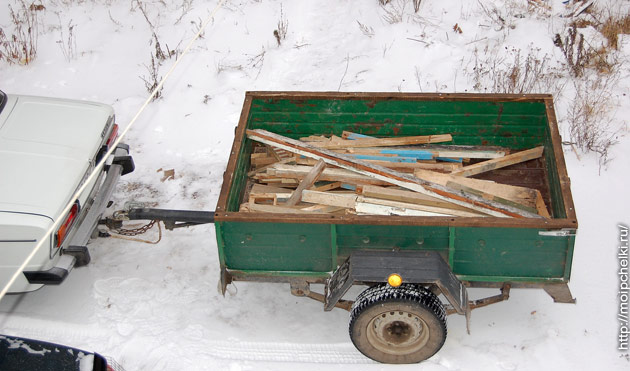
The father in the village also has a machine, but he is homemade, heavy and terribly impractical. If I continue beekeeping, I definitely need to buy my own, but for now we presume that the beginner beekeeper has nothing of his own. The premises were illegally leased, the machine requested, and where to find the material? To buy dry industrial wood will be expensive. In the basement of the house where I live, all the pieces of wood that could have been used in the business: door frames, some bars, frames and other “garbage” that I would not have paid any attention to earlier. Pine, poplar, alder - stale wood, dry and light - what you need. Almost half of the trailer has been picked up.
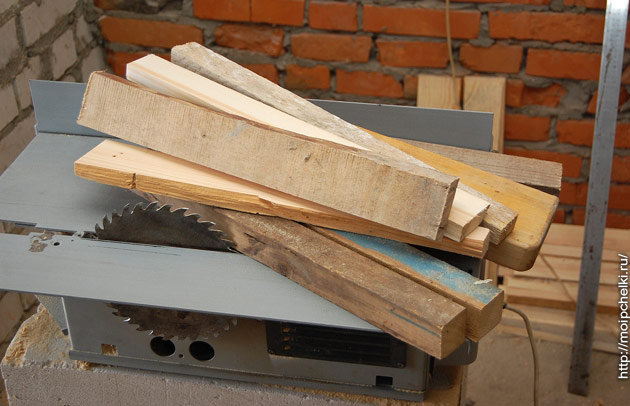
I went through this trash again, raised the nails, hinges, cleaned it as much as I could from the paint (it quickly taps the saws and knives). You can start manufacturing. Drawing frame for a long time already in my head, here it is assembled:
For one case you need 10 frames. But the constituent parts and their sizes:
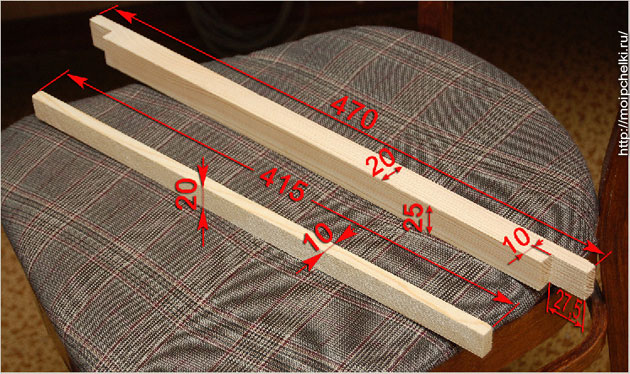
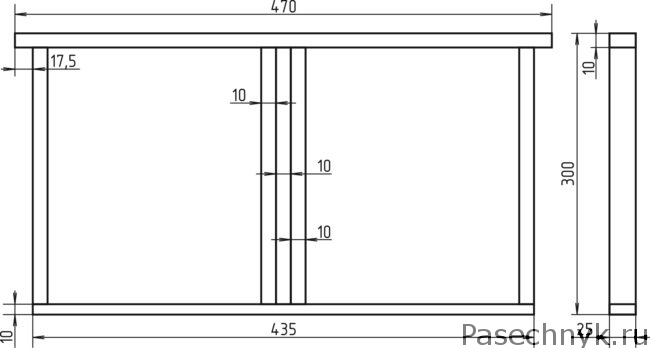
It seems that everything is simple and clear. I cut the blanks. This is for the upper bars - 470 mm long:
For the lower and side bars - length 415 and 220 mm, respectively. Each blank is stitched from two sides.
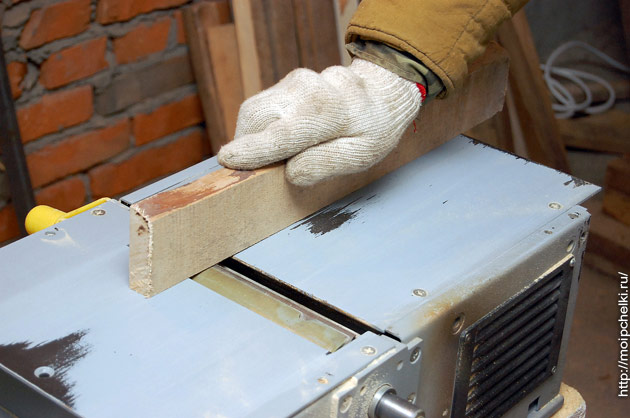
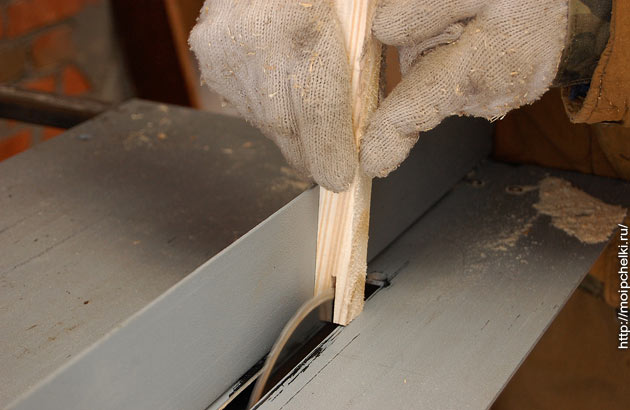
I make the top bars. Put side saw at the saw at a distance of 25 mm.
Pressing planed planes to the table and the rest, spreading the workpiece. Keep your fingers away from the saw, using a wooden pusher.
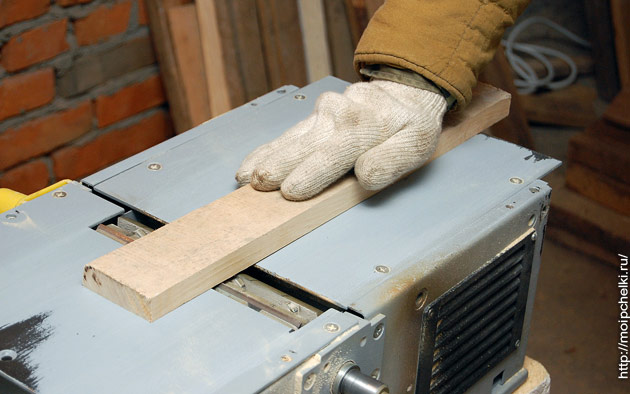
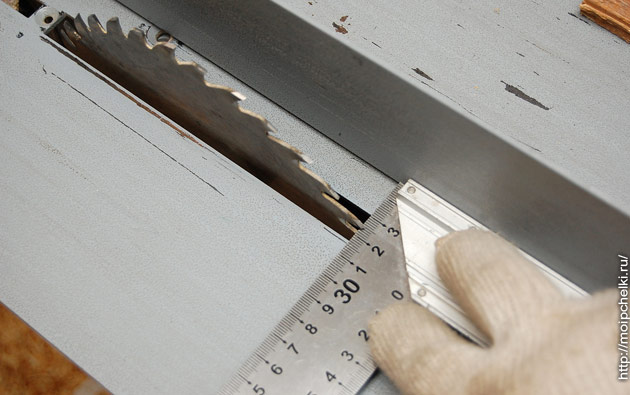
There is no hurry and yawn - you can lose a finger, or even several at once. In general, if you hurry - there is nothing to do at the machine. Extraneous thoughts in such work should not be distracting, not to mention the fact that not a single drop of alcohol should obscure the mind. The cost of the error is too high. Second - and you will not return anything. No matter how much you want, whatever money is paid ... You cannot sew a finger back, you will not restore the functionality of the brush. Bitter experience, unfortunately there. Several operations and a year of rehabilitation ... And now put the side emphasis on the size of 20 mm and trim the slats on the other side.
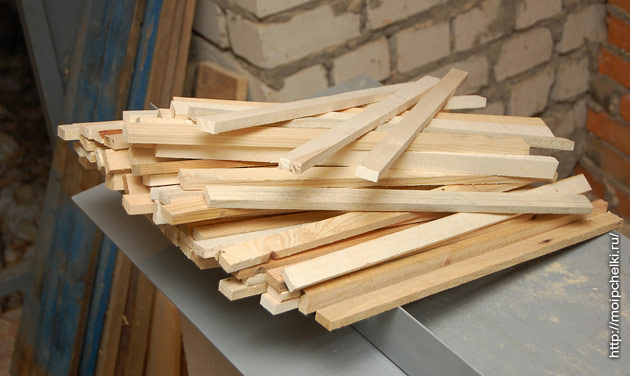
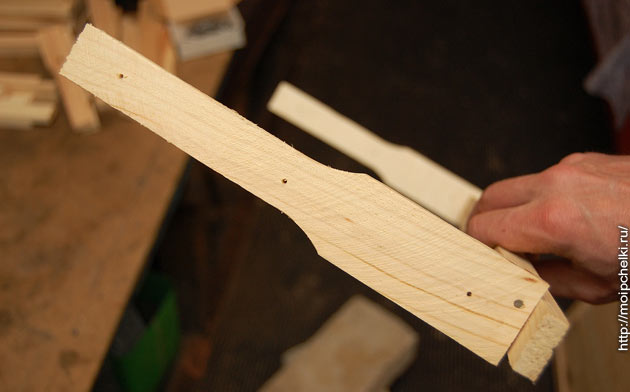
These are the top bars for hive frames.
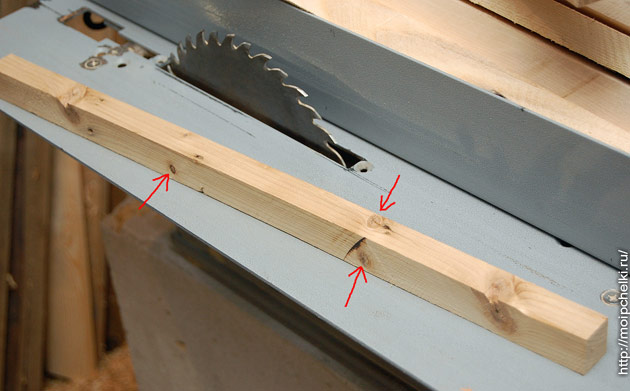
I try to get the strips without knots. With such here, small still fit:
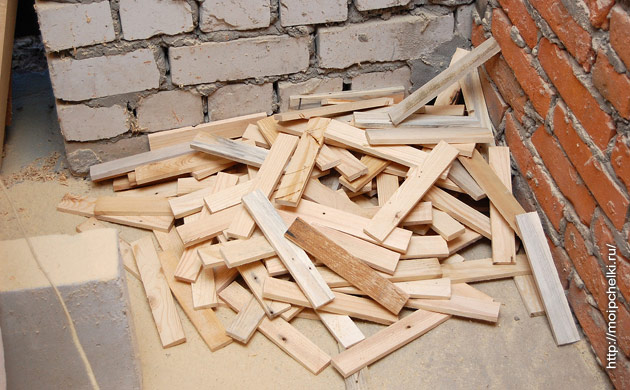
And those closer to the edges - this is a marriage. Bar with large knots throw out without regret. It is heavy, releases resin, then bends at knots, and when hammering nails during assembly, it breaks. And the most unpleasant thing that can happen is that the frame on the bitch can simply break and just when its full honey or brood will be removed from the hive. Sod's Law…
And planks for side slats.
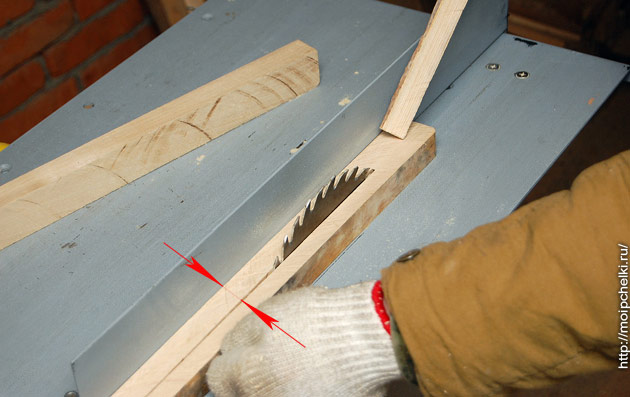
That's not all. In the upper bars need to cut the hangers. I do one propyl:
And then another.
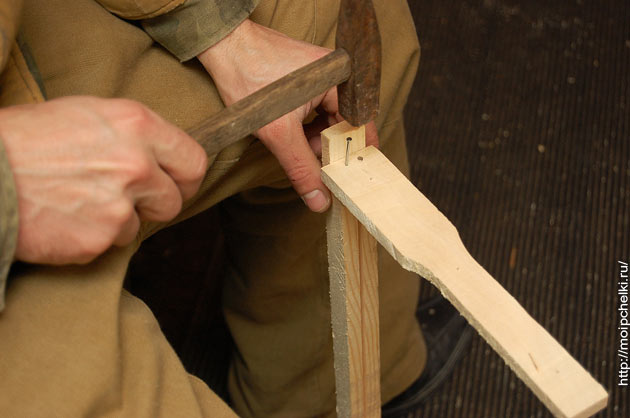
Well, the final stage of manufacturing - assembly. Those who have the process put on stream use for this powerful pneumatic staplers with a long bracket. I, a beginner, used the usual hammer and nails. I like nails for this case 1.6x32 mm - and the length is sufficient, and the planks do not split.
Having beaten the second edge with one nail, I check whether in one plane the “horns” turned out, if necessary, I correct it by turning the bar.
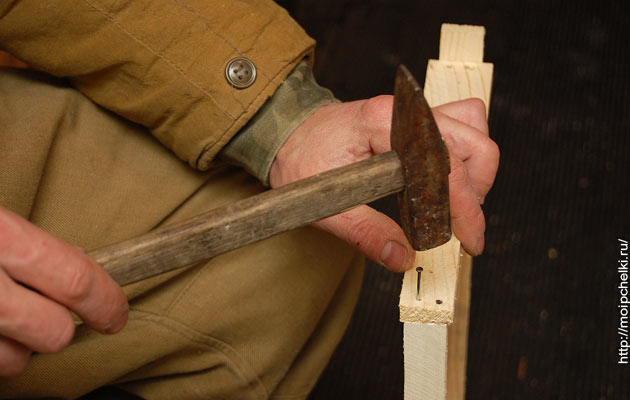
While on one nail, this can be done, when on two - no longer. If you do not check - the framework can turn out to be a “propeller” and will interfere with each other in the hive. The bottom bar is nailed on one side with two nails - so that it does not turn, on the other - one is enough.
That's all. It would seem that making frames for hives is not such a complicated process, everything is fast on paper. But I had to work hard, stand in the cold, strain my brains somewhere. And run with the camera out of the wagon - in the cold, the batteries are quickly discharged and the focus mechanism freezes. And I like this job ... With a tree, but with my own hands. Well, if there is no machine and material - one way out - to buy frames in the store. And the prices are there ... For example, one assembled frame costs 6 hryvnas, which is about 70-80 American cents or 24 rubles. In online stores you can find much cheaper, for example, 3.5-4 hryvnia in a disassembled form. But have to pay for shipping. Here is foundation, but more on that another time. Best regards and see you soon! PS Frames for 145 mm I was already making with a different technology, with locks, a thin upper and lower bar. Details And then he made another dozen frames at once. To receive new blog posts to your e-mail, subscribe. The key to successful breeding bees are comfortable and properly equipped hives. The extent to which the honey collection will be successful depends largely on how well the frames are made and arranged inside the bee house. The correct design of the framework, despite its apparent simplicity, must take into account a number of factors, each of which has a significant impact on their quality. This should include:
Therefore, the correct production of frameworks for hives is a very important and crucial task, and it is necessary to approach it very responsibly. The location of the frames inside the hiveThe spatial position of the cellular frames is determined depending on the direction of their axes. It can be longitudinal or transverse with respect to the letka. As experienced beekeepers note, the chosen method of positioning the framework for hives does not affect the performance of bees, but the speed and convenience of control on the part of the beekeeper depend on it. With a longitudinal arrangement, it is possible to tilt the hive and at once examine all the frames. In a transverse position, this is not possible, since the hive frames will sway and may crush the bees.
In the case of beehives with a square cross section (for example, a magazine type), you can at any time change the spatial arrangement of the frames and move to an accelerated control method. Sizing and basic standardsBefore you determine the required geometric dimensions of the framework, you need to know the basic requirements for their proper placement. Both their overall productivity and the development of your apiary may depend on their proper spatial location inside the hive. Therefore, in the manufacture and installation of frames, it should be borne in mind that the distance:
Manufacturing technology for hive frameworks should ensure their reliable fixation in the internal volume and the possibility of unimpeded seizure, if necessary. Among the most common standards showing good results, experts indicate the following dimensions, which have a framework for honeycomb in external height and width:
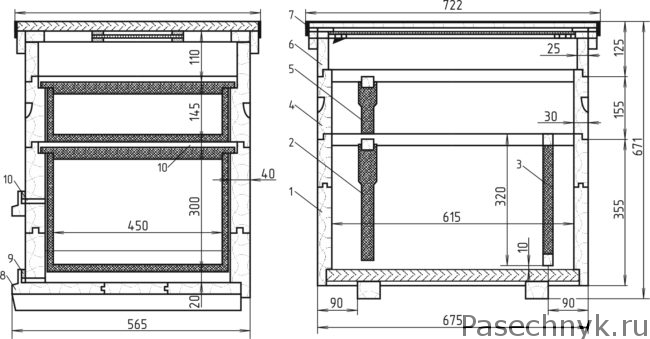
In determining the required dimensions, it should also be borne in mind that they must correspond to the size of the hive in order to fully comply with the conditions specified above. Therefore, we can say that the design of the house for bees and the size of the honeycomb frames are inextricably linked, and your honey collection and proper development of the bee family depend on the right combination. 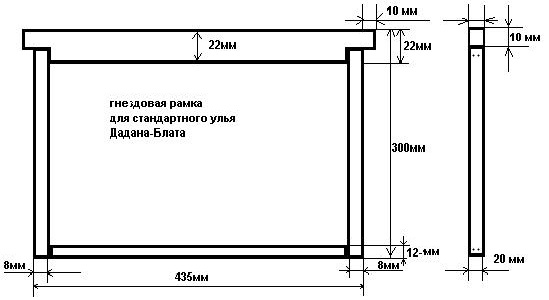 The design and size of the frame Dadana-Blatt. The design and size of the frame Dadana-Blatt. Distance between framesThe construction of honeycombs occurs within the framework that the beekeeper installs in the hive. This technology allows you to simplify the control of filling the honeycomb and facilitate the process of collecting honey. The stability of the cells can be increased by installing a special wax plate and fixing it on the wire stretched inside. Intermediate honeycomb walls can be purchased at specialized beekeeping shops or manufactured independently. Bees fill honeycombs in ready-made beeswax plates much faster.  Drawing and frame size Ruth. Drawing and frame size Ruth. The distance between the planes of the framework for hives is called "bee streets." Their width should be within 10-12 mm. Reducing the passage will not allow bees to work normally on honeycombs due to crowding, and because of the increased distance, construction of honeycombs between frames can begin or a significant increase in the thickness of the honeycomb can occur. In order to precisely maintain the required distance, the side slats are given a figured shape in which the upper part of the plank is wider and the middle is thin. Another solution may be the use of special spacers on the side slats, which prevent the framework from converging and allow for quick and accurate installation. Principle of constructionTraditional honeycomb frames are made from 4 wooden planks: two side, top and bottom. In this case, the length of the upper strap is slightly larger than the overall dimensions of the frame and its edges protrude on both sides. This allows you to quickly and easily install the structure inside the hive, laying it on the existing longitudinal support along the side walls. 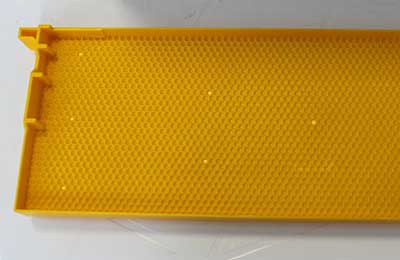 The dimensions of the billet Ruta. The dimensions of the billet Ruta. Trading networks offer beekeepers sets of elements for assembly, bee frames in ready-made assembled form, with holes for wire or without them. The price of factory-made frames depends on the type of wood, the quality of processing of parts, the presence of holes, the level of assembly and the brand of the manufacturer. The most expensive products are made of beech wood and are delivered in a completely ready to use form. The type of material chosen for making frames has a significant impact on the efficiency of their use and the amount of honeycomb produced. Also important are the dimensions of the structure, its strength and weight. As the material used today wood and plastics. 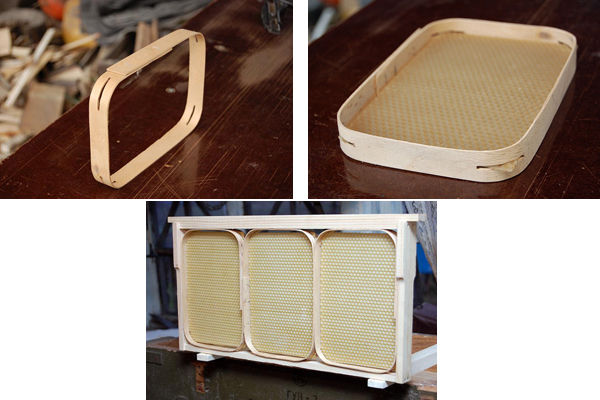 Collecting sectional frame. Collecting sectional frame. Moreover, plastic, as an innovative material, has not yet received wide distribution. Most beekeepers, in the manufacture of bee frames, prefer wood as a more natural and environmentally friendly material. The wooden planks used for assembly should be well treated with sandpaper or on a sanding machine until a completely smooth surface is obtained. When using resinous softwood, the surface of the planks is recommended to be treated with hot wax or natural drying oil. The joining of the planks between themselves should be done with steel screws, having previously missed the joints with PVA glue. The use of nails may not provide sufficient structural strength.
To ensure the best stability of the assembled structure, it is recommended to make 4 tensions with the longitudinal arrangement of the string and 6 times to tension the wire with the transverse. In the mini framework, you can do only 2 broaches. The use of hard wood can reduce the number of strings and simplify the process of performing work, but this option will increase the weight of the product. To ensure that the installed wire does not protrude above the surface of the slats and does not touch the walls of the hive, making them difficult to install, longitudinal grooves are cut in the plates. The diameter of the holes drilled to pass the wire should not exceed 1.5 times the diameter of the wire. The holes themselves are best done with a low-speed drill or screwdriver. Good results can be obtained by burning holes with hot metal. The use of cold sewers or other similar tools for these purposes can lead to the breaking of the finished straps. Which wire layout is better?The increased number of strained strings with a transverse arrangement allows you to more evenly distribute the force applied to the slats, and reduce the possible bending. Four, and sometimes just two strained strings increase the force effect and contribute to greater bending, and, hence, the subsequent weakening of the wire tension. On the other hand, an increase in the number of strings leads to a complication of the structure, increases the time for its manufacture and complicates the process of soldering the intermediate wall from the honeycomb to the wire. Therefore, when choosing the location of steel strings and their number, you should consider the strength of the material of the frame and its size, since the larger the frame, the more stretch will be required.
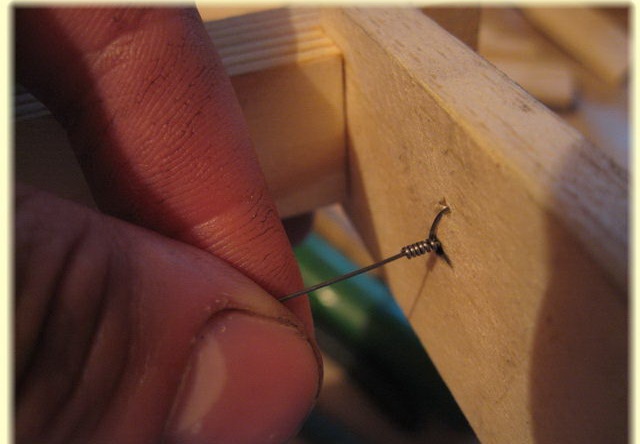
They should protrude above the surface of the strap by 4-5 mm, which is quite enough for fixing the wire. The length of the nails is 15-20 mm, diameter 1.5-2.0 mm, and the surface itself must have an anti-corrosion coating. If you need to perform braces, nails are simply hammered into the bar on the hat. At the same time the wire changes its length and provides the best tension. Such a stretch technique allows you to do without the use of a tensioning machine or other specialized devices. Choosing wire for framesThe wire used for bee frames as tension strings should be steel. The use of wire from non-ferrous metal or thick fishing line is not recommended due to the soft structure of the material and the ability to stretch over time, as well as the complex technology of fastening on the frame of the intermediate wall. In addition, the use of fishing line or soft metal does not ensure the safety of the strings when removing the honeycomb with a knife.
Therefore, in specialized stores for beekeepers offer two types of steel wire: ordinary black and stainless high-alloyed. Stainless steel is durable, but it is more expensive. Its increased rigidity somewhat complicates the process of stretching the frame. At the same time, it should be borne in mind that black strings are much cheaper and softer, but may eventually rust due to the processing of frames with pest formulations. The final choice is yours, as each type of wire has its advantages and disadvantages. 1 of 3
Wire tensioning instructionsAfter making wooden frames with installed spacers or figured side planks, it is necessary to proceed to the tension of the wire for the subsequent fixing on it of the intermediate wall of the honeycomb. To do this, you need the following inventory and materials:
To improve the convenience of unwinding the wire, it is recommended to install the coil on a vertically located axis. String installation and stretchingDuring string stretching on the frame, the order of work will be as follows:
The level of string tension should ensure the appearance of a musical tone when it is twitching with a finger. In the opposite case, you must perform waist. Installing the inner wallAfter the frame with the tensioned strings is ready, you can begin the process of fastening the inner wall of the honeycomb to the wire. This is done by heating the wire and melting it into the material of the fixed plate. The ends of the wire are connected to a current transformer operating at a supplied voltage of 12-36V. Use of equipment at 220V is prohibited due to safety concerns. As a source of current, you can use a charger for car batteries or buy a device in a specialized beekeeping store in the inventory department. Using a car battery is not recommended because you can just ruin it, including in short circuit mode. For soldering the intermediate wall:
For bees, the principal location of the intermediate wall does not matter much. It may slightly reach the edge of the frame, have a slight bias during installation, or be assembled from several lanes. The main thing is that it does not disappear after the frame is installed in the hive. Plastic hive framesToday, most beekeepers use wood for making bee frames as a natural material that has been tested for centuries. However, the development of modern technology has led to the emergence of plastic products on the market. This is due to the desire of manufacturers to exceed the performance of traditional materials and create a lighter, stronger and more convenient framework for hives. In cold weather, wood quite actively absorbs moisture from the air, and it shrivels during heat. This leads to a deterioration in the quality of the framework and may lead to a decrease in the quality of honey. So far, the frames of plastic are manufactured only in an industrial way and sold as ready-to-use products. Constructions of a full-fledged standard size and a mini frame for connecting them into a cassette unit are made of plastic. In this case, the inner space of the product is filled with a thin plastic plate and the tension of the wire with the subsequent installation of the inner wall is not required. It is enough just to cover the plastic surface with melted wax with a roller and set the frame in the hive. SummarizingIndependent production of a framework for beehives is not a difficult job, but even a beginning beekeeper can do it. Traditional designs are made of wood and steel wire. The overall dimensions of the frames depend on the design of the hive and its volume. In addition, the plastic frames, which are easier to use, but more expensive for a beekeeper, are sold and successfully implemented. The choice of a suitable design depends on the size of your hives, the level of development of the bee family and the wishes of the beekeeper. Frames for bees are made with their own hands or bought in the store in finished form. The manufacturing process is simple, so it does not require much effort. It is important to prepare an exact scheme and the necessary material. Making a framework for hives with your own hands is a simple process that does not require special skills.
First, the beekeeper determines the size of the future hive, then selects the drawings for a particular type of hive. It is important to adhere to the basic rule: dimensions must be accurate. As for the height of the frame, it directly depends on the depth in the hive box. The twelve-frame hive is very popular.
In the design process, follow the established standards. This unification appeared after the hive was invented. Most of the beekeepers give preference to blanks that are made with their own hands, since it is possible to pick up everything that is required.
In modern beekeeping such designs are popular:
Using the necessary drawings for the listed structures, prepare the listed blanks. It is important to remember that each frame differs not only in size, but also in material.
In order to facilitate the task at hand, prefabricated frames filled with dry land are sold. Such a framework will only glue or join with nails. Of particular value are those frames that contain a groove on the upper bar. With it, easily set the wax sheet in the frame. The process of making the framework requires drawings for a specific type of hive. This process takes into account all the constituent structures:
Need appropriate sleeves. Best of all, brass bushings are suitable for the construction of twelve frames. Sleeves are actively used in modern apiculture in the process of building frames, as they contribute to good wire tension with the aim of attaching the honeycomb. Sleeves have several advantages in application. For example, in the process of their use, when the wire is tensioned, the wood of the framework is not damaged, as a result, the tension in the wire does not weaken. Sleeves prevent the process of deformation of honeycombs and honeycombs. In simple words, if you use the sleeve, you will extend the life of the frame several times. Dadan-Blatt Frame
The brightest representative of this blank is a hive of twelve frames, which is assembled using the drawings for the Dadan hive. The design of the twelve frames is most convenient for insects. You can do it yourself, using the necessary material and drawings, which will greatly simplify the process of work. The design of the twelve frames is not much different from the one in which there are ten. If you decide to create a frame yourself, decide on the type and material that will be used in the construction process. Observe strict parameters, otherwise you will significantly reduce the productivity of your own apiary. Assembly instructionTo make the blank yourself, you need all the components of the structure, a hammer and glue. Algorithm of actions:
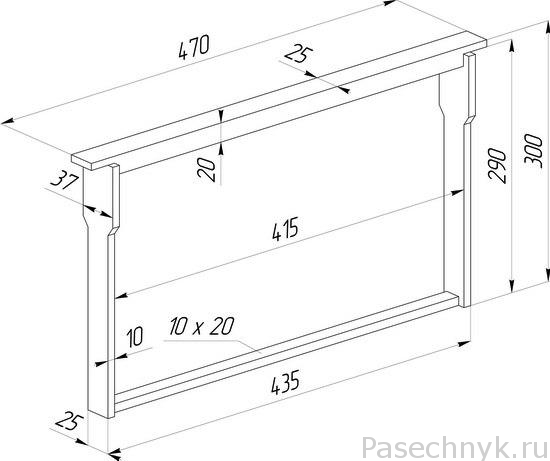
Following the instructions of the instructions, you quickly and easily construct a frame. This design is considered the most popular among beekeepers, but this is not surprising, since it is one of the most convenient for the bee family. In addition, it is elementary to do it yourself, choosing the right size wooden slats. Earlier, and in our time, hive bee cages were mainly made of wood, as from the safest and most environmentally friendly material. Sizes and featuresThe dimensions of the Dadan-Blatt design are fixed by many years of experience in beekeeping and are divided into store and breeding. Store (or semi-frames) are used in the lower tiers of the hive, so their size is smaller. The size of the nesting form is 435x300. The size of the store form is 435x145. The constituent parts of each frame are the upper and lower bars (1 pc.), As well as two side bars. The length of the upper bar must necessarily provide on each side 1 cm for the installation of the frame in the hive (on these “ears” it will hold). 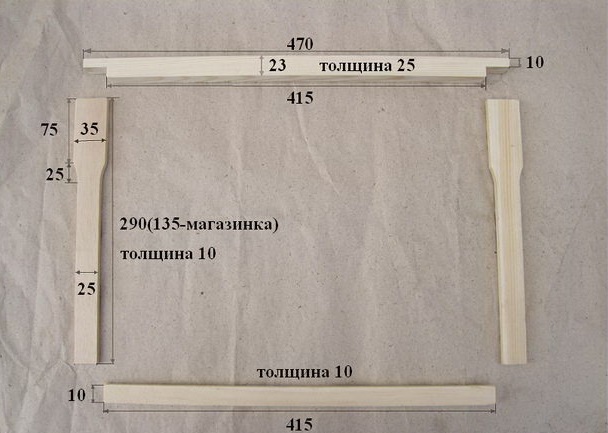 Scheme and layout of the future design Scheme and layout of the future design The width of the side bars and the top bar is standardly equal to 25 mm, the size of the top bar in height is 20 mm, the dimensions in width of the side bars are 10 mm. The lower bar in height should have a size of 10 mm, in width - from 10 to 25 mm. Next, we will tell you what materials will be required in order to make this construction independently. Tools and materialsMaterials for the frame frame: wooden dry slats, sanded and prepared for knitting, as well as a coil of thin wire (available in a store for beekeepers or in the construction market). Tools for manufacturing: awl, hammer, pliers or strong nippers, nails shoe (thin and small). The workpiece is made on a comfortable surface - a table or machine, so that all elements are visible and at hand. You can also use clips for fishing line to fix it on both sides when tightening.
Step-by-step instruction
You can see the exact dimensions in the figure at the beginning of the article, the exact marking of each frame part is also shown for greater clarity. So, what sequence of actions will need to be performed in order to properly carry out the production of a framework for the hive?
Shop bees frames are prepared in the same way, only there the number of wire rows equals two. Next, we invite you to watch a video in which an amateur beekeeper will talk about their own process of making skeletons. As you can see, they are quite realistic to make quickly and simply, without much financial expenditure. Langstrota-RutaThe wooden structure of this hive is similar to the design of Dadan-Blatt, it is also removed through the top of the hive, but the dimensions are slightly different. The standard norms of such a framework are as follows: the height of the side rails is 232 mm, width is 35, the upper bar is 9 in height, and 470 in length (taking into account the hive width 450 plus 10 mm on each side). The bottom plate is 8 in height, 19 in width, and 450 in length. In fact, the design is very similar to the Dadan frame form, it can be easily made by the above scheme (also using wire). 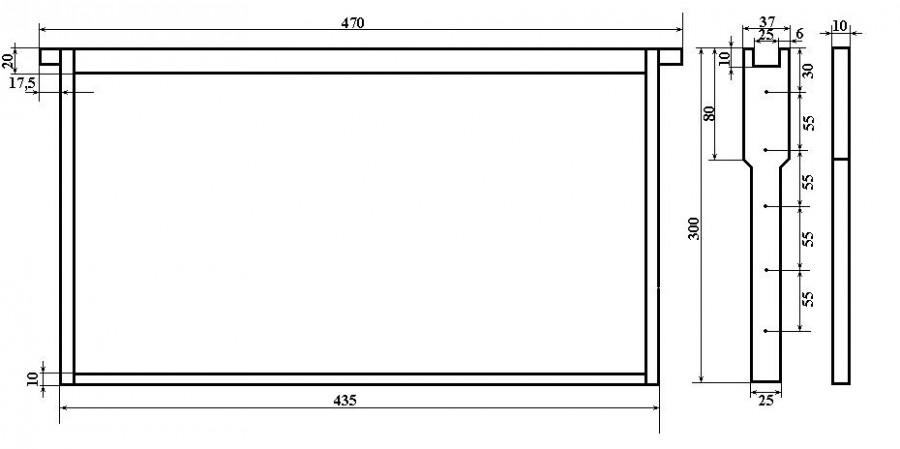 Drawing framework for bees Langstroth-Ruta Drawing framework for bees Langstroth-Ruta Video "Properly tightening the wire on the frame"
The bee house consists of many components. These include the hull, the roof, the roof, the bottom, but the most important component is the framework for bees. They are intended for the accumulation of honey and its extraction without harm to the bee family. Such forms are installed in the middle of the case in special grooves. The number of these structural elements will depend on the type of hive, as well as the degree of family development. Frame materialThe main material for the manufacture of the structures in question is considered to be wood, although plastic products have recently appeared on the market. According to experts, they are no worse than their counterparts. If the frames are made for the hives with their own hands, the beekeeper must pay attention to the quality of the joining of the connected elements, as well as observe the dimensions indicated on the drawings. Products purchased in the store must also be checked for compliance with these requirements. The new honeycomb is a rectangular design with a stretched wire and installed wax. In the future, the bees will make honeycombs here and begin to pack honey. The main advantage of wooden frames is the possibility of making such constructions with your own hands, as well as naturalness and good ventilation of the material. But the disadvantages include: the destruction of wood at a temperature of 40 degrees and difficulties in transporting the apiary, as wooden products are quite massive. Advantages of plastic frames:
Disadvantages:
DimensionsDespite the comparative simplicity of the frame (the frame consists of four wooden slats), the productivity of the entire bee family and ease of maintenance will depend on its dimensions. From the history of beekeeping, it is known that the initiator of the unification of the sizes of the framework structures was the famous beekeeper P. Prokopovich, this happened in 1918, and since then the dimensions have the following meanings:
DIY frameBefore proceeding to the manufacture of a frame structure, it is necessary to determine its size. In this article we will describe how to make a framework for beehives with your own hands that fit the Dadanovsky hive, because this form is considered the most common in our country. Plastic frames are usually sold in the store, it is difficult to make them yourself, so we take an environmentally friendly material - wood. Manufacturing side bars for hive frames By design features, Dadanov's frames can be divided into two main types: nesting (for uterine-laying eggs and growing brood) and store-type, which are used for honey accumulation. With the necessary dimensions you have read in the last chapter. when setting the top bar, leave a gap of 1-1.5 centimeters on each side. This extension is used to fasten the frame to the hive body. The width of the side bar as well as the top bar has a standard value of 2.5 cm, the bottom one is from 1 to 2.5 cm. The height of the top bar is 2 cm, and the side and bottom parts are 1 cm. Required tools and materials:
Sequence of workFor a start, lay the workpiece, as well as the necessary tool, on a flat, flat surface, for example, on a table. Now, with the help of a hammer and nails, we knock together a skeleton. Further, on the side walls of the structure with an awl, we make holes of 4 pieces on each side. Here you need to keep the same distance between the holes, and in the upper and lower parts make two punctures, it is necessary to secure the wire. How to quickly pull the wire on the frame At the final stage of work on the frame tensioned wire, it is located in the form of a snake, which allows you to make the necessary tension. The edge of the wire is twisted with pliers. After that cut a piece of honeycomb and stretch between the threads. The places of contact of wax and wire are driven around with a special roller. That's all, our product is ready for installation in the hive. |


| Read: |
|---|
Popular:
Military cap with his hands
|
New
- All the most interesting in one magazine
- Recipes cooking delicious lyulya
- How to fry pork escalope in a pan with tomatoes?
- Pickled Valui: recipe, collection rules and preparation steps
- Brief rules of golf. Basics of golf. Short rules
- What is the name of the golf course
- Soldier cap
- Feeder fishing from "a" to "z"
- Pollock: cooking recipes in a pan
- Original fish dish for the contest


